If you have not come to this page from the sequence starting at Starting a New Cave" then go and read that first.
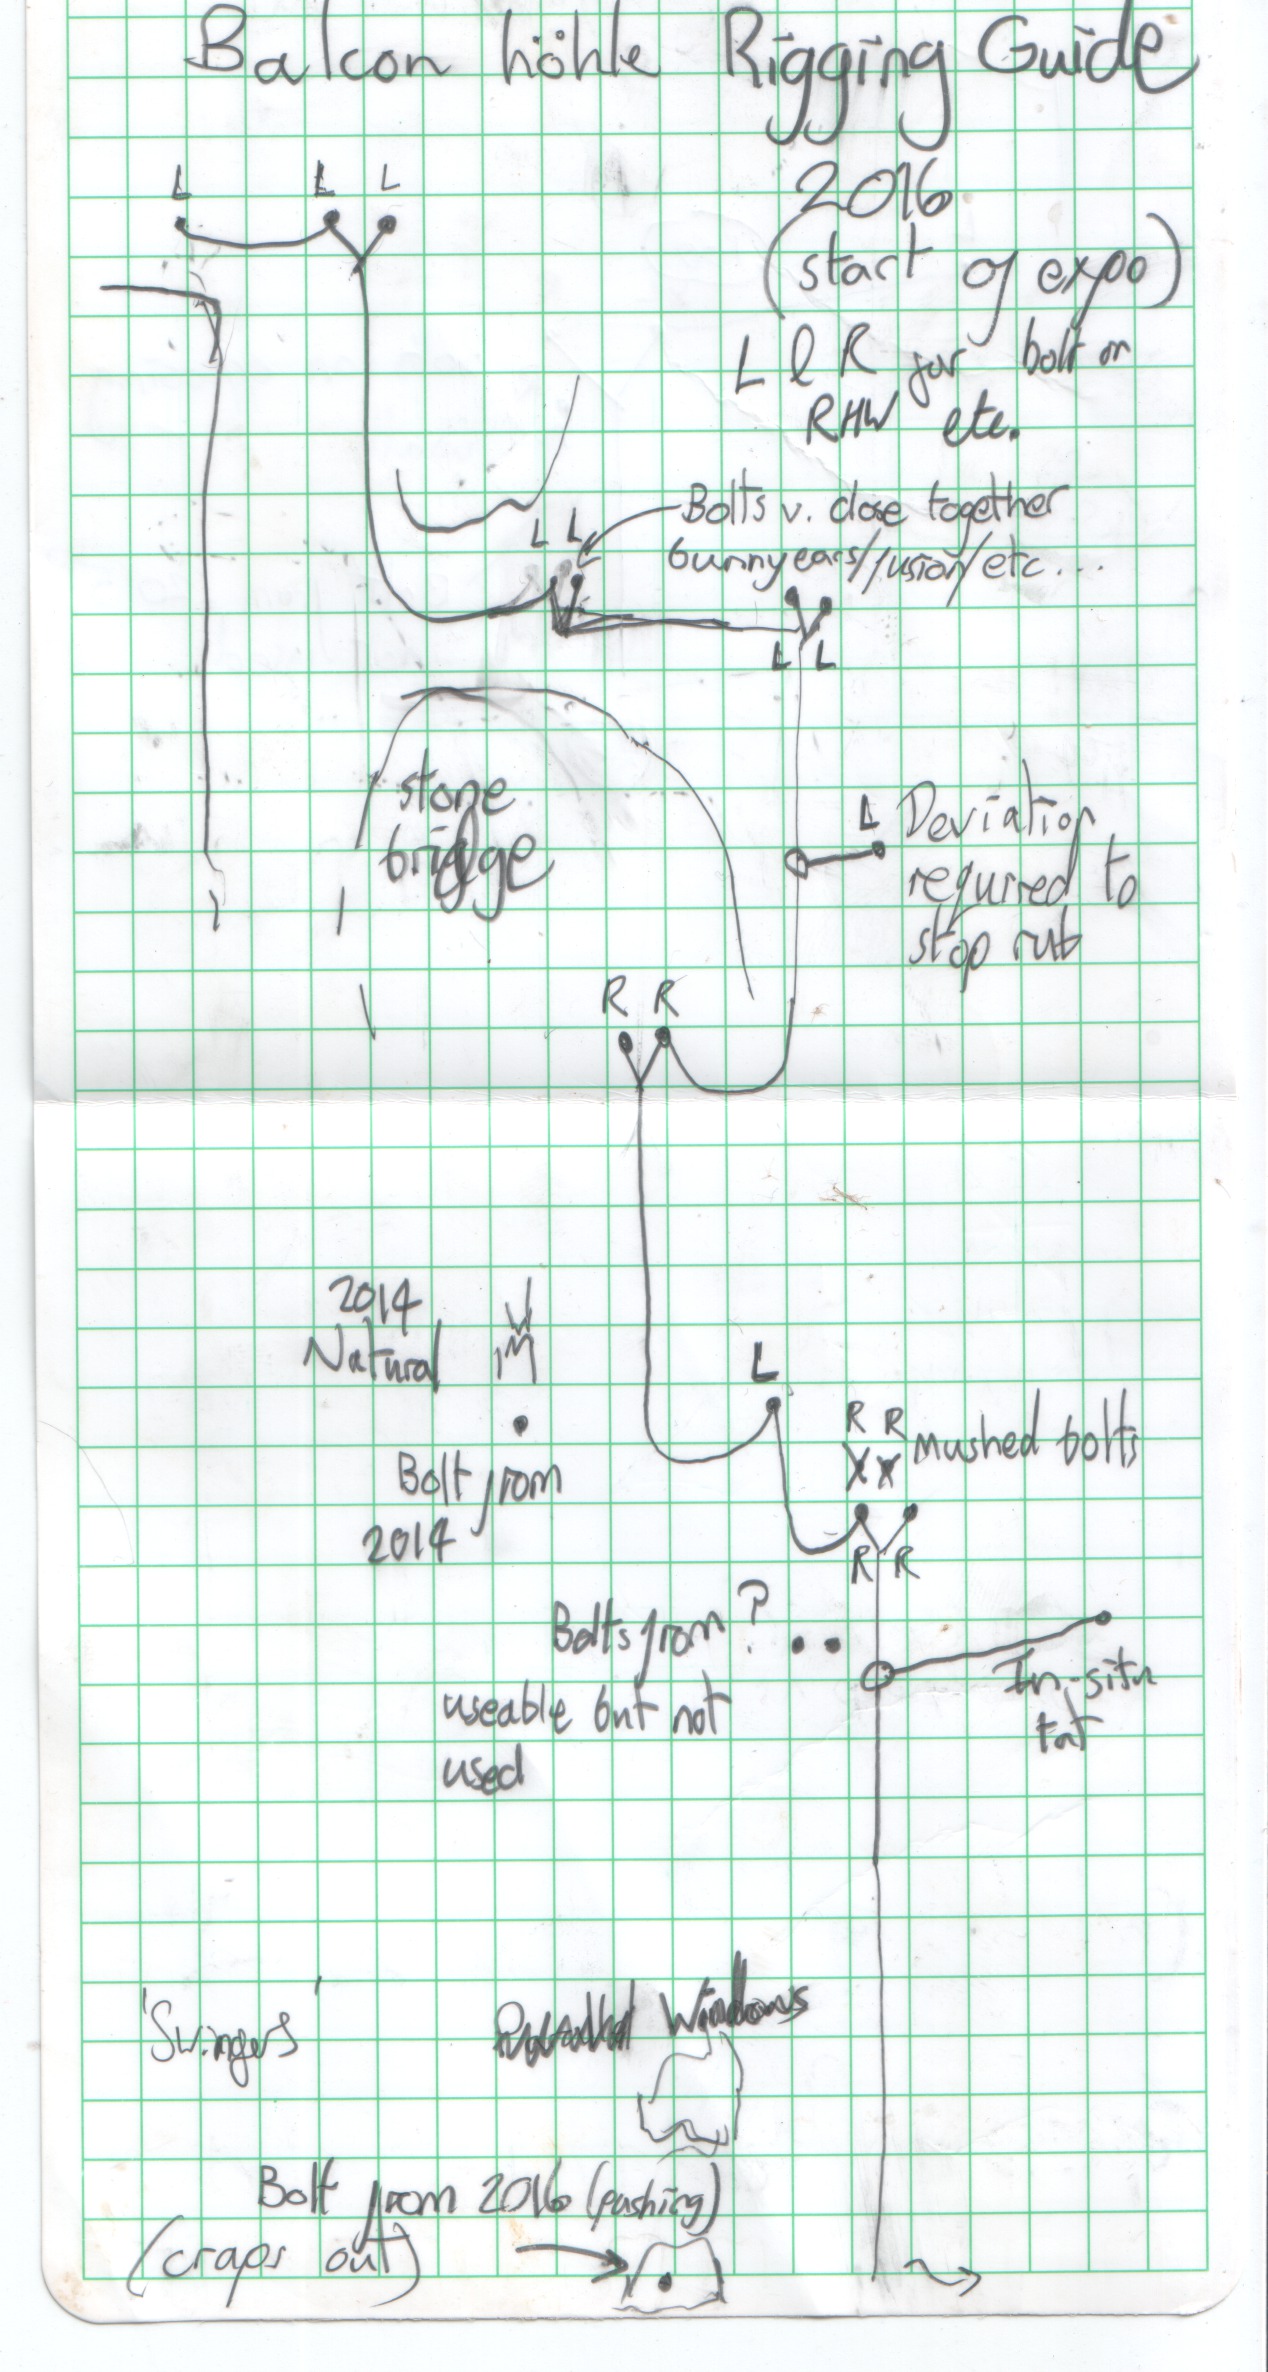
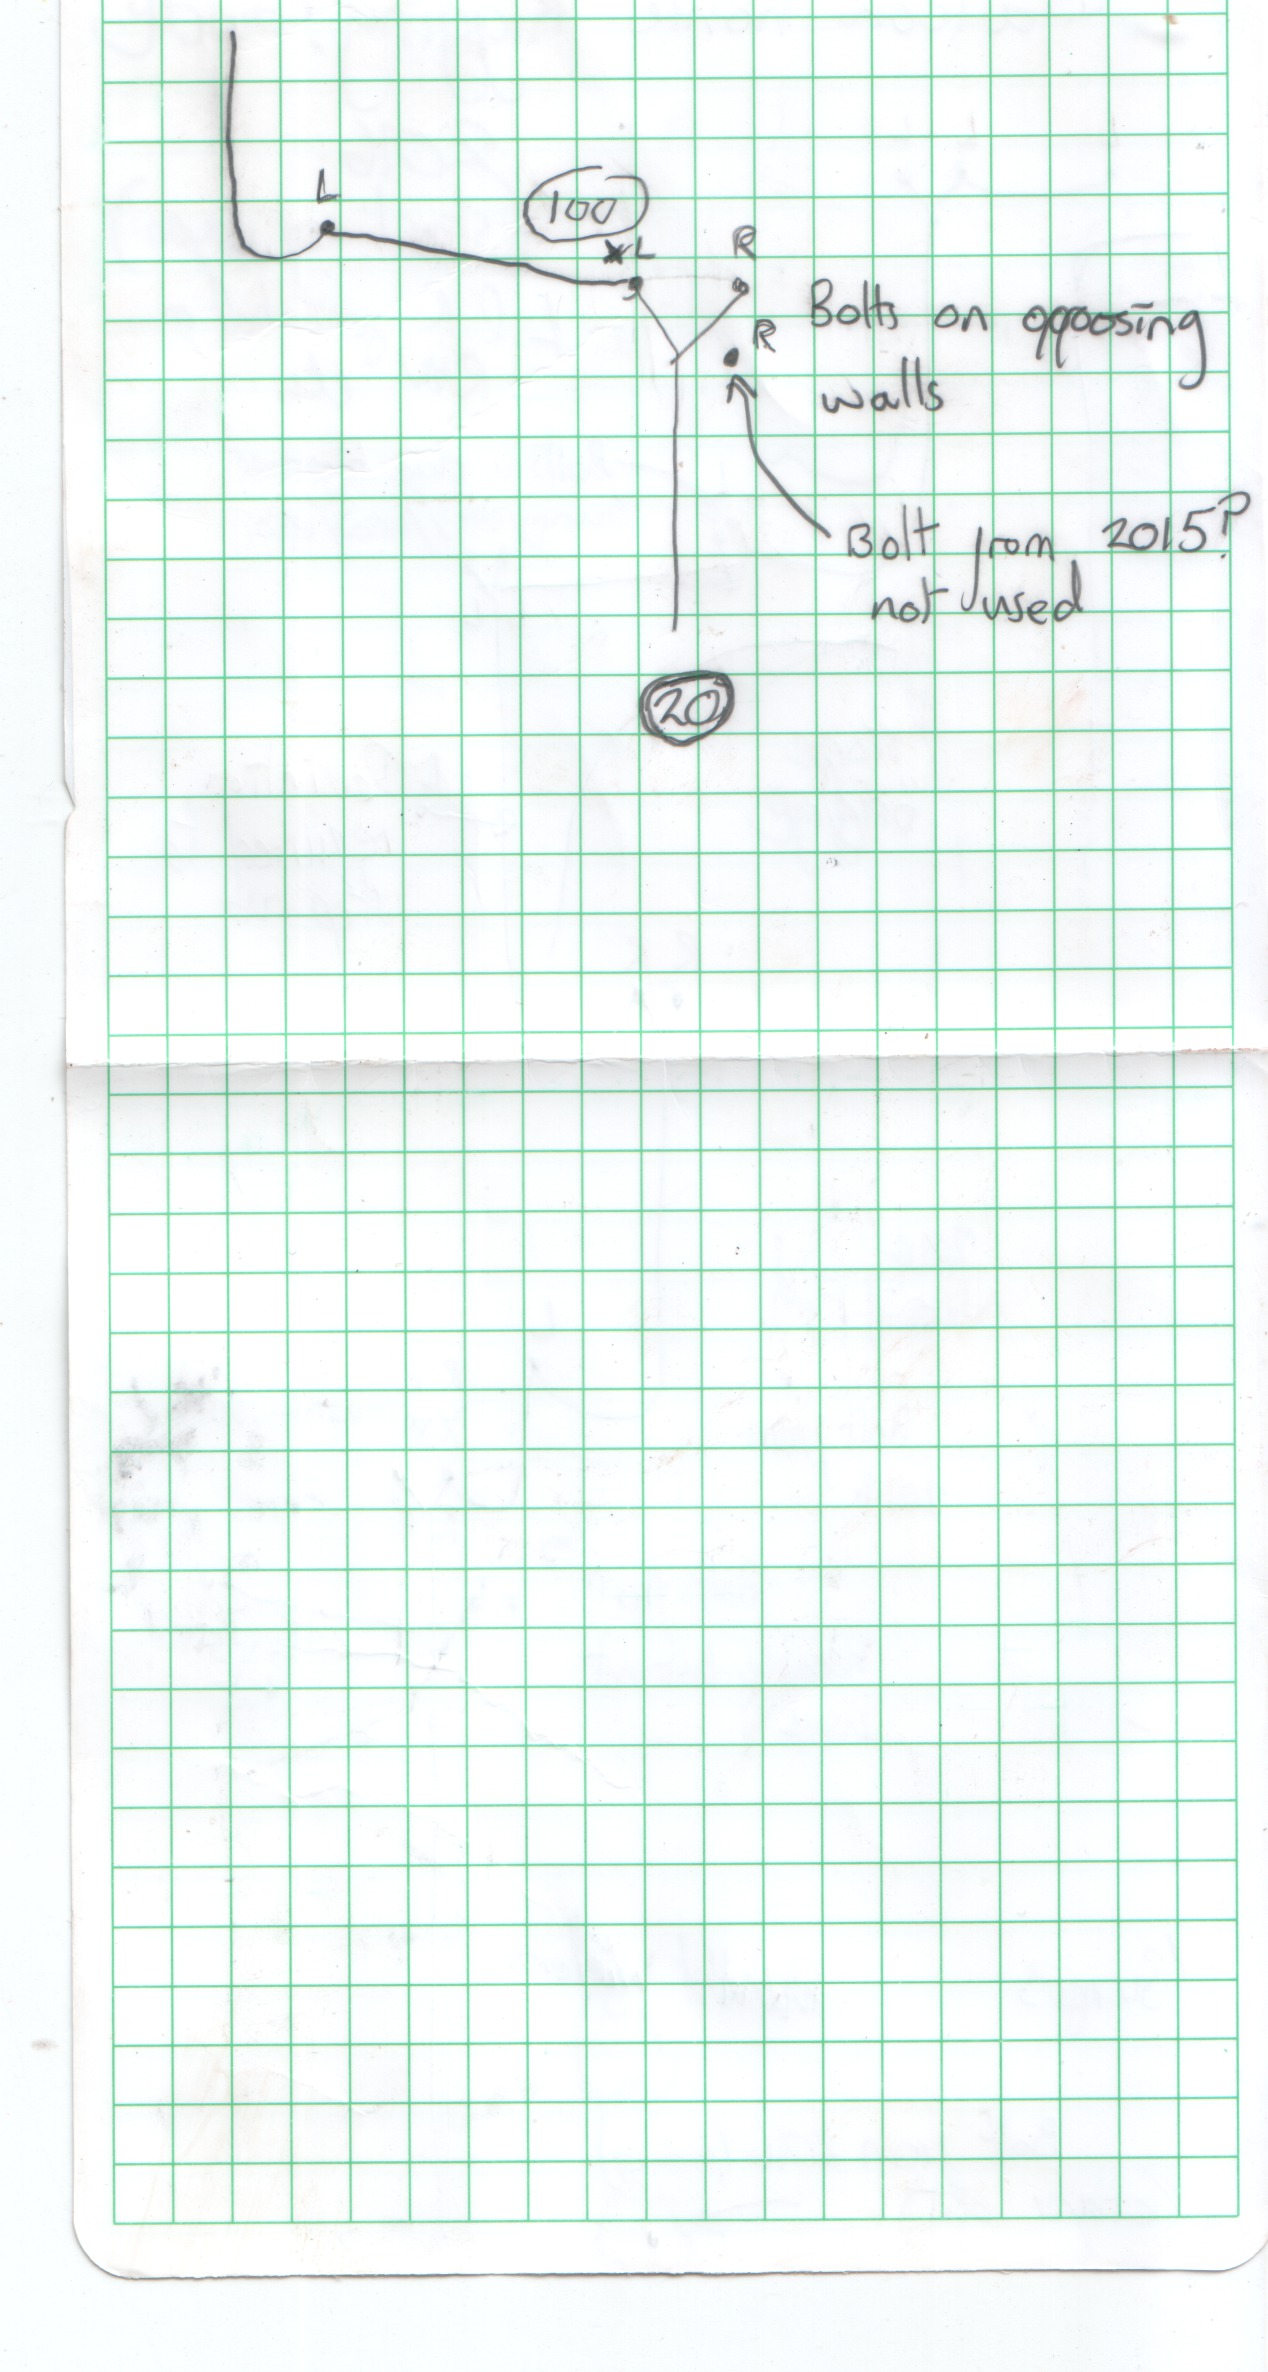
The logbook is the place where we record the rigging of caves as soon as possible after we discover them. For a particularly fine example of rigging guides in a logbook, scroll through the 2005 logbook.
SAFETY: Sketched rigging guides are most intensively used during the few days after the pitch is first rigged, and this is also the time when accidents are most likely, so this is an occasion where hours count. Sketch the rigging in the logbook as soon as possible and make sure a copy is at both base camp and top camp.
When a cave is derigged, a good way of getting the rope lengths for your rigging guide is to leave the knots in ropes removed so they can be measured, but these days our caves are a bit deep and complicated for this to be feasible. Although a good survey and details of the belays can be used to estimate the length of rope needed, this is no substitute for measuring how much rope it actually took to rig. So please do this during the initial exploration and write it down in your survey notes.
You will already have an "Interim rigging guide" in the logbook entries of the trips, and also sketches on waterproof paper which were made underground which were stored in the survey wallet and scanned to produce "notes-XXX.jpg" files in the online survey wallet for your trip. For small caves the logbook entry may be all you need.
Collect together your notes for the rigging guide now, including all the pitch lengths. It is a good idea to copy these notes now and put them in the plastic survey wallet or to photograph them and put the files in the online survey wallets. The next step of doing the survey can take some time so get the rigging data in order now so that it doesn't get forgotten.
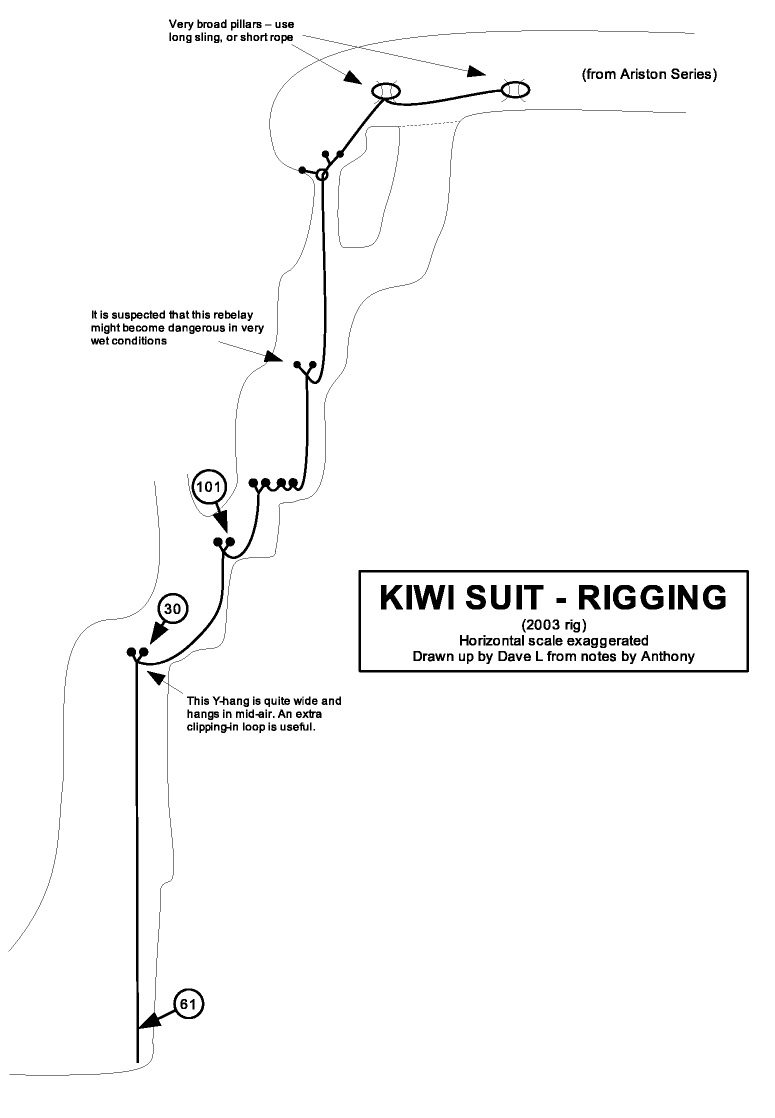
A Rigging Guide of the vertical sections is published with the cave survey and the cave passage descriptions in the cave guide after surveying is complete. This is usually easiest to do as a sketch, but must include notes to ensure that all bolts can be found again and any deviations and natural belays recognised for re-rigging in future.
You will enter the final rigging guide sketch as a scanned drawing within the cave description when you edit the HTML pages for the online cave documentation. This is done using the "New Cave" online form.
Your initial rigging guide might be needed with some urgency during expo while exploration continues, so this is the place to put it.
See also the part of the bolting & rigging handbook which discusses writing up your rigging attempts.
There are three different activities for rigging topos:
The simple and nicest-looking way to make them findable is to add them to the HTML inline in cave descriptions. For a finished
example see the rigging topo for the "Merry Go Round" pitches in the Swings and Roundabouts area
in 204.
Creating a new cave in the online system is how you create the inline HTML. It is the next step in this
Survey Handbook sequence of pages.
[To Do - improve documentation for how to add in image files in cave descriptions]
You should produce a separate rigging guide file for each connected set of pitches which will initially live in
expofiles/rigging_topos/ e.g. see
expofiles/rigging_topos/264/entrance_topo_2016.pdf
but also (to demonstrate that something is always better than nothing):
expofiles/rigging_topos/264/entrance_topo2_2016.jpeg
The format is important. Please don't use PDF: if you are scanning a hand-drawn sketch then JPEG is best for our purposes as it is compact and we reuse it easily elsewhere in the system.
If you are using a drawing package then produce the file in SVG format. Inkscape is what most cavers use as it's free and stable. This will make it possible to edit and update your topo in future.
When you first produce a topo, please upload it to the server using Upload Drawings". Yes, topos are not survey drawings, but this will work for now. Tell a nerd where you have put them. Also copy it to the right folder e.g. expofiles/rigging_topos/1623-290/2022/on the expo laptop in the potato hut. [If you are confident with Filezilla, copy it from the expo laptop to the server and then move the copy on the expo laptop to e.g. expofiles/rigging_topos/2022/copied-to-server/]
If you draw up the topo after expo is over, then upload it as above and email a nerd who will move them into the right place.
If you have your own machine configured as a expo bulk update laptop then you can use Filezilla to upload the topo files directly to the server.
Discussions on Expo Slack after the 2019 expo resulting in us consolidating rigging topo files into expofiles/rigging_topos/ when previously they had had a number of different homes. So if you remember putting them somewhere else in the past, don't do that now. Put them in expofiles/rigging_topos/.
Eventually when the full cave description is written up, selected topos will be moved to the :expoweb: verson-controlled repository where they will be linked in to the HTML files for the cave descriptions, e.g. :expoweb:/topos/204/kiwi.svg.
[ We could dream up some fancy scheme for indexing the rigging for every pitch in the system and add that into troggle but frankly we don't think it's worth the effort.]
If you look in detail at the description of Steinbrückenhöhle you will see rigging topos inline as pixel images (not vector files) in the passage descriptions. These are stored with the passage HTML files, e.g. in :expoweb:/1623/204/rigging/kiwi.png, whereas the master copy of this rigging diagram is the vector file at :expoweb:/topos/204/kiwi.svg. We needed both because web browsers used not to be able to display SVG files embedded in HTML.
If you use a vector file format which is not SVG you may still need to do this vector-to-pixel conversion when you write up the cave description. But we always keep the original vector file.
Back to the previous page in this sequence Drawing up your survey.
Now go the the next page in this sequence Creating a new cave in the online system.