Click to see in online editor.
If you have not come to this page from the sequence starting at Starting a New Cave" then go and read that first.
You do not need any software to create a survex file. You can do it using the online editor in your web browser. So you do not need to have installed survex on your laptop at this point.
Once you used the online system, which tries to give useful feedback, you can type up survex files using a text editor.
If using a digital survey device, initially cut and paste the surve data from an exported file into the online survex editor form.
So this is important.
Now, in 2023, we have mobile phones which can get a GPS location directly from the satellites without requiring a 'mobile signal'. We find that relying on one of the party recording a continuous 'track', and then extracting the locations later, is very prone to human error. The worst and most common error is that everyone forgets to do this.
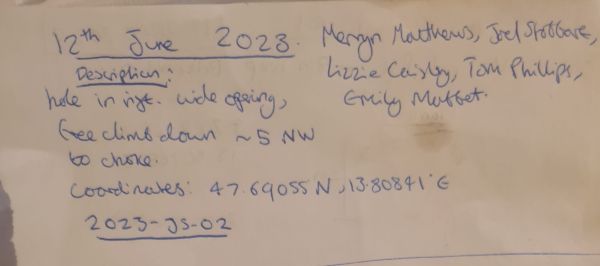
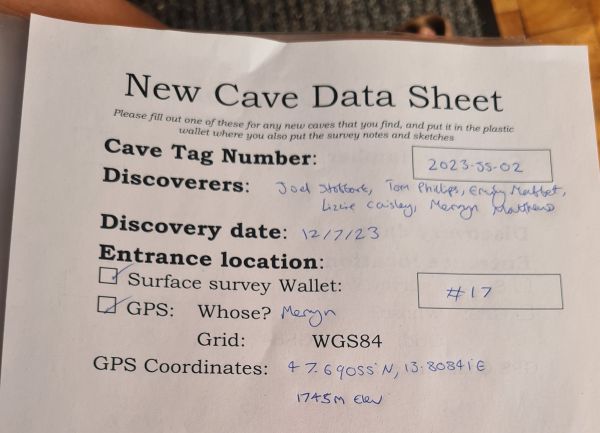
The (strongly) recommended procedure is to take a specific GPS measurement at a well-defined point and to write down the location on your prospecting survey notes. Then for a new discovery it will be copied onto the New Cave data sheet.
Note that we record the location in degrees and decimals of degrees: 47.69055 13.80841 and the altitude is in metres.
The altitude is almost useless: we get better altitudes by using the lat/long numbers together with a laser scan of the plateau topography. GPS altitudes will continue to be pretty bad, and even the new Galileo system won't promise anything better than ± 0.4m in 2030. (If you take the altitude from a track while moving the altitude can easily be 15m wrong.)
See the bottom of this page for how the location information is typed in.
This is where you type up the hand-scrawled notes directly into a a web browser, creating a new online survex file automatically in the right place on the online system.
You will be over-writing a template file with lots of comments and optional examples in square brackets, but first you need to find the right place for everything.
Having confirmed the right name to use for your passage and your cave, including whether it is in area 1623 or 1626, the survex file will eventaully be in e.g.
caves-1623/2050-BH-03/easybimble.svxThe way to start is to open a web browser on the equivalent page
http://expo.survex.com/survexfile/caves-{area}/{cave}/{surveytripid}.svx
where {area} will be 1623 or 1626, and for a new discovery, {cave} will be something like 2050-BH-03 if it is the third cave disovered by
Dr. Bunsen Honeydew on the 2050 expo, e.g.
/survexfile/caves-1623/2050-BH-03/easybimble.svxBefore you click on that link, you need to make sure that you are logged in. In the top-right of troggle-generated pages there is a menu item "Log in", if all your browser pages are handbook pages, click here to get to the log in page. The username is "expo" and the password is the usual cavey:beery one which is written up on the whiteboard in the potato hut.
Now click that link /survexfile/caves-1623/2050-BH-03/easybimble.svx and a survex-file editing page will open, pre-populated with an example template for survex data.
Overwrite the name of the survex file "-1623/2050-BH-03/easybimble.svx" with the right data for your cave and press return again to make sure that the browser 'knows' that it is working on your survex file and not the mythical one in 2050.
Most of the template data you will delete and replace. Edit this template and type in your own data. OK, so if you have never typed a survex file before, go to this section below on this page.
If you have several parts of the cave surveyed on one trip, create several distinct .svx files.
You can save your work by pressing the "Save this edited svx file" button below the edit box, but it will refuse to save until you have hand-edited out all the template material in [square brackets].
As you edit it, you can press the "Differences between edited and saved versions of this file" and the differences which comprise your recent typing will be listed below the edit window.
Before you finish typing, use the third button "Run 'cavern' on this file".
- If you haven't yet removed all the [square brackets] stuff, nothing will happen except a message
SAVE FILE FIRSTbelow the edit window.
Error: remove all []s from the text.
Everything inside [] are only template guidance.

All [] must be edited out and replaced with real data before you can save this file.
below the editing window.
Technical Note: When the survex file is saved, it is being saved to the permanent store on the expo file server. It is also being automatically registered in the version control system. So don't worry about losing data. A super-git-nerd can always recover it (not a job for an ordinary nerd though).
You may see a number of error messages below the editing window: read them and understand them. If you don't understand them, ask someone.
So using the online system gives you a very, very easy way of syntax-checking your data entry and typing up your notes.
The output you get from 'cavern' will look like this (yes this really does take less than 0.01s):
    LOGMESSAGES
    Survey contains 21 survey stations, joined by 23 legs.
    There are 3 loops.
    Total length of survey legs =  305.80m ( 305.79m adjusted)
    Total plan length of survey legs =  253.09m
    Total vertical length of survey legs =  125.24m
    Vertical range = 44.74m (from galactica.1 at 0.35m to galactica.20 at -44.39m)
    North-South range = 99.31m (from galactica.19 at 28.14m to galactica.12 at -71.17m)
    East-West range = 53.27m (from galactica.1 at 1.12m to galactica.9 at -52.15m)
       3 1-nodes.
      13 2-nodes.
       3 3-nodes.
       2 4-nodes.
    CPU time used  0.00s
If you have a complex cave like 204 or 161 with many separate exploration zones then you can put subfolder names in the URL bar e.g.
survexfile/caves-1623/2050-BH-03/murderalley/killerclimb/easybimble.svxand the intermediate directories will be created on the server if they don't already exist. This is in addition to the directory name which is also the name of your new cave being created automatically.
The survey data typed up must include all the notes, including station details and passage names. A simple copy of the export from a digital device will not do. We need names, dates and description. Make a backup copy to another machine or USB stick as soon as you have typed it in.
New users will be using the online form to create the .svx file , not by editing a text file with a text editor, so don't confuse newcomers by showing them how you (an expert, of course) do it.
The new survex data will live in the folder on the expo laptop:
/home/expo/loser/caves-{area}/{cave}/{surveytripid}.svx
example:
/home/expo/loser/caves-1623/264/mongolrally.svxand tell someone nerdy when you have finished and they will ensure that it is saved, committed, and pushed appropriately to the :loser: repo. All of which is automatic if you use the online form.
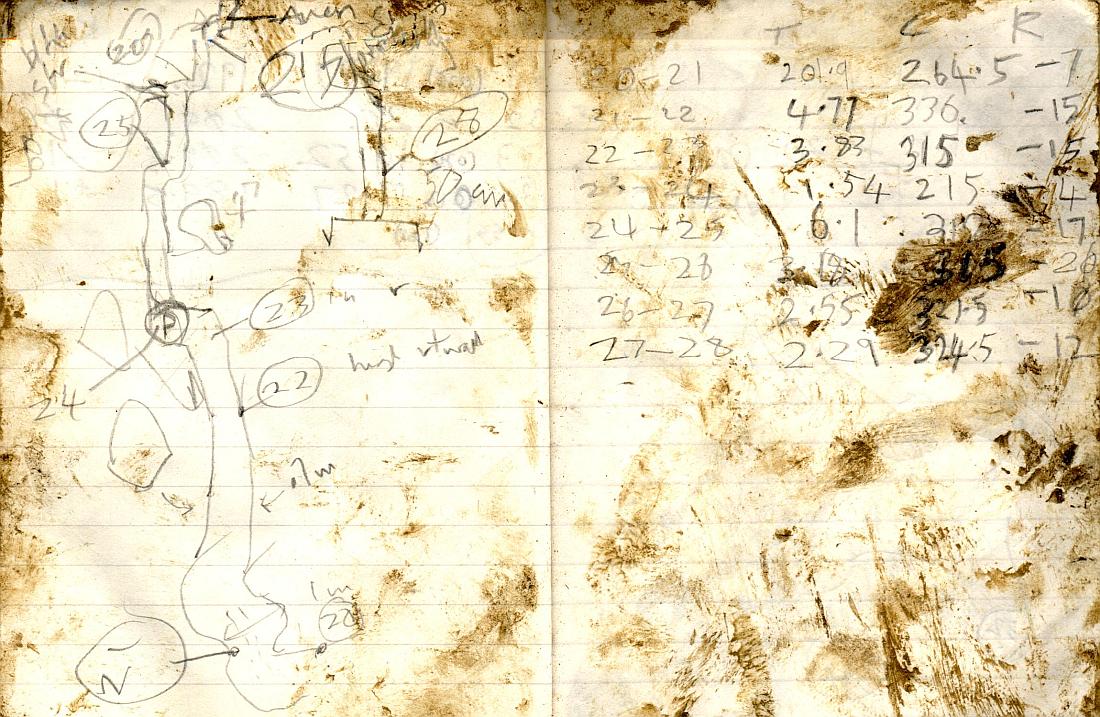
Once you have created the .svx file you will run survex to check that your format is correct without typos and to generate a centre line. Then you will print the survey line, manually transcribe your sketches from the wallet notes onto that paper, scan it again and then use that scanned image to digitise passage layout into tunnel or therion.
[Nerds: survex cave data belongs in the repository :loser: so e.g. :loser:/caves-1623/264/mongolrally.svx". We are assuming that normal users have never worked with an distributed version control system at this point which is why we are telling them to use the online form.]
QMs are the unexplored leads, they are Question Marks because we don't know where they go to. There is a specific format for recording them in survex files.
Read this separate description about entering the QM data into a survex file.
The location of the cave is, eventually, stored in a survex file, just not the same survex file.
If you are doing this for the first time, don't bother with this *fix stuff. Just type the latitude & logitude numbers into the New Entrance form and someone else will do the *fix stuff.
The last part of the survex file is a description of the passage surveyed. Remember
that this is intended to be read by people
who have not been to that bit of the cave themselves
;------------
[from couldashouldawoulda_to_bathdodgersbypass.svx]
;Cave description ;(leave commented-out)
; See 2017 description for details of GSH up to the 'p50'.
Briefly, on the way to couldashouldawoulda a 22 m entrance crawl from the
surface leads to a climb down and a junction. Left leads to easy c
rawling passage for a short distance, then another junction where
traversing over a shallow hole and down a stooping-height sandy
passage to a sharp left turn and a sandy, easy 'squeeze' leading to a
straighforward p10.
Note that the description is often written as one long line. Use the word-wrap capability in your editor to make it easier for yourself. See more detail in the Cave Description" handbook page which also describes eventual HTML publication.
Back to the previous page in this sequence
Creating a new survey wallet.
Now go the the next page in this sequence Drawing up your survey.