A walk through tunnel - More paths
From Fs_wiki
So far we have drawn only wall paths.
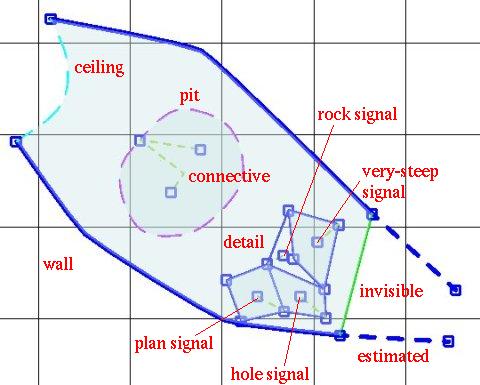
Tunnel has eight different types of path.
The current type is displayed in the top of the control panel,
and can be changed clicking on the
corresponding button on the row underneath or with the
drop down option list.
| symbol | thickness | style | color | description |
|---|---|---|---|---|
| W | thick | continuous | blue | wall, used to draw cave walls |
| E | thick | dashed | blue | estimated wall, used for walls that are estimated |
| P | thin | dashed | violet | pit, used for the contour of a drop |
| C | thin | dashed | cyan | ceiling, use for the contour of a chimney |
| D | thin | continuous | blue | detail, used for small lines of internal details of the cave passage |
| I | thin | continuous | green | invisible, used to draw an area contour where there is no path of another type; |
| N | thin | dashed | green | connective, this is not shown in the final output, but is used to connect symbols, signals and labels to areas and nodes; |
| F | thin | continuous | violet | filled, for areas filled with a solid color (used in creating certain symbols: a filled path will be filled with black, using the imaginary line that joins begin and end nodes). |
The image below shows these paths. The boulders drawn with detail paths have been comnnected to different signals to show the effect of each.
In addition there is a box S that toggles beweeen the two path drawing modes: splined and jagged. With the jagged mode, a path is drawn as a set of straight line segments. With splined mode, the corners are smoothed.
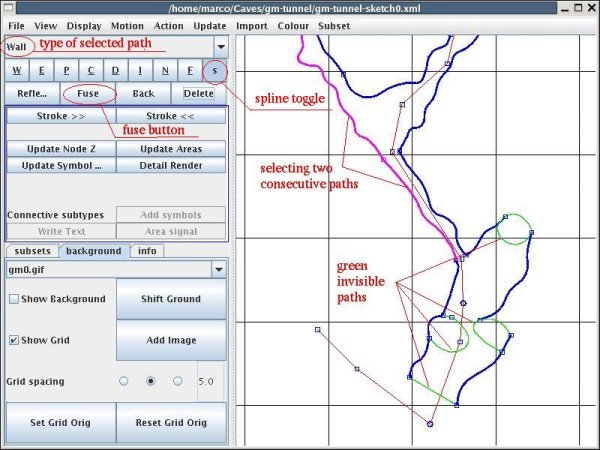
Start by closing the cave passage areas with invisible paths that join the points at the gaps. Ctrl click on the first point, draw the path, and finish by ctrl click on the second point. Invisible lines are displayed in green during the drawing and are not present in the detail render. Invisible lines should be used to delimit areas that must be filled with cave symbols (blocks, sand, pebbles, etc.). The picture below shows our sketch with an invisible line delimiting the passage where the drawing stops, and three invisible lines for the areas with blocks.
To draw one of these areas we have to split a wall path inserting two nodes. If you need to insert a node in the middle of a path, you must first select it (right mouse button), then Ctrl Shift click (with the left button) in the place where you want to insert the node. Notice that if you select several consecutive paths (multiple selection with Ctrl and right button) you cannot insert a point in one of them. You can insert a point only into a selected single path.
When you insert a point in a selected path, this path becomes deselected and the new point becomes the begin-node of a new path. If you are just interested in splitting the selected path into two, click on the "Delete" button (or the menu "Action | Delete"). Only the point which splits the path into two will remain. This is useful when you want to split a path, because most of the times you want to split where a new path branches off.
The opposite operation is the fusion of two connected paths into a single path. To do this select one path (right mouse button), then select the next path with Ctrl and the right mouse button. The two paths will both appear pink to show that they are both selected. To fuse them click on the button "Fuse" (or the menu "Action | Fuse"). In the picture below you can see that two consecutive wall paths have been selected. You can also select several consecutive paths, always holding the Ctrl key down when selecting the next one. However in this case you will not be able to fuse them all together: you can fuse only two paths at a time.


