A walk through tunnel - Additional topics
From Fs_wiki
In this section we will talk about some topics inherent to cave map drawing which have not been discussed so far.
Contents |
Filled path
We did not have a chance to use a filled path. Actually it is used just to create symbols, because it allows to fill the area "enclosed" by the path (and the segment joining the two end-nodes if they do not coincide) with a solid black.
As an exercise you may try to develop a symbol using the filled path (besides the other paths).
Signals
Area signals can be attached to areas with connective path. The signals are
- plan: is used for the floor of the cave
- rock: denotes a portion of rock
- hole: a hole in the passage area
- verysteep:
- dropdown:
- zsetrelative
- frame:
Rock area signals have been discussed in Section 4.2.
What do the other signals do? According to J. Todd: "Verysteep" does not do anythig at the moment. Probably it will have some sort of special shading in the future. I expect that "Dropdown" is similar. "Frame" is about rendering other surveys into an area to make a poster with parts of the cave visible at several scales. Very experimental..
zsetrelative area signal
Enables you to adjust the vertical positioning of areas. For example where you have one area which goes over the top of another, but there are no actual survey legs to attach the area to, then Tunnel can appear to arbitrarily pick the wrong area to be on top of the other. Typical situations are where an unsurveyed side passage is sketched in. You know it passes over the top of the main passage, but Tunnel draws it underneath. Draw a connective line between a node on the side passage and the nearest survey station in the main passage, and then add an area signal zsetrelative to the connective line. Type an elevation offset value into the text box in the left pane (a positive offset to say the passage is that much higher than the station you attached it to), then update node z and update areas. Now when you render the sketch Tunnel should show the passage on top of the main passage. Likewise to force the side passage to be under the main passage you simply enter a negative elevation offset value for the area signal.
Hole area signal
"Hole" is like "rock" as far as you cannot stand there. There is a difference however: you cannot stand on the "rock" because there is the rock. You cannot stand in the "hole" because there is nothing.
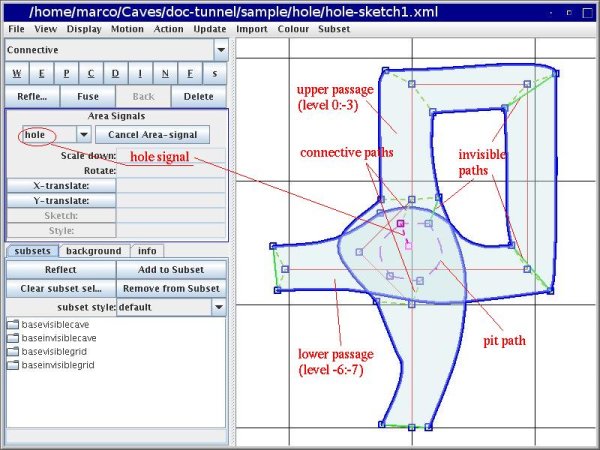
To draw a hole in a passage that leads to a passage underneath, draw a pit-path around the contour of the hole. Draw an invisible line that connects the contour of the hole to the contour of the upper passage. Thus the area of the upper passage will not include the hole, while the area of the lower passage will include it.
This cave map does not have any hole. Therefore we have to practice it with a make-up hole. The picture below shows how a hole can be drawn. Try to draw one and see how it is rendered.
Here is a made-up example of a south-north passage turning east, then south, and finally to west and passing under itself (in the east-west direction): the survex data file, "hole.svx" is in the archive of data samples, data.tgz.
You can draw a hole in the upper south-north passage, connecting to the lower east-west passage. Open the survex file with Tunnel, set and save the XML directory, and create a new empty sketch.
First of all you have to attach the path nodes to the centerline
(with connective paths) so that
Tunnel can know the level of the pieces of passages.
It is also important to break the passages with invisible paths
so that the portion of the upper passage with the hole is clearly
at a level above that of the lower passage.
In the picture below we have broken the wall paths inserting several nodes
and attached them
to the stations. We have also inserted a couple of invisible
lines at level -3 and -6 to make sure that the levels of the upper and
lower path are well separated.
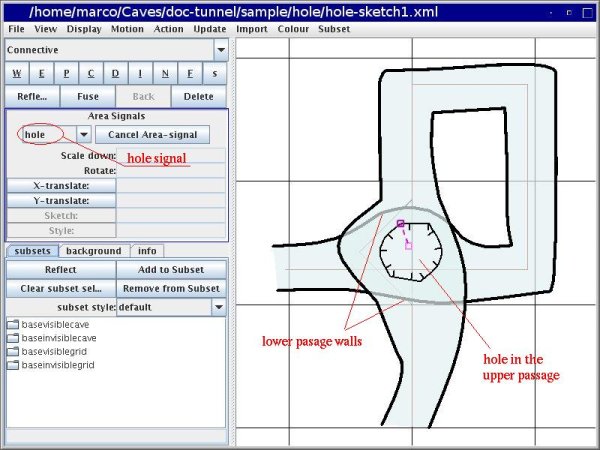
Finally we added a connective line to the pitch area, with a "hole"
area signal. The detail render of this is shown in the second picture
below.


Plan area signal
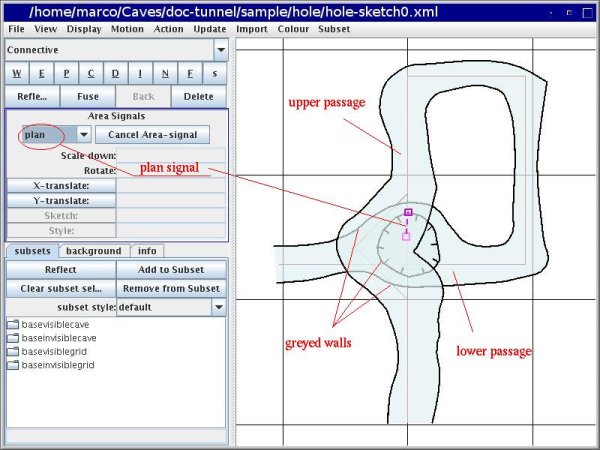
What if the pit is in the lower passage? Redraw the upper passage passing "across" the pitch. Disconnect the pit contour from the stations in the upper passage and connect them to the stations below. Remove the invisible line between the pit contour and the upper wall, and insert one to the lower wall.
If you attach a "hole" (or a "rock") area signal, the pit area will be rendered white (the piece under the upper passage will be slightly lighter than the rest of the lower passage), which is probably what you do not want. So use the "plan" area signal, if you want to show that the bottom of the pit is there.
Pitch undercut
We have talked about pitch undercut in Section 4.1.
The menu "Action | Pitch Undercut" creates an invisible path that overlaps with the pit path and two zero-length lines between the respective end-nodes. Furthemore it attaches an area signal of type ... (TODO which one?) to the zero-size area between the path.
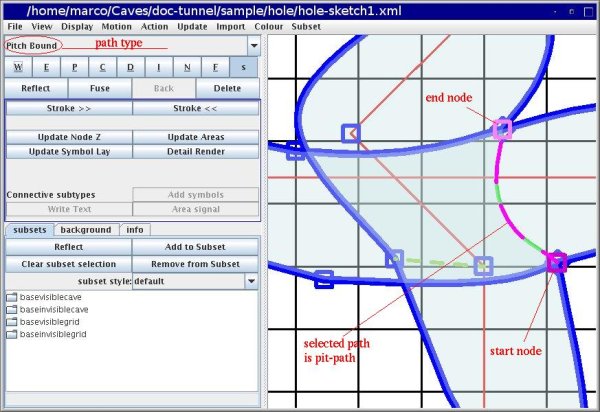
To render the areas properly, you must then connect the upper passage to the nodes of the pit path, and the lower passage to the nodes of the invisible path. When you click (Ctrl and left mouse button) on the node of a pitch undercut you get either the node of the pit path or that of the invisible path. If you get the wrong node, click the "delete" button and try again. When you want to select a node at a point where there are several nodes, every time you click Tunnel highlights one of the nodes and a path attached to it, in round robin. The path is useful as it helps you to identify the node you want. Continue to click until you get the right node.
To see which node corresponds to which path, select the path. Tunnel highlights the pit and the invisible paths in turns. The pit path is dashed, the invisible path is continuous. You will see the two different nodes highlighted (pink) as squares at different angles (0 and 45 °).
TODO: This is a list of other things that must talk about:
- area selection (Shift and right button), what is area selection good for ? maybe to add to subsets.
- it seems that there is no continuation for area selection unlike for the paths.
- it is not possible to associate a symbol and a signal to the same connective line; neither a symbol and text. However it is possible to make trees of connective paths and put a symbol, a signal and text at different nodes of the tree. FIXME: This is done !
- the types of files used by Tunnel: svx, leg, 3d (?), pos, exports, sketch: something about this in [[Section 2.2]]
- subsets: according to J. Todd, they are ''labels associated to each path that can be used to change how they are rendered, like classes and stylesheets; user interface is awful''.


