(click for instructions)
If you have not come to this page from Starting a New Cave" then go and read that first.
If you don't know what a wallet is, read the introduction to wallets.
Click on the image on the right for a page of further instructions.
* As people spend longer and longer at top camp, we may establish a wallet file at top camp too, with pre-allocated numbers.
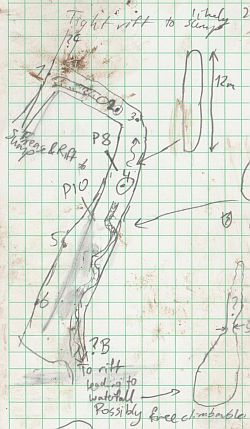
The original paper notes and sketches should be filed in the clearly marked wallet. Rip them out of the notebook, don't take them caving again and don't leave them lying around to be "Gössered"!
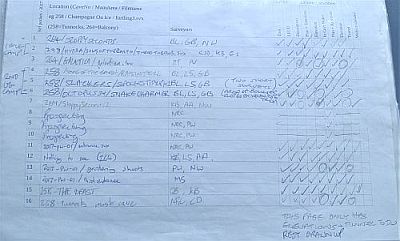
The notes (all of them, including dates, personnel, calibration, LRUD, station details, etc.) should be filed away in the wallet in the current year's surveys file. You should include a transcription on a sheet of paper if they are illegible (to other people; if you can't read them yourself, go back and do the survey again!). Even if you do this, never throw away the original notes.
As well as looking through the other plastic wallets in this year's lever-arch binder, have a look online at the list of all online wallets and have a look at all the folders referred to in your cave in, e.g. here is the survex data for cave 290: the wallet identifier is in the right-most column titles "Scans". (But this is not all the wallets, only those from which a survex file has been created). If you are doing an entirely new cave, then this page won't exist yet but it will be where your new discovery is eventually published. A more complete list of the wallets for a cave is at cave 1623-290 and this shows the online tick-list data as coloured boxes.
There are also lists of the wallets per year, per cave and per person (surveyor), e.g. see all the wallets for 2018.
As well as following through the links on those pages, have a look at the drawings files page which lists all the Tunnel and Therion files, and associated with each, the wallets and their the scanned notes, plan and elevation scans ("Scan files" column).
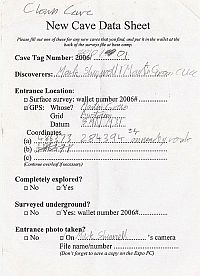
BEFORE you do anything else, make sure that you write, in ink, visibly, the DATE and the name of the CAVE on the first page that you scan. And the NAMES of the people on the trip. LEGIBLY please.
Each wallet has a corresponding folder in the online system where a record is kept of what information is in the wallet and where the corresponding survey data is filed:
/expofiles/surveyscans/2018/2018#19/
This is where the scanned (or photographed) copies of the survey notes are kept.
To use the scanner attached to the expo laptop, select the "Simple Scan" icon from the vertical menu of icons which you get by clicking on "Activities" in the top lefthand corner of the screen.
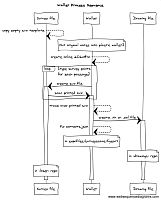
[ Normal people should skip this, but nerds need to look here to understand the online wallet maintenance process ].
If your initial backup photos of your notes were poor quality, use the scanner in the potato hut to make better copies. Scan to JPEG format as .jpg files.
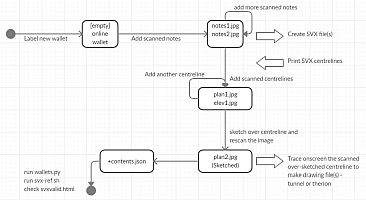
Name the scanned pages "notes-cavepassagename.jpg" etc., (or notes-1.jpg if you must, but self-describing filenames are much better). This is important as a script detects whether these files exist (with names beginning "notes..", "plan.." and "elev..") and if you name them something else it will hassle you unnecessarily. (Or you can use this format cavepassagename-notes.jpg if you like.)
[ Note to maintainers: do not rename these files even if they have been created with the wrong names. They are permanently referred to by the tunnel/therion/troggle system !]

Upload the scanned files from any computer with internet access using the Upload Scans form. You will need to login as user 'expo' with the usual {cavy:beery} password.
The form shows the files already uploaded in the online wallet, and you click on the very large "Choose files" button to open a file chooser dialog where you can select several files at once to upload.
Some of the tickboxes on the lower half of the form correspond to the tickboxes on the paper index sheet (shown in more detail here). Other tickboxes record whether it is a tiny cave not worth surveying (no survex, plan or elevation required), a simple pit (no plan required) or a flat grovel (no elevation required).
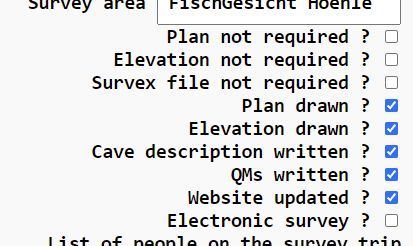
The QMs are written into the survex file as described in the Adding QMs handbook page.
The "Website updated" checkbox is for later when you copy the description text from the survex file into the Cave Description page of the online cave registration form. This is described in the Cave Description" page and on Step 6 of this survey process Creating a new cave in the online system.
[ Note that the paper form has 3 boxes for the survex file: the numbers for the survey legs (data), the numbers for the LRUDs, and the description / QMs. The online form only has the QMs and a filename for the survex file. ]
Scanned survey notes are voluminous and so are not kept in the version control system. So for safety, if you upload a file with the same name as one already there, the upload process will add a random suffix to the filename. You will need to contact a nerd to confirm which one you want to keep.
You will be using the expo laptop (or some other laptop in the potato hut connected to the scanner) to do the scanning and you will need to put the scanned files somewhere before you upload them. So to avoid confusion, put them in the folder corresponding to your wallet name, e.g. for 2018#19 put them in:
/home/expo/expofiles/surveyscans/2018/2018#19/But then please upload them to the wallet on the server using the upload form. Don't just leave them on the expo laptop.
This is what that wallet looks like using the Upload Scans form.
If someone made a mistake and you are the nerd who needs to rename a file then be aware that this is much, much easier using
the expo laptop, but first, you should read the online wallet maintainers' notes


The correct folder
on the expo server is the same as that on the expo laptop - because we set up the expo laptop to be like that.
But you will need to learn how to use Filezilla (expo-relevant instructions here)
to move and rearrange things on the server to match.
Please only copy files to the server that you created yourself and which live in your own wallet folder


If you want to use your own laptop for complex rearrangements of files in the server's online wallets you need a
minimal laptop setup
- as documented for complex uploading your expo photographs.
Just to the left of each filename in the list on the wallet upload form is a "»" symbol. Click on this and you get a webpage form which renames the file after it is uploaded to the server. The filename as uploaded is sanitized, so it may not be exactly as you uploaded it. But it is sanitized for a good reason: don't try to rename it back. All funny characters cause weird behaviour somewhere - so don't use them.
If you used a survey device, phone or PDA instead of making notes on paper, you need to store your .topo files, or whatever other format you have. Put them in exactly the same place as a scanned survey sketch would go, but also write a paper note and put it in the plastic wallet in the potato hut to prevent someone re-using that wallet number.
As well as the native format .swc files produced by your Supa-Wunda Caving device, also export the data into as many different 'standard' formats as possible, zip them up into a file, and upload that too using the Upload Scans online form. In 10 years (or less) when all that is left of Supa-Wunda Inc. is a dusty footnote to the pages of history (or more likely a muddy brown smear on the pages of history) we want to be able to read the data using whatever software we have available then.
Note: some devices can export a survex file. This direct-export should be treated as raw data and should go into the wallet system (Upload Scans). But you will also need to make an edited version of that survex data - complete with correct *ref, *team, ;QM and cave description text and upload that to the survex file system.
See the Survey Device specific instructions for the different sorts of devices we use and how to store the data of each format.
If you are using the expo laptop, upload the .topo files using the Upload Scans form and also copy them to an ordinary online wallet wallet, as there is no physical wallet, e.g. for 2018#16 it would be:
/home/expo/expofiles/surveyscans/2018/2018#16/in the same way as you do scanned notes or scanned survey sketches. (We used to use a different naming scheme for non-physical wallets, but that turned out to be both confusing and not necessary.)
Troggle scan upload does not allow you to create subfolders for scans or topo files. Either put all your files into one folder, and upload them from there, or find a nerd with a basic laptop who can interact directly with the version control system. Or email them to a nerd as below.
If you are not in the potato hut and your screen is too small to use the upload form then email all the .topo files to a friendly nerd (not necessarily on expo) who will upload them in the right place.
Back to the previous page in this sequence
Creating a new cave in the online system.
Take a side trip to the online wallet maintainers' notes.
Now go the the next page in this sequence Starting a new survex file".