
[None of this applies to the Bosch drills and their battery packs.]
Please check with a battery nerd whether this is still up to date. It was valid on Expo 2022.
We have 2 types of batteries:
Batteries need to be charged on compatible chargers.
We have 3 types of charger:
1 will charge only Blue-taped standard batts. Do NOT just try again more than once if you get an error. 3 tries can make a battery permanently unusable. This is the normal charger to use for Blue taped batts.
2 will charge only Green-taped modified batts. Charge Green-taped batts on this.
3 can charge all the batteries, but needs to be set up correctly. See below. It is normally used for diagnostics and recovering over-discharged packs which will not charge on the normal chargers.
This is the set of 3 (2 half-width) chargers made from old green/turquoise Makita chargers. They have a set of 4 LEDs. (The full-width one only has 1 LED in 2018). Charges at 40W.
This is the black all-purpose charger with LCD display. Charges at up to 50W
The Yellow Propeak chargers do the same job, and instructions are similar, but have no fan, no backlit display, and if pack is low voltage will charge at C/10 (10% of normal) until voltage rises sufficiently. Charges at up to 50W.
LiIo CHARGE
C=3300mAh 14.4Vp
This information will not go out of date.
Note that the drills have no battery-voltage monitoring at all, and the monitoring circuit in the battery is bypassed when connected to the drill. Thus the drill can easily be used to over-discharge a battery, so please stop drilling when it gets slow and put on a new battery, unless it's an emergency. Drilling with an excessively-sagged voltage will knacker the weakest cell-pair. If your battery does get to this state, try to charge it up as soon as possible. Cells must not be left at <2V for any length of time as they rapidly (hours/days?) degrade to useless in this state (and that pair will need replacing - which means reassembling it back in Cambridge and welding in a new cell pair).
Makita have put very 'conservative' software in the batteries (as bought) which will stop them working on an as-bought, unmodified Makita charger, even when they are in fact fine. The monitoring board in the batteries is powered from the 1st cell pair so that pair tends to get discharged more than the others when left sitting for the 11 months of not-expo. If an unbalanced (or over-disharged, or too-hot) pack is inserted into the Makita charger the charger and battery will do serial-comms negotiation, the charger will refuse to charge the battery and the battery will remember this. If you try this 3 times, the battery will mark itself bad and will never charge again on a Makita charger. Only a replacement circuit board in the battery can fix this (or new software if we knew how to nobble it).
Such batteries are normally still fine and charge on a sensible (RC - Radio Control, because RC people are the main market for these chargers) charger, possible after a "balance charge" to get the cells in the pack in sync again. Expo has a couple of chargers capable of doing a "balance charge" (Black Accucell6 and older Yellow Pro-power Prodigy II). Unfortunataly Makita don't build the 14.4V packs with the necessary connections to the cells, so the circuit board in the battery has to be replaced to make this work easily for expo. For 2018 this was done for 7 of our packs, and 3 automatic balance chargers were built by Wookey.
Further explanation: the charger uses a different pair of electrical connections from those used by the drill - that's why there are not just two electrical connectors in the charger - to accommodate those extra connections.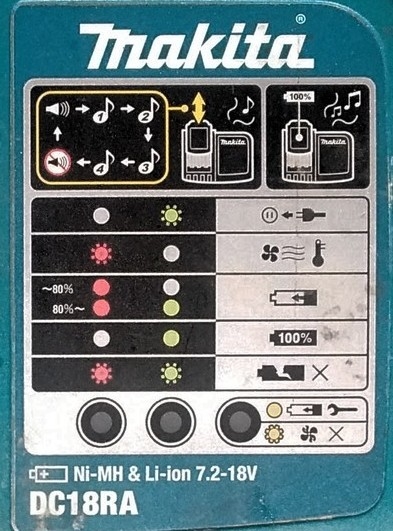
We have these types of charger; the non-mains chargers are all at top camp and can run all night using the car batteries:
New for 2018 is varying battery capacity. We have 3Ah, 4Ah and 5Ah packs. Bigger packs will take longer to charge from empty. The capacity is on the cell label next to the yellow connector.
Each pack has a sliding indicator on the side. This is entirely manual, but is very useful for indicating when a pack is known to be charged, flat, or partly discharged. Slide the slider to show green for full, red for flat, half and half for 'partly used'.
If a battery has green insulation tape on it it has been modified by us and will not charge on an unmodified as-bought Makita charger.
Simplest is try to charge it again and find that it says it is done in a couple of minutes (Up to 4 mins on the balance chargers). This may 'waste a life' on batteries that still work on the Makita charger. Checking it on the RC charger will not waste a life. It will quickly rise to 16.4V, and the current drop to 0.1A or so. That indicates a full pack. It will tell you so after a while (1-5 mins).
The drill batts are 4S2P 14.4V lithium ion packs (8 18650 cells: 4 in series, each being a parallel pair). This means that they are charged as 4-cell packs, to 4.1V per cell-pair. They can be charged at up to 3A rate. Battery 1 has connector wired as balance connector. No other packs have this yet (2017). The official Makita packs use Sony SE US18650VT (1.5Ah, 20A high-drain) cells, and we have a few with with Samsung INR18650-13Q (1.3Ah high-drain cells). All give a reliable 2.3-2.6Ah capacity in practice, even after 9 years expo useage.
At end 2017 we bought two 4Ah packs. The non-makita one uses LG DAHD21865 cells (2Ah, 25A). I can't read the Makita cell type without unwelding the pack. For 2018 we made 3 new 5Ah packs from Samsung 25R cells (2.5Ah, 20A) (Sponsored by uk18650.com).
The drill discharges at 26A current draw when drilling (~400W), so that's 13A per cell in a 2P configuration.
This is the green/turquoise charger with 3 LEDs, and diagrammatic charging info on RH side. Charges at up to 100W.
First insert the battery.
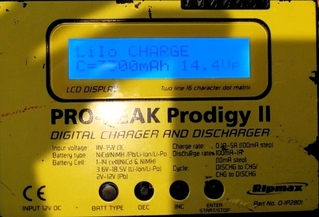
Check that screen looks like this: Displaying
LiIo CHARGE
C=3300mAh 14.4Vp
If this is not the case then move to the long instructions.
If it is showing exactly as shown above, hold down the "Enter, Start Stop" button (the one at the right-hand end, the 4th one from the left) for two seconds. The screen will display "battery check" and then start charging.
The screen will then look something like below (but with different numbers) when charging:
CHG 0.04 00002
LI+3.26A 15.331V
If this is not the case then move to the long instructions.
First insert the battery.
If the charging screen is not displaying the settings shown above then the correct charging settings need to be selected. You can do this as follows.
Now hold down the "Enter, Start Stop" button for 2 seconds until "Battery Check" is displayed and the screen looks similar to below, but with different numbers:
CHG 0.04 00002
LI+3.26A 15.331V