A walk through tunnel - Merging sketches
From Fs_wiki
Individual sketches usually cover only one survey, or less.
To create the whole cave map you must put the individual surveys together
into a single drawing.
Survey hierarchies
It is convenient to organize Tunnel surveys in hierarchies. Tunnel manages arbitrary levels of hiererachies. For example each survey can be stored in its own directory, with its xml files, and its sketch. The directories of the surveys of a branch of the cave can be collected in a directory (for the branch). And the directories of the branches can be put under the directory of the cave.
With Tunnel you can open a single survey, ie. the directory of the individual survey. Or you can open one branch of the cave: if you open the directory of a branch, Tunnel brings in all the subdirectories of the surveys as well. You can also open the whole cave.
The hierarchy of directories is as follows:
    gm-full
      +-- gm-01
      +-- gm-02
      +-- gm-03
Put the global survex data file "gm.svx", that comes with the archive of sample data, in the directory "gm-full". The three subdirectorires contain their respective svx files, and the xml files previously created with Tunnel.
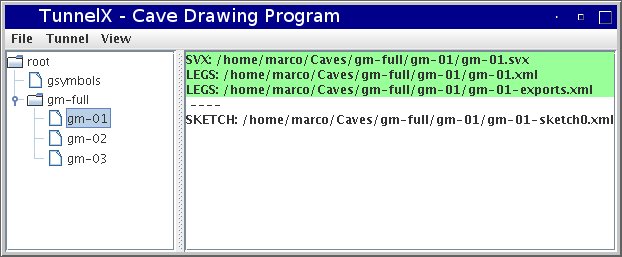
Now open with Tunnel the XML directory "gm-full" which contains the three maps for the individual surveys. The MainBox window of Tunnel displays the hierarchy of surveys as in the picture below.
Importing sketches
Now create a new empty sketch in the directory "gm_full", and import the centerline in it (menu "Import | Centerline"). Next, you may import the first cave sketch in this one. Select the subdirectory "gm-01", so that it is greyed and its file list appears in the right section of the MainBox window. Select the sketch you want to import: there is only one, so you don't have much choice. It will appear highlighted with a stronger green color (or red if you make any change to it, or grey if not loaded yet). Go to the drawing window where you are drawing the global cave map, and select the menu "Import | Import Down Sketch". You can choose yes to the dialog that asks if you want to load the centerline info. The sketch of the survey will now appear in the global cave map.
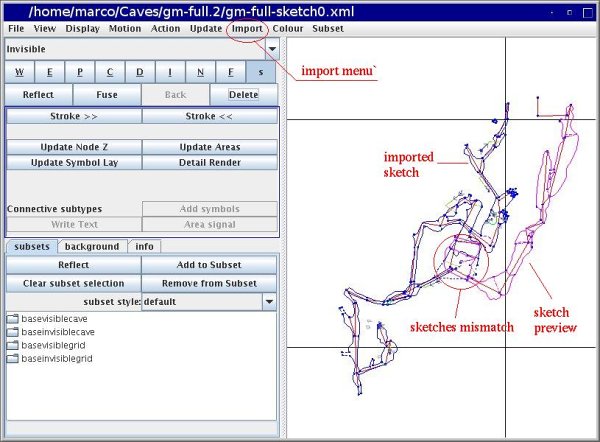
Continue with the second sketch. You might want to preview the effect of the import before actually doing it. Click on the menu "Import | Preview Down Sketch". The skecth will appear in pink color. This is shown in the picture above. You have to click on the menu "Import | Import Down Sketch" to actually import it.
Now complete the cave map with the third sketch. Then you can proceed to smooth the wall paths and the other cave features in the region where the sketches overlap. You will use the fuse-path action for this.
The path action "fuse-path" moves a node of a path and deform the path accordingly. First, you start a new path at the node you want to move with a click of Ctrl left mouse button. Then you end your path at the point where you want to move the node to (Shift left mouse button). While the segment is still selected (pink), click on the button "Fuse". The start-node moves to the end-node of the segment, and the paths joining the start-node are warped accordingly.
Finally update the node Z (the heights of the stations), areas, and
symbols. And check the detail render with (menu "Update | Detail render").
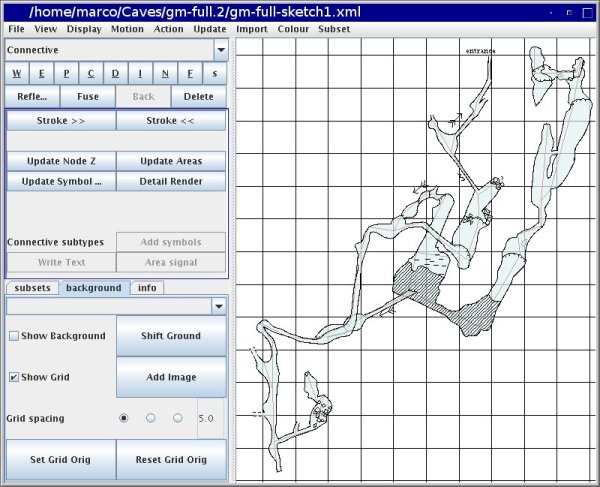
As a final touch we set the origin of the grid at the cave entrance. Click on the station at the entrance (Ctrl and left mouse button), then click on the button "Grid orig" in the "background" tab panel (or the menu "View | Set Grid Orig"). The grid will be shifted so that the entrance station is at a corner of the grid. The node is still selected. Click the button "Delete" to deselect it (or the menu "Action | Deselect").
In the image above the grid spacing is 10 m and the origin has been set at the entrance of the cave.
If you want to revert to the original grid origin, click on the button "Reset grid orig" in the "background" tab panel or the menu "View | Reset Grid Orig".


