Surveys and Rigging Guides
2013 Plan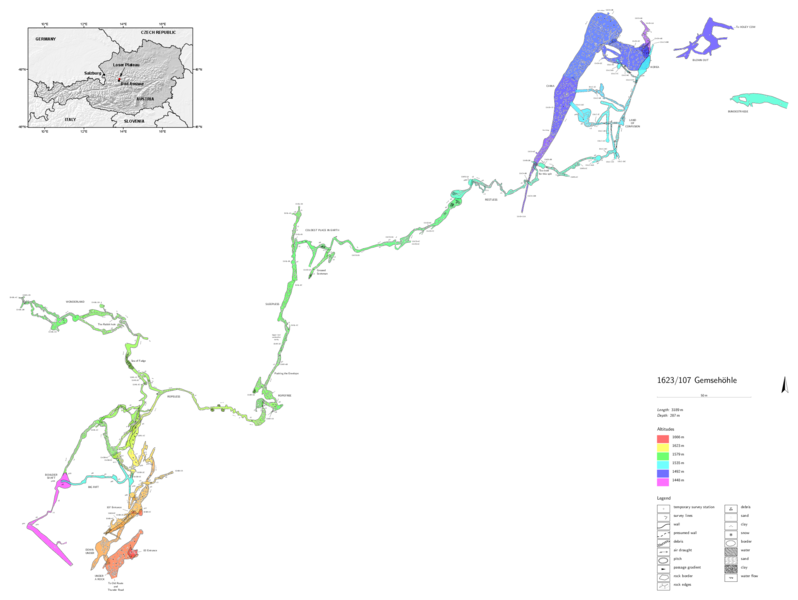
2013 Elevation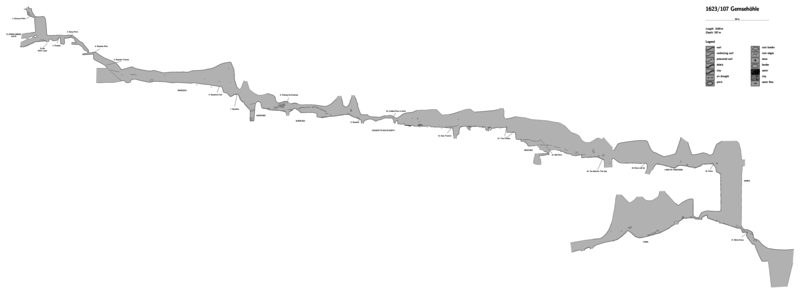
1978 (grade 5) survey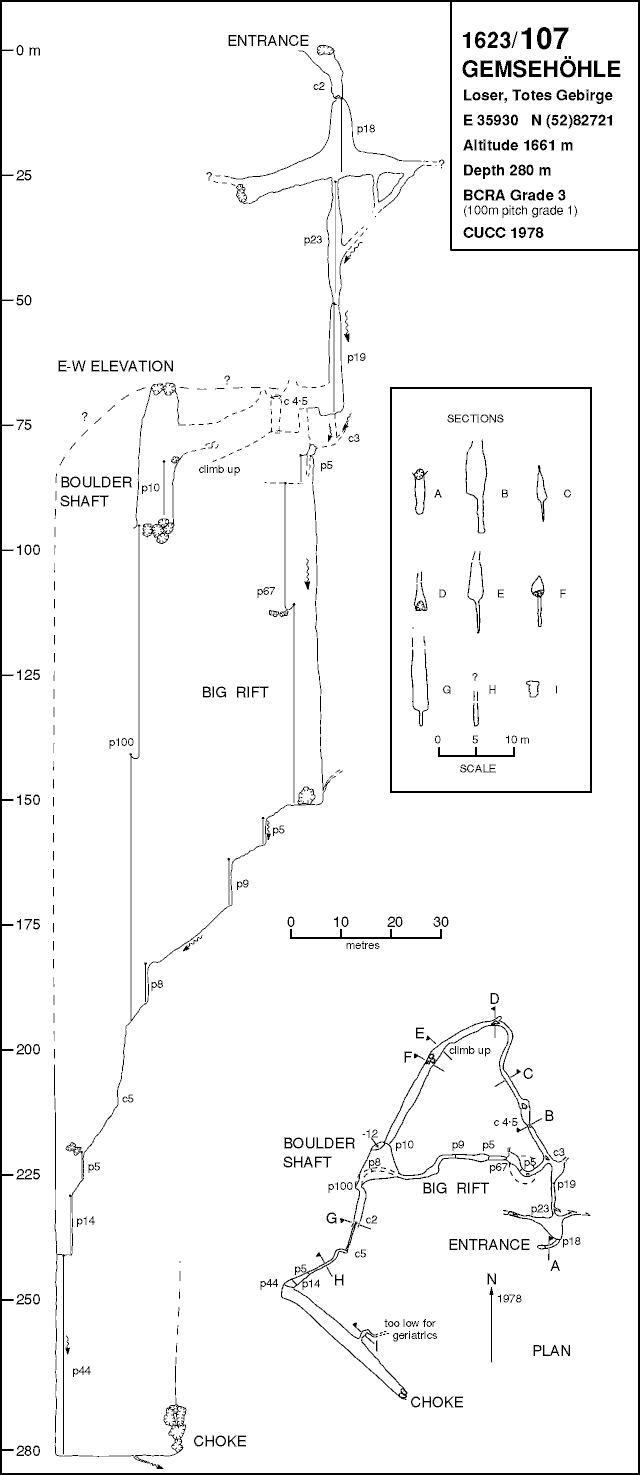
Underground Description
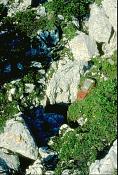
Small entrance in boulders in a dry gully drops into a small chamber, in the bottom corner of which is the excavated head of a pitch. This quickly bells out to 6m diameter and lands after 18m in a large passage which contains ice-formations early in the season (or at least did in the late 1970s). This large, phreatic passage leads to 83 (via Down Under) to the southwest (by climbing up the hading left wall into a higher level passage) and Ropeless to the northeast. The 1970's way on is down pitch in a rift almost opposite the entrance pitch, from which some of the draught pours.
To the northeast, the passage is smaller and is soon broken by a 5m deep rift. Upstream (right) ends in a boulder choke below 2012-70, downstream (left) appears to connect to the 1970’s pitch series. To continue, the rift is crossed by a pendule to a chossy slope up on the other side. From the top of this slope a series of short dusty ramping pitches lead down. In 2012 a rope was only used at the top, but in 2013 it was rigged down to the bottom (p10, c3). At the bottom a short section of dusty crawling passage (draft in your face) leads to another rampy pitch. This is initially freehanging, but becomes more rampy (p10, c7). At the bottom of the rampy section, a rifty pitch continues below, and a traverse level heads off to the NNE and into Ropeless. There are two ways Ropeless can be gained. In 2012 the rigging ended when all available gear was used, and a bold traverse continued until it was (just) possible to climb down into the sandy passage. In 2013 more gear was available, and the drop was rigged down from the end of the traverse followed by a short (rigged) down and up to gain the same sandy passage.
This sandy passage is followed against a strong draft. Shortly (~15m later) the passage bends to the right, and a smaller walking sized side passage leaves on the left (which is more obvious when going out) - this leads to Wonderland via Sea of Fudge and connections to the 1970’s route.
Continuing east along the main Ropeless passage, a short climb down (rigged in 2013) and traverse across brings you into a large, drippy chamber with rocks all over the floor. At the end of this a small rift is descended (rope) down a narrow rubble slope which isn’t very stable, so beware of dislodging rocks onto people or the rope below (this may in fact be better rigged by traversing at a higher level from the chamber and then dropping when it opens out). After a few metres you land on a col with pitches to each side. West quickly ends in a too tight rift, East is descended to a rubble slope. Facing down the slope, Ropefree is through a window on the left-hand (north) wall, reached by a short rope traverse. From the top of this it is possible to scramble down the other side into another chamber. A strong draft emanates from a far too-tight right in the floor on the right. At the end of the chamber a tight rift can be gained at floor level, but it is better to bridge up and along, traversing over some rocks (avoiding one squeeze) to an unavoidable short squeeze (Pushing the Envelope). This is best entered feet first - there is a convenient ledge the other side (but do keep in mind there is a pitch below). Tackle is best passed through with at least one person on each side.
Immediately through Pushing the Envelope, is a rift pitch that appears to continue down a fair way. Descend the top narrow part of the rift (rope) until it opens out where a traverse ledge takes you around the left side of the continuing pitch into Sleepless.
Sleepless is a fairly high passage. It is best to follow it at floor level - there is an upper level but this ends in a tricky climb down through the boulders. Following the lower level (which soon splits off down a sloping climb on the right side of the passage) a short section of straight rift is soon followed by some pretty mud banks. The passage opens out and narrows again and continues until it is broken by a small hole. This can be crossed with a short traverse (rope). Beyond this, Sleepless appears to continue north with a pitch. The main way on is to ignoring this and follow ledges round to the right into a short section of curving phreatic passage. Shortly this hits the end of a large cross rift which heads off to the South. At this intersection, the draught is really strong and cold - this is the Coldest Place in Earth. Skirt around the end of the cross rift on the left (rope) to where a short pitch descends to a gloopy muddy floor.
The Coldest Place in Earth is followed until a large pitch is reached. This is crossed by Easy Traverse (rope) round ledges on the LH wall. Beyond this, the passage is followed until a pitch is reached. The Twin Pitches are split by a wet muddy pool. At the bottom of the second part of the pitch the cave becomes more rift like - Restless.
From the base of the second of the Twin Pitches, a floor trench soon starts. The best route we found was (description written from memory nearly a year later) to descend about 2m into in it fairly soon, then traverse along at that level for a bit, climbing down about another 2m near a chock stone (if you descend too quickly the rift is very awkward to move along - and coming out, it’s quite easy to miss where to climb up and find yourself trapped in the bottom of the rift, unable to get higher - if this happens, just backtrack looking carefully for where to climb up). The rift widens as it kinks left, and you want to descend onto the large ledge which is (hopefully) not far below. Traverse round as the rift bends back to the right, and the short Rift Pitch soon follows. This pitch ends on some ledges (but there is a continuation below), follow these ledges on. Continue along the rift, traversing on ledges and climbing down when possible past a small pool. The passage now widens and is broken by a large undescended pitch, Too Bold for This Spit. This is thought to connect with China 68m below. A traverse is made along the right hand wall to reach a passage on the other side with a chossy floor sloping up. From the top of this slope, head down the other side and follow the passage as it bends to the NE.
The passage is broken by a short pitch Down and Up, abseil down this and climb the other side (free-climbable to rig, but really deserves a rope for normal use) to reach Land of Confusion. The main rift passage is high, but in places narrow, and can be followed past several easy climbs and side passages to reach the head of a large pitch, Korea.
Korea can be descended to land at the south end of a large breakdown chamber with several ways on. To continue deeper cross to the North end of the chamber and wriggle down through the rocks until it opens out further. A series of pitches can be descended through the rocks into a continuing rift. To reach China, follow the southern wall to the west through breakdown and down a short climb until you break out into a large passage, China. Turning right in China quickly ends in a large muddy/bouldery wall, with a passage on the right which connects back to the Korea chamber via a short pitch. Turning left, China can be followed along and down until the passage eventually narrows, and progress is blocked by a pitch.
Wonderland
Following the side passage from ropeless leads down several short climbs to come out in the wall of a slightly larger passage. Left here leads to a connection with the 1970’s route, and to another with Ropeless. Right leads to Wonderland via a short wet and muddy duck, the Sea of Fudge. When going through the pinch point, beware of a stalactite. After this the passage enlarges until it ends at a junction with a cross rift. To the right this soon ends, but left can be followed down a couple of climbs (the second is easiest if you follow the LHW) to land at the bottom a drippy aven. Climb up into a tall narrow rift on the other side, and wriggle through The Rabbit Hole (the wide point in an otherwise too narrow rift). This quickly becomes a keyhole passage with a walking sized phreatic part which is followed. The floor trench quickly leaves the main passage on the right (following the departing floor trench is awkward at first, but opens out at an undescended pitch).
The main Wonderland passage is followed, past a small chamber on the left (with side passage doubling back), and then a second larger chamber. The is a climb up on the back wall of this chamber which appears to gain a passage above. A low way on at the end of the chamber reconnects with the main passage further west. The main passage suddenly gets much smaller and splits with a choked passage on the right and a small aven on the left.
Big rift series
A pitch of 23m has an inlet entering part way down, which makes the rest of this pitch and the following one of 19m unpleasant in wet weather. Two ways then lead on, either down with the water or by traversing round this drop to another passage.
Climbing down with the water leads to a short passage with the water in a rift below. Round a sharp corner is a short drop to the head of a larger rift. A 5m pitch down this leads to another rift which, in turn, leads out to the side of a large shaft. Stones dropped from a small hole in the corner of the passage above the 5m pitch also fall into this shaft. Laddering from the side, the pitch is 67m with a large ledge just above half-way, and is unpleasantly wet in poor weather. From the base of this pitch, the continuing rift/canyon trends south west and has pitches of 5, 9 and 8m before the other route drops in from above.
Over the traverse, a short pitch of 4.5m, followed by a short climb up, leads to the head of a pitch of 10m to a boulder floor. Two ways on from here are down through the boulders into a shaft, or across the shaft and into a narrow rift. The way through boulders soon chokes, but the narrow rift soon opens into a massive shaft of 100m with a rebelay roughly halfway. This drops directly into the rift reached by the original route.
Below the junction, the rift continues with a 5m climb and pitches of 5, 14 and 44m, this last pitch being quite wet and emerging into a massive cross-rift trending south east. The water disappears into the choked floor of this rift via a nasty wet crawl, rapidly becoming too small.
Explorers
CUCC 1978, 2013: opened and Big Rift explored by Team Youth. Team Geriatric explored the Big Pitch and reached the bottom. Olly and Jenny extended in 2012/2013QMs
QM page for 1623-107Wallets: scanned survey notes
There are 23 wallets with data for this cave:2013#05 2013#15 2013#16 2013#17 2013#26 2014#01 2014#07 2014#16 2014#27 2015#01 2015#04 2015#19 2015#20 2015#46 2015#58 2015#59 2015#60 2015#61 2015#62 2015#63 2015#64 2015#66 2015#67