Every year some poor bugger who has probably never done it before it gets to rig the tarps and be responsible for any soggy miserable nights that might result if it's not done well enough. Starting from the bare space it's really quite hard to know where to start if you've not done it before, so this doc attempts to provide some advice.
The diagram comes from Wookey+Joe's rigging effort in 2014 when the tarp wrapped up around the rock and a separate one covered the rear. In 2015 we bought a much longer big white tarp which covers the whole rear area down to the ground. So the description no longer really matches the diagram. An updated diagram would be good one day.
There are two essentially-separate jobs:
If there is any chance of it raining soon, start with the water tarp, as you really don't want to miss collectingt all that water, and setting up in the rain is rubbish.
I will describe things as if standing at the bottom entrance looking up, because that works for all three sections. So the left wall is the gear/stove/animal-hole wall. The 'back' is the top end of the bridge. The 'front' is the main entrance.
Since 2015 we have one really big (15x10m, white) tarp (rather than the smaller 10x10 green one, shown in the diagram). This covers the whole sleeping area from front to back and is a lot drier. It is set up so that essentially the whole bivvy is covered. The tarp is just about wide enough to span the width of the bivvy. The instructions below are a good guide as to how to set up any tarp, and the large white tarp actually has a few instructions written on it. You can largely ignore the 'fold' notes, and use your own judgement.
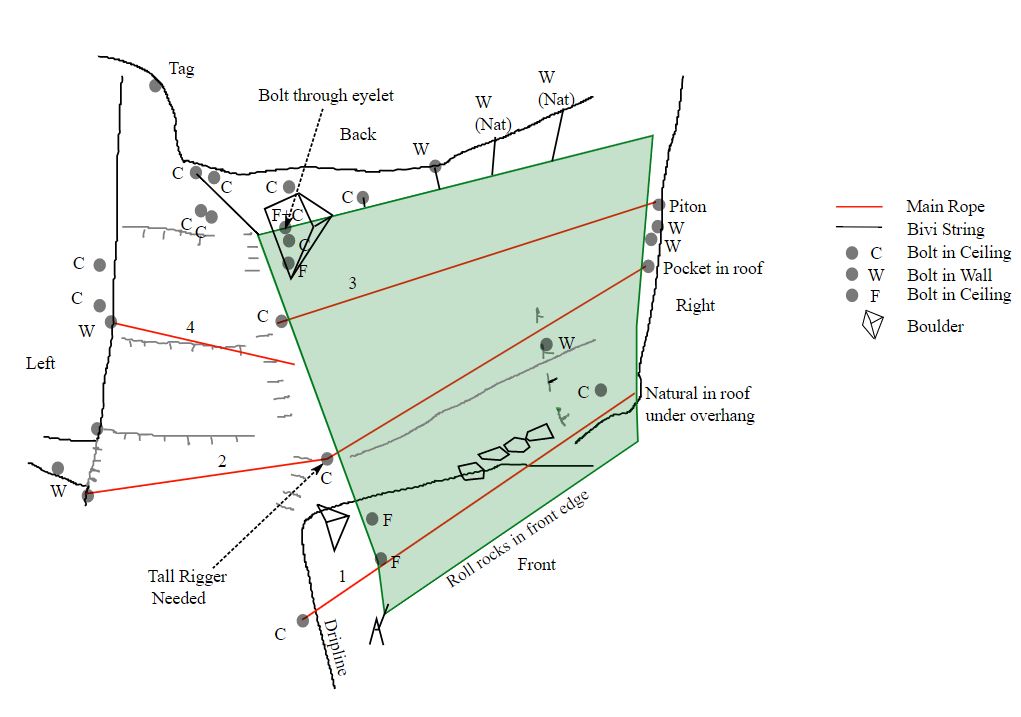
Start with the big white tarp. The long edge goes from front to back of the bivi. The basic position is that it goes all the way to the right wall, partly 'underneath', and the left hand edge crosses the steps up the middle. The back edge reaches the floor behind the top 3-person flat area at the back entrance.
So start by opening it out to full width on the wide central bed-shelf. and pulling the RH edge close to the wall. Sequencing the ropes is a bit tricky, you need the tarp vaguely in place, then install the two main ropes to lift it up. Finalise the tarp position and tension it.
Once the tarp is somewhat spread out, rigging the ends of the two main ropes - one across the front and one across the middle (passing under the tarp). These are the two that take high loads. The rear major rope has no real load - it just keeps things neat. Now tension them to lift the tarp up and ensure it is neatly spread. The middle rope attaches to the roof bolt just at the LH edge of the tarp. This needs someone very tall, or sitting on shoulders, or something devious with bivi string to pull it tight.
P.S. At the rear entrance, you can rig up some extra tarps to make it more comfortable.
This is one large tarp covering most of the internal roof and coming out both the front and the back to the ground. There are two main cross-ropes, one at either entrance to hold it up, another central cross-rope, and 'knitting' to reduce sagging in the almost-flat central area. The objective is to get it taut enough and square enough that almost all the water runs down the top and out the front, rather than collecting in 'buckets', which then drip. That means that it has to be fitted quite 'flat'.
Ideally the lines that run down from back to front should be so tight that no cross-lines are needed. Thene there can be no dripping pockets at all. This requires threading lines through maillons in the roof, rather than tying them off, then pulling down on the line with all your weight (jammer and a friend useful) before tying off at another bolt at about waist level. You should not need to put in new bolts, they should all be in place already.
to be written
to be written
Use a long/thin (2x5m) waterproof 'logpile' tarp. It is hung between two side longitudinal ropes, with lots of bits of string attaching the eyelets to the side ropes. Aim to hang it under the hole in the roof, and far enough forward that water off the front falls onto the 'water platform' (not into the food boxes).
It's easiest to approximately tie the tarp to the side ropes with adjustable knots, then put the ropes in place, adjusting as you go. The outer line ends up too high to adjust once properly in place. Adjust it to catch as much of the water falling through the hole as possible, and slope gently, but consistently downwards.
The funnel/filter is hung below the end of the tarp where it will get nearly all the water and is much easier to hang/adjust/unclog. (Prior to about 2010 we hung it directly below the hole, but that missed a lot of water and was very difficult to adjust or unclog.)