Importing and Distorting
From Fs_wiki
Contents |
Bring in the Centreline
Centrelines
The drawn survey legs, sometimes called the centrelines, are the backbone of every drawing above Grade 1 standard. It's late in the tutorial to bring them in, but they are a distraction to standard drawing procedures because they behave in a completely different manner.
To bring in your centreline, create a new empty sketch in one of the survey directories, by selecting it in the left hand panel of the MainBox and clicking 'Tunnel | New Empty' Sketch on the menu bar. Now click on 'Import | Import Centreline' on the menubar to bring in the centrelines associated to the current survey (and the surveys below it).
Survey Hierarchy
You may have observed that there is one survey per directory, and each directory may contain other directories. This forms a hierarchy of surveys. It is good practice for a survey to either contain centreline information (survey measurements) or contain other surveys (as a grouping), but not both.
If you select a subdirectory of a directory corresponding to a survey, and import the centrelines corresponding to that, you will have a subset of the centrelines you would get for the directory/survey above.
Importing sketches
This is the final piece of the puzzle. If you have two sketches, both of which contain centrelines, and the centrelines in the second sketch are a subset of (or the same as) the set of centrelines in the first sketch, you can Import all the paths of the second sketch into the first sketch.
You will do this for any moderately large project, where you want to draw up different sections of the cave separately (perhaps combining three or four drawings into the same sketch) before stitching everything into the same sketch.
Warping
If the corresponding centrelines in each of the sketches are not exactly the same, Tunnel will distort the paths of the second sketch to best approximate the differences between the centrelines as they are imported into the first sketch.
The procedure
You should have the sketch you want to import the lower sketch into visible in the Sketch Window (This is what you get by double-clicking on a line that begins with SKETCH0: in the right hand pane of the MainBox). Now select the sketch you want to import from in the Main Box. You need to have both the survey directory selected on the left hand side, and the particular sketch of the survey from the right hand side. Just select it so it is highlighted; don't double-click on it or it will be made visible in the Sketch Window instead of the sketch you are trying to import it into.
Previewing the importation
Go back to the Sketch Window and click on 'Import | Preview Down' Sketch in the menu. An image of the sketch you are going to import into this sketch will be made visible in pink in approximately the right size and orientation but without any warping.
To import the lower sketch fully into the upper sketch, click 'Import | Import Down Sketch' on the menu bar.
You can now click on 'Import | Preview Down Sketch' again to see how much it was distorted.
Connectivity
The paths are warped according to how closely they are connected to the centrelines that needed to be moved. The closer something is connected to a point of the centreline by a series of paths of any type, including connective type, the more its position will be effected by that centreline.
It's possible for the paths that define the outlines of two separate passages that cross over one another to be repositioned independently as though they were in separate drawings, as long as there are no paths of any kind connecting them.
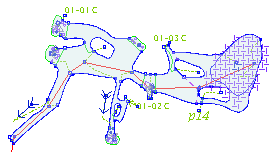
A simple example showing how Tunnel can radically warp the shape of the sketch to match changes in the centreline.


How it works
Here is a quick explanation in words without using pictures. The first step is to make correspondences between the centreline paths of the imported sketch to centreline paths in the current sketch. From this, we define a function that takes an XY point in the plane of the imported sketch to an XY point in the plane of the current sketch. If there was only one centreline path in the imported sketch (corresponding to one path of the current sketch), this function would be easy: find the relative position of the point to the centreline path in the imported sketch (as in, some proportional distance along the path vector plus a proportional distance perpendicular to the path vector). We apply this set of relative coordinates to the path vector from the current sketch, and calculate the result.
When there is more than one centreline path, we work out this function for each path in the imported sketch, and derive a point in the destination sketch. If there are ten centreline paths, then our one point goes to ten points, one for each pair of corresponding centreline paths. We then put the point at the weighted average of these ten points. This result is smooth and usually doesn't create any dreaded kinks.
Stitching together two sketches
Remove the invisible lines that were temporarily filling the open ends at the joining point of each of your two sketches then wiggle the walls so that they link smoothly onto each other. Check that symbols filling the area either side of the join (e.g., sand, boulders) are consistent and are working OK. If the join is at a complex place such as a junction you will probably want to check all of the original drawings of this area to make sure it looks consistent (try to have two sketches join in simple, small passage if possible though!).
Once you have imported a sketch and saved it you cannot reverse this process so for big survey it may be wise to make a temporary master sketch where you import all your separate sketches and check how it looks before you do it for real.
Work flow
The working process of generating surveys varies according to the job. For example, in 2007 we may have sketched each drawn up survey section separately as the expedition progressed. Then, when the expedition is completed, we made one master copy of the centreline (using survex to produce a pos file). Note that this centreline would likely have slightly different positions for survey stations for at least some of the drawings that were produced earlier in the expedition due to loop closures that occurred later in the expedition. Then, onto this end of expedition centreline, we would import all of 2006's drawn-up survey and warp it to the new, 2007 shape in the process - this can take up to a quarter of an hour of processing time. However, afterwards, all that remains is the job of importing each piece of the drawn-up 2006 survey sketches separately into the new master copy and then splicing the joins in - this takes a few minutes for each piece and can be completed in less than a day.
The result is a massive single survey sketch that has to be handled and viewed all at once in the computer. The original sketches from each of the surveys are no longer of any relevance.
While it would be preferable if the computer could import all the sketches on its own and link them up automatically, this is beyond the scope of what's possible except in reasonably limited conditions not often seen in reality. Therion does it this way, and calls these individual surveys "scraps", and thus retains a direct connection with the original drawings of each survey trip, rather than taking copies as Tunnel does.
Therion's way is more correct than Tunnel's method which seems to leave numerous out-of-date copies of the surveys lying around if you aren't careful to remove them. However, the cost of ensuring that the joins between the different drawings and scraps are without overlaps, gaps, and clean enough for the computer to handle, cannot be predicted.
Navigation
- Next Subsets and styles
- Up Tutorial
- Previous Drawing Up Your Own Survey
