Location: E 35849.2 N (52)81046.7 H 1479.5m
Depth to sump 740m
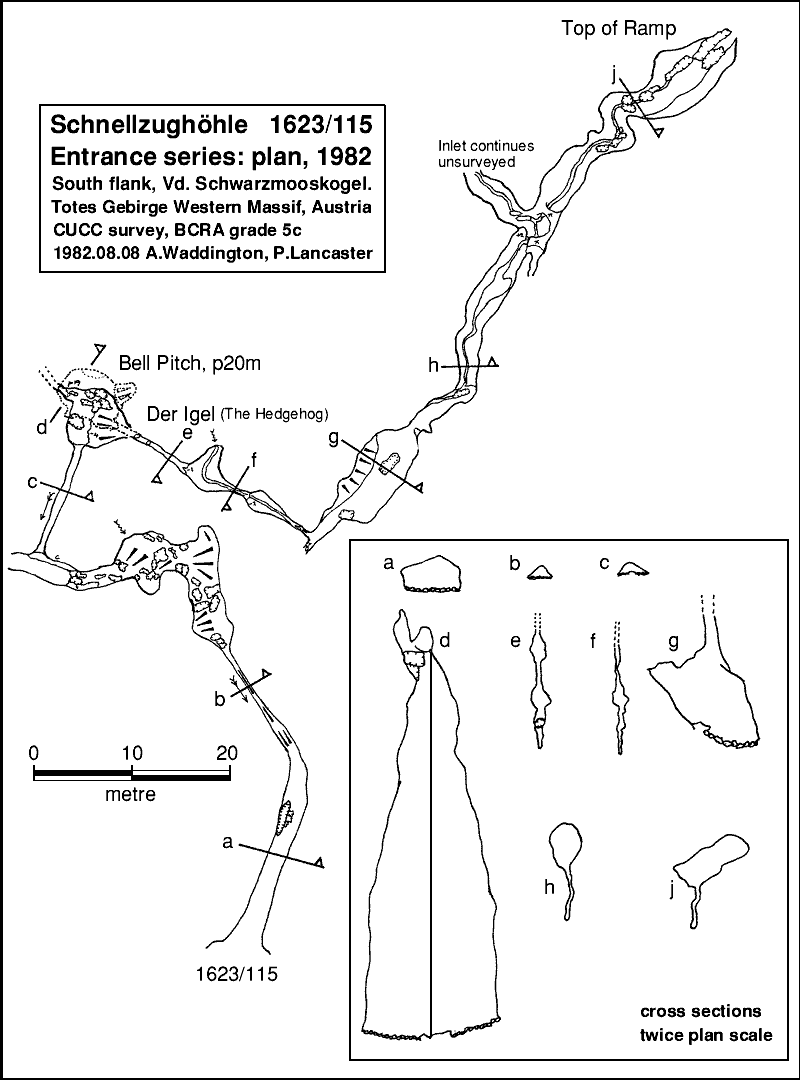
The entrance opens in the southern slopes of Vorderer Schwarzmooskogel, reached by marked path number 201 from the Bergrestaurant and car park at the top of the Loser Panoramastrße. This is followed over Egglgrube, past the Kratzer Valley and along the well-marked Stogerweg perched on the hillside above Weiße Wand. Shortly beyond the draughting hole of 1623/32 Windloch, the path drops steeply down the hillside. The entrance is reached by steeply descending to 90m vertically below the Stoger Weg just beyond the point where it levels out again. There is a permanent survey station ('P3') just at the junction.
A large tube runs horizontally into the hillside [X0000-115-01 X] (passing below a small skylight), until it suddenly closes down to a steeply descending crawl full of loose stones ([X0000-115-02], originally excavated) and strongly draughting out in summer. This drops into a small chamber with a drip inlet which is the ideal place for a tin to collect water for carbide lamps. Down the slope an 8m pitch (the hole opposite, [C1980-115-46], leads only to a blind passage) is followed by a scramble down loose stones to a conclusive choke [C1980-115-45]. The main route lies in following the draught up an obscure 8m climb, [C1980-115-47], on the right above the pitch (bolt aid required for reascent, ladder recommended), to a sharp crawl through a small tube.
A climb down and a traverse to the left over blocks (avoiding the obvious loose hole on the right) finds the head of the free hanging Bell Pitch (20m) hidden behind a block. This lands on a boulder floor with two dry trenches leading off: the right leads to a 7m ladder with unstable boulders at the head. This lands in a sharp thrutchy tube, The Hedgehog, which heads Southeast to emerge in a dry meandering trench which breaks out into a large abandoned phreatic passage.
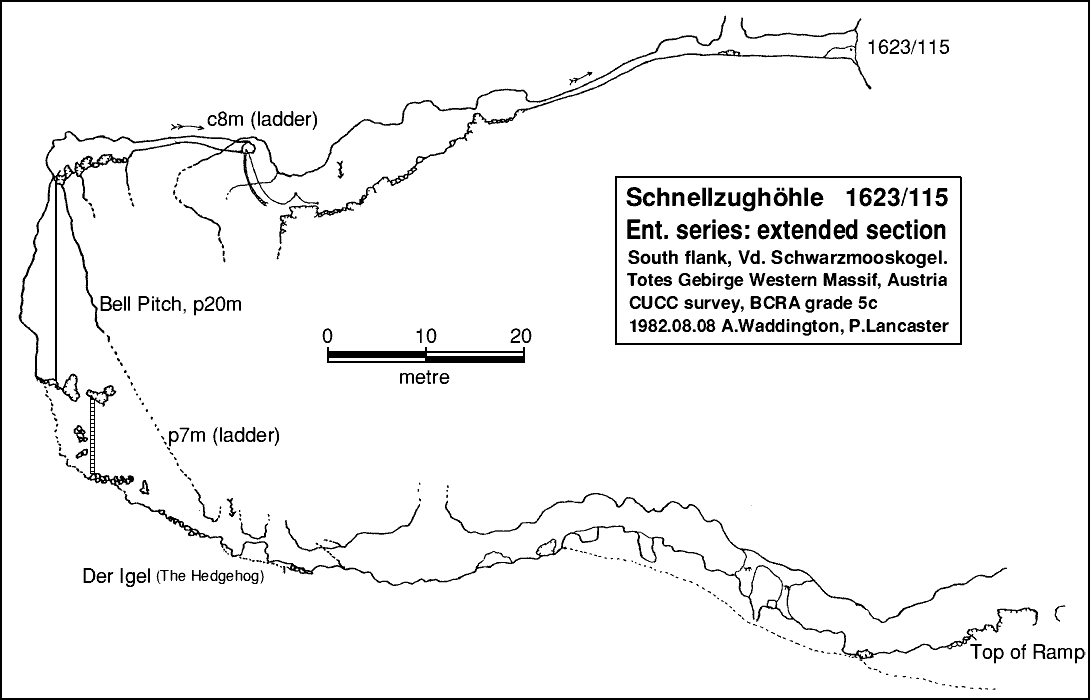
Right (SW) becomes low over a silty mud floor [C1980-115-48]. Left (NE) is developed along the strike through a chamber with an aven and on to a climb up. This is the start of a series of traverses where a narrow trench cuts into a roller-coaster tube. This ends at a short climb down to a junction where a larger tube is intersected. Almost straight ahead, the large passage with a choked trench in the floor reaches a larger hole down (Baker's Bungle) which is crossed to a small rift leading to the head of The Ramp. The Ramp can also be reached by an obvious traverse off, 10m down Baker's Bungle, [C1980-115-49]. This is the start of 200m of continuous pitches to the Big Chamber. [Not the same Big Chamber as in 142. Ed.]
The Ramp has formed where a deep vadose trench (now abandoned) has cut down from a phreatic passage sloping at 45°. The way is down the ramp, initially on the near side, but crossing the trench to a ledge system at the far end of which a better hang down a 45° slope leads back to the top of the trench. Across this is a slope to The Col; left here leads to a vast black space to the Southeast [C1981-115-01], but loose boulders prevented exploration of this route.
The main way on follows right (south), down a series of sloping pitches, largely against the wall and developed in a hading rift. The pitches become more vertical as a prominent WNW-ESE joint or fault is reached. After passing some loose boulders, a 26m pitch reaches the bottom of the rift where a small stream joins the route. This can be followed up until a pitch is met. Downstream, a short way above the water, a thrutch under and over chockstones leads to a further drop.
A short traverse (bolts) round two bends enables two clean washed and fluted pitches (18, 19m) to be rigged. These are the first of the Inlet Pitches. The rebelay between the pitches is at the level of a damp ledge, but well out on the (true) left wall where it is usually dry. From the large wet ledge now reached, a traverse out onto the right wall (ledge, but line very useful) reaches the top of a 6m pitch avoiding the rather broken and splashy final section of the rift pitch.
The Inlet streamway rises rapidly in wet weather and makes the lower pitches unpleasant but not impassable. The 6m pitch lands on a boulder floor where the water flows down to the left, but right, avoiding the water (except in wet conditions), a boulder slope reaches a 24m pitch from a large chockstone. The pitch hangs free, landing on the floor near the centre of the Big Chamber.
The Big Chamber (115 final chamber) marks the end of the initial vertical part of the cave, and the start of the most extensive horizontal development at about 1200m asl. From here several ways lead on. Up the boulder slope in the chamber leads to the site of a food dump where an inlet is seen in wet weather. The two main ways on lie downstream. Following the large abandoned passage above the streamway leads to the connection to Junction Chamber. The water itself can be followed as Pete's Purgatory. Both lead to the deepest parts of the system via the Confluence.
The large abandoned tube may be followed West above the Purgatory by crossing from ledge to ledge, or by climbing up from below some way downstream of the chamber. Eventually further traversing becomes impractical as the ledge and tube give out, but shortly before this, the low mud filled continuation [C1981-115-10] leads off to the right, Northwest, into a mazy fossil phreatic area. The passage size increases in this, past one or two passages right - the main way on being fairly obvious and marked by the prints of previous explorers. A small vadose trench in the floor contains only seepage water, but the route lowers to a crawl through a sandy floored arch to a point where the route diverges. Slightly left (NNW), a short thrutch emerges at Connection Cairn, but more sharply right (uphill - NE) is the easiest route through in a low, wide sandy crawl rejoined by the original route on the left after forty metres or so. The passage continues large, with a small vadose trench in the floor and much mud infill. Following the large tube for a hundred metres or so to its conclusion emerges about 10m up the side of Junction Chamber with an excellent view, but no easy way down.
The best route to reach the floor lies 50m back down the passage, where a small hole in the right wall (coming from 115) leads to a horribly muddy bedding plane crawl which pops out above a streamway which is followed up to Junction Chamber by careful traversing.
Junction Chamber is a nexus of routes where the entrance series of both Schnellzughöhle and the ramifications of Stellerweghöhle join. Several other routes can be followed for varying distances - the main continuation of the Purgatory Bypass is Dartford Tunnel: the way to the deeper parts of the system.