Surveys and Rigging Guides
-
Click here to download the detailed plan survey of Fischgesicht Höhle (1623/290) and other nearby caves such as 1623/291 after the 2023 expedition
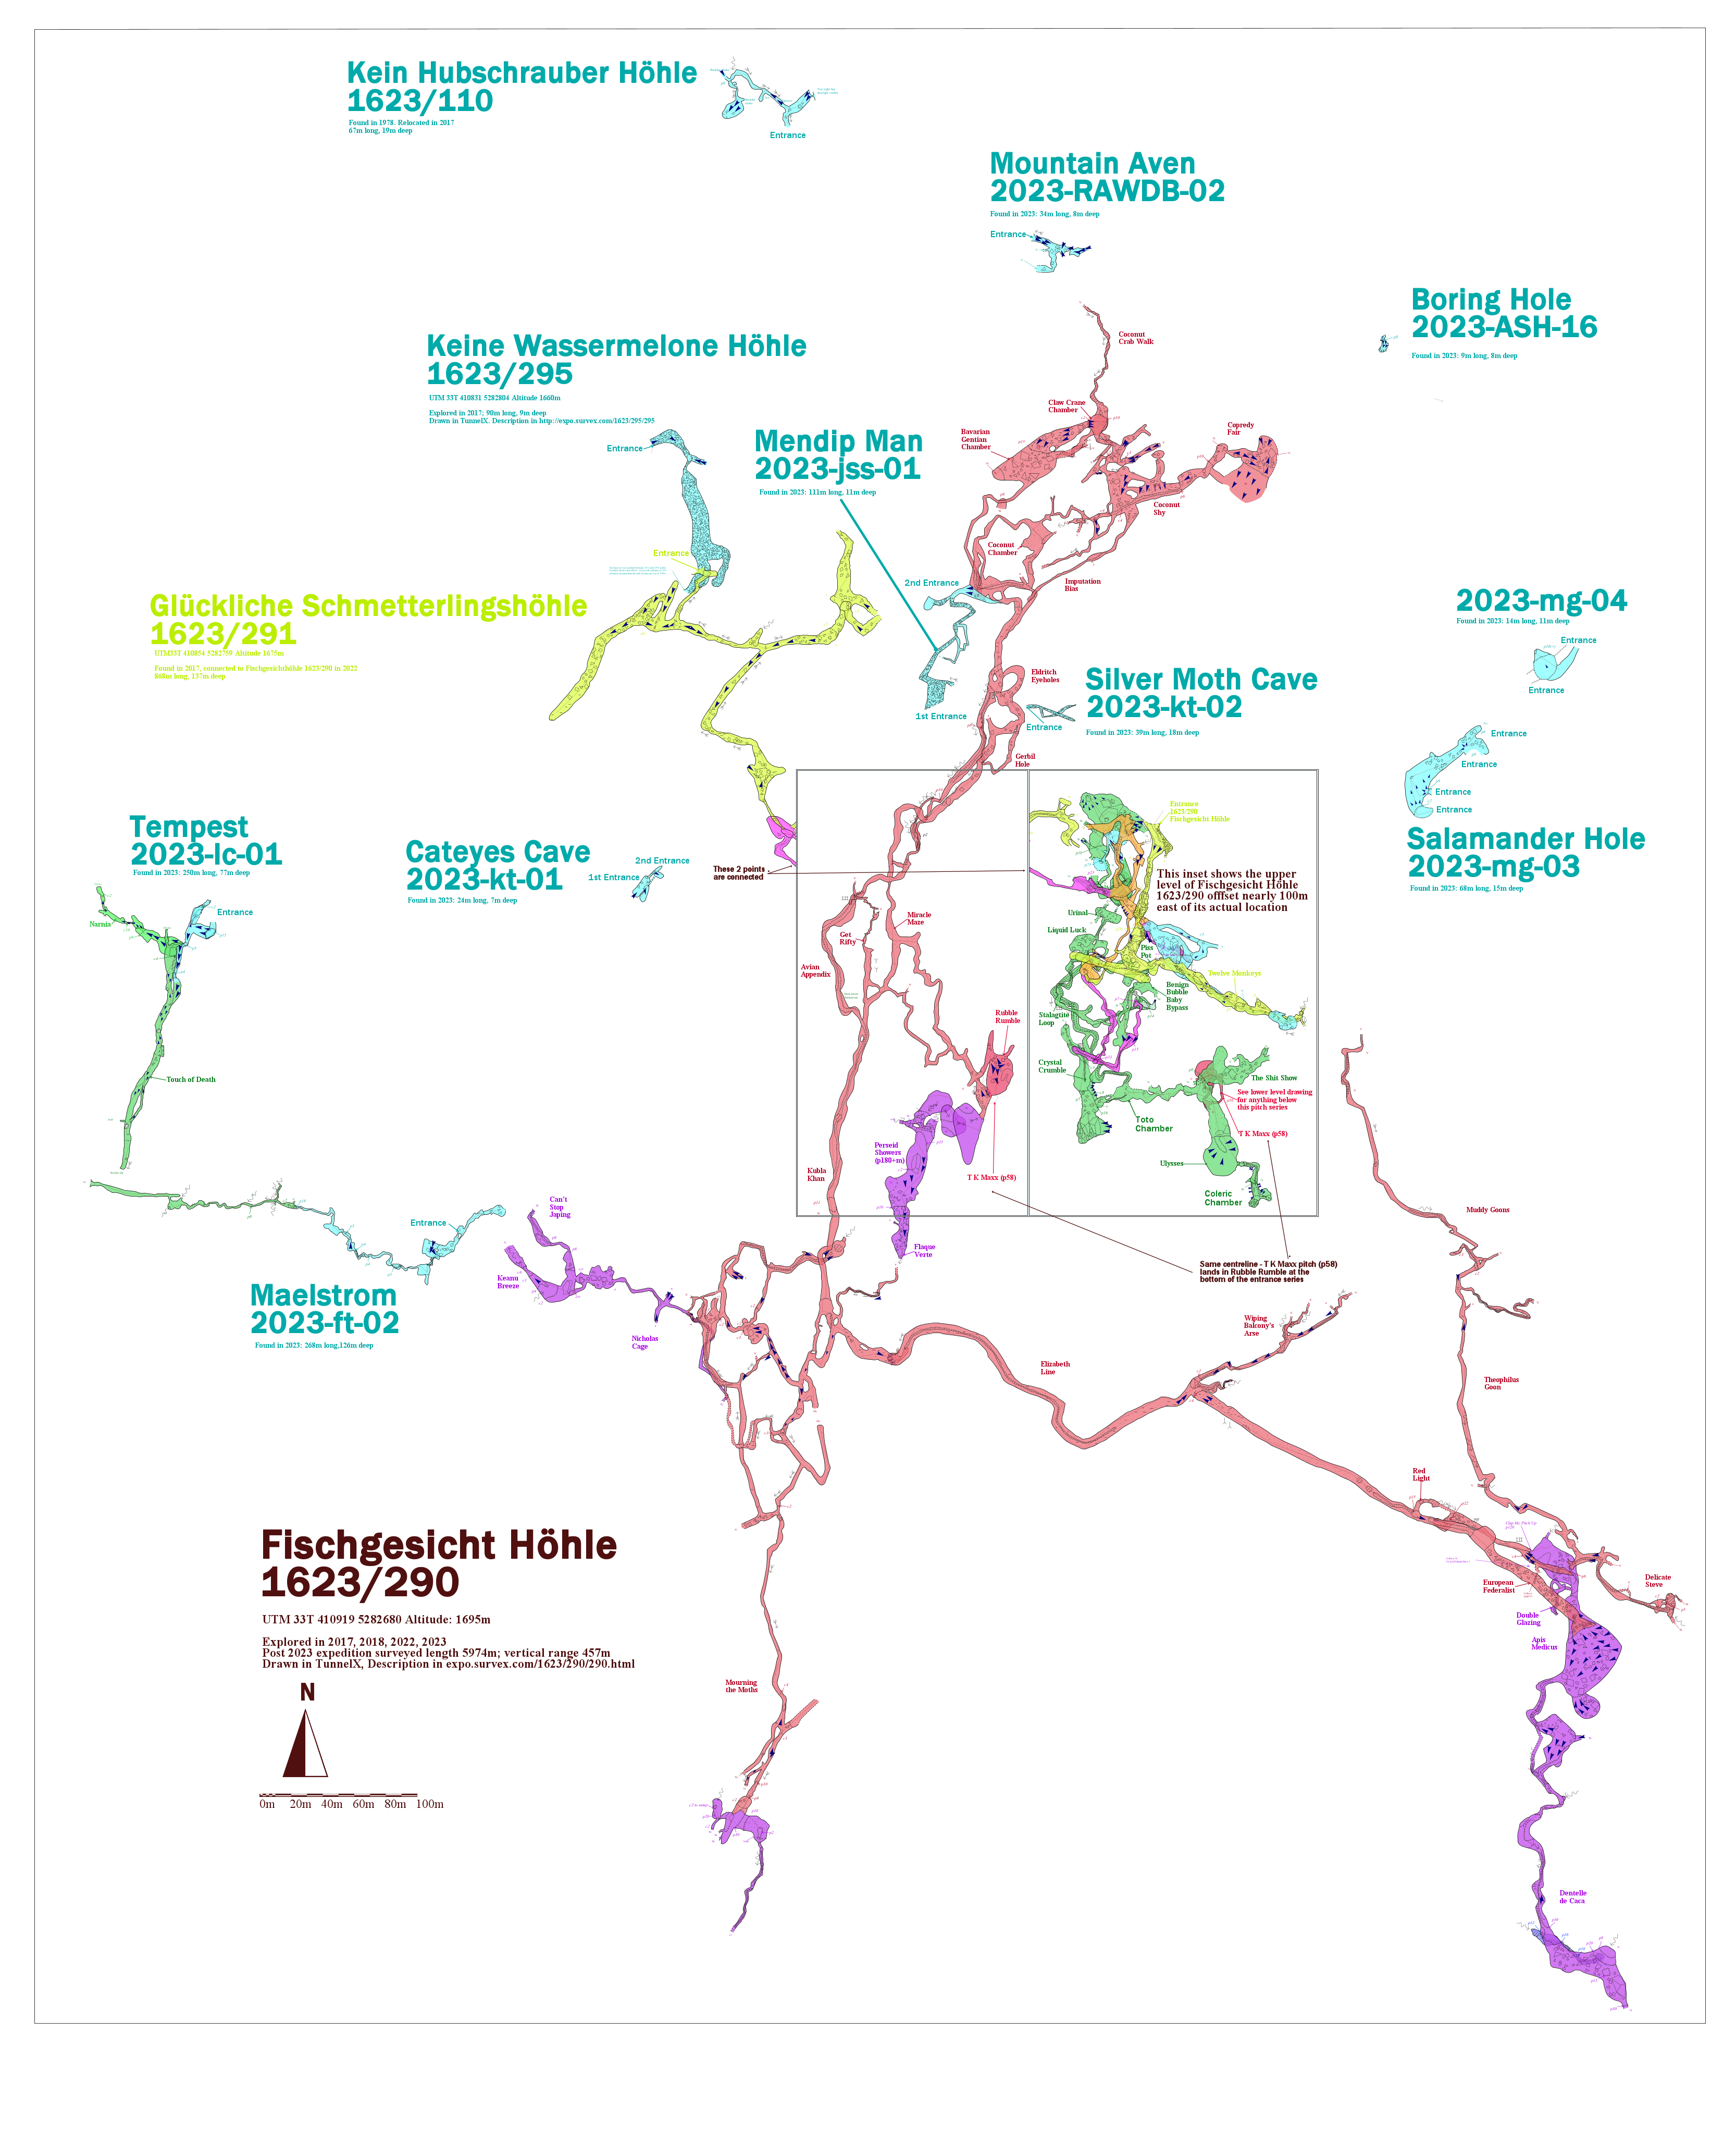
Low resolution plan of 290 and 291 plus nearby caves after the 2022 Expo.

Simplified extended elevation of 290 after 2022 Expo.
Underground Description

Schematic showing names of major passages; see below for surveys
                                     entrance
                                         |
                                         |                         redlight
                                         |                          /  |
                                         |                         E   |
                                     ulysses                      /    |
                                         |                  pushderig  |
                                         |                      /   apismedicus
                                         |                     E
                                         |                    /
                    coconut*------N--kublakhan--S----N--sesamestreet----S----horrorbank
                                         |                  /                   |
                                         |                 W                    |
                                         |                /                     |
                                         |          nicolascage                 |
                                   perseidshowers        |                    moths
                                                         |
                                                         |
                                                         |
                                                  keyanubreeze
Start of description: Entrance to Ulysses
Twelve Pitches
Entrance is a strongly drafting horizontal walking / stooping rift with some snow. In Aug 2018 it was entirely blocked by snow.
From the entrance travel along the passage of shattered rock, navigating a couple climbs. After a few minutes, you enter high-up into a large canyon. Traverse along the wall until you reach first pitch. Below first pitch, cross the chamber and head West/right into the tube to reach second pitch. East/left from the base of the pitch leads to Windy Tube and 12 Monkeys.
Below second pitch, cross the ice plug and do a small climb to a traverse leading to third pitch (Pendulum Pitch). Pendule to a rock halfway down, into rift passage. Follow the meandering rift, taking care as the floor opens out, until fourth pitch (33m) into a canyon with a stream at the bottom (Blitzen Boulevard).
After traversing Blitzen boulevard for roughly 20m down stream, you come to a phreatic passage on the left hand side above a slightly exposed, muddy climb. Following this passage onwards for roughly 10m you reach a small chamber know as Benign Bubble Baby Bypass (so-called due to the odd look formation suck in the corner). To the left of the formation you quickly reach fifth pitch (7m) that drops into a ledge above Piss Pot. Piss Pot is roughly 15m in depth but ends in a bouldery choke, not worth any more exploration unless you fancy starting a dig. Right of the pitch is another meandering passage. Following this for roughly 15m the floor drops out, and you reach sixth pitch (Liquid Luck).
Liquid Luck is a roughly 25m pitch that drops onto a ledge, surrounded by canyon. The chamber is large and fairly drippy, with some small inlets high-up. North East, a phreatic passage can be accessed by a traverse. This leads to a 19m pitch and a large wet chamber called the Urinal (named due to the smell of p** during exploration). This is the point where lots of smaller streams connect into the main canyon of the area. The ceiling extends ~20m and an inlet is expected to connect
Back at Liquid Luck, phreatic development also continues South East, leading to the rest of the discovered system. Traverse along the phreatic part of the keyhole passage into another chamber which has a canyon widening in it on the left. Stay high and traverse along until you are across into the continuation of the phreatic passage. This is the beginning of Freeattic Flys (so-called because Lydia Leather is dyslexic and didn't realise it wasn't spelt that way).
Freeattic Flys continues along for 30m, passing intricate coral-looking formations and a multitude of dead flys. The rifting, meandering passage leads to several awkward free climbs down. Eventually you get to seventh pitch (5m) that drops into a ledge halfway down, with the continuation called Odious Odium going South East on a traverse line.
If you drop ~10m to the bottom of seventh pitch, you drop into Toto chamber (so-called because of the large, solidly-perched boulder in the shape of Africa you land on). The rift passage level with this boulder leads to crystal crumble, where a canyon (probably the one below Freattic Flys) enters from one end of a latge chamber and sinks into a boulder pile at the other end.
Odious Odium continues the phreatic passage and decends the rift when neccessary with eighth pitch (6m) and ninth pitch (5m). Ninth pitch is a one-bolt-wonder which puts you into a large junction on a cemented rock floor which continues both North and South. Turning North/Right leads toward Ulysses, whilst South/Right takes you to Shit Show.
Ulysses is a very large chamber, roughly 20 metres in diameter, and of currently unknown depth (but expected to be greater than 50 metres). The walls around the chamber are pretty crap, and the entire funnel-shaped floor is loose scree. The whole of Ulysses itself is excessively crumbly, and likely no amount of gardening will make the chamber "safe". It may connect into the known cave below, and requires very careful descent if dropped. A traverse has been rigged along the right side wall, to reach a rift that enters opposite the initial point of approach. This leads to Choleric Chamber, where there are two waterfall chambers (one of which was dry in 2018) which connect into a narrow rift in the floor. The Ulysses traverse could be continued another 10m around to a ~15m bolt-climb up to very promising (if true) train-tunnel phreatic.
Surveys above Ulysses (by .svx name)
- 12monkeys
- blitzen_to_liquidluck
- blower
- canyon
- capncrunchresurvey
- capitaincrunch
- entranceseries
- fishface1-part1
- fishface1-part2
- flitterwolken
- freeattic_flys
- gardeningschool
- icytube
- kcc
- kreshkonnections
- redfishbluefish
- sciencevsfun
Ulysses to Kublakhan
Turning left after ninth pitch will lead to tenth pitch (15m) which drops into the Shit Show. The chamber is made up of false floor and massive boulder chokes, and is not an area to tread heavily. The way on is through a rift out of the chamber and leads to eleventh pitch (6m). Shortly after eleventh pitch you arrive at twelfth pitch (Rubble Rumble), a significant 70m pitch into a large chamber. Crossing over a large boulder and then climbing down underneath the chamber has the final 3m hang which can be rigged from the end of the same rope in a steeply sloping passage with a lot of loose choss, which leads to a low crawl crossroads.
Surveys above Kublakhan (by .svx name)
- rubblerumble
- rubblerumble2
- rubblerumble3
- toto_to_crystalcrumble
- ulysses_to_colericchamber
- ulysses_to_toto
Khan junction

Kublakhan to Perseid Showers (route down)
Left at the crossroads leads to Big Bastard.
(perseid area based on Nat Daltons notes): Below first few bolts swift progress was made due to some optimistic rigging until a large window was encountered. This seemed wetter than the drippy clean-washed shaft I was in, so I carried on down our original shaft until I reached a particularly puzzling section. This whole section is clean washed and feels like it will get wet, but I was unable to avoid it entirely; it will be interesting to see what this does on a wetter year. A few more bolts took me to ~30m above a large ledge with a big black hole swallowing lights (and rocks; a ~3 second drop plus rattle @ end). At this point I was down to my last hanger so put a rebelay in with a vague hope of being able to progress further down. After ~100m rope of pitch descended we headed back.
Surveys in this area (by .svx name)
Kublakhan to Coconut series (route north)
Back in Miracle Maze, the passage continues with a sandy floor, with passages coming in on the left from Kubla Khan and Avian Appendix. Eventually it reaches Eldritch Eyeholes, a chamber with two prominent round solution pockets in the ceiling which look like eyes. There are three routes here which all join back together after 5-10m. The passage climbs out of Eldritch Eyeholes until a rift re-enters from the right at a 2m climb. Above the climb, the route follows the rift whilst a tube on the left re-joins the rift after only a few meters. In the rift is a right turn, which goes up to Coconut Chamber, whilst the continuation of the rift also eventually reaches the same chamber. In Coconut Chamber, a series of narrow tubes to the left of the large rift continue, and eventually loop back to the same rift that can be seen from the chamber itself. The final lead is a small climb in the tubes which leads to an undropped pitch of approximately 10m.
Surveys in this area (by .svx name)
Kublakhan to Sesame Street (route south)
Straight at the crossroads is a small crawl passage, unexplored. Right at the crossroads leads to Miracle Maze, an assortment of sandy phreatic tubes. The first left in Miracle Maze takes you eventually to a large junction chamber. In this chamber, the right turn is a small climb up to a large phreatic development that loops back to the rest of Miracle Maze. The left turn is the downstream continuation of the phreatic tube, called Kubla Khan.
Kubla Khan continues downstream, with a floor rift joining in from the right in Avian Appendix, named after a prominent wall marking that looks like a bird. Following Avian Appendix is a horribly precarious rift which also leads back to Miracle Maze. Kubla Khan itself continues downstream with the walking surface descending to water-level to reach a small pool (Caverns measureless to man, down to a sunless sea) which is good for having a piss in. After the pool the walking surface rises again, past a precarious mudstone arch. Eventually the water and the floor rift leaves the passage again on the right. At the end of Kubla Khan the passage splits, a high level phreatic tube requires a handline bolting over a nasty traverse, whereas the low level goes under a crawl into a small sandy tube.
Surveys in this area (by .svx name)
Sesame junction


Path north leads back to Khan junction,
path west to Keyanu Breeze,
path south to Moths and
path east to Redlight.
Sesame Street to Nicolas Cage and Keanu Breeze (route west)
Right after the sandy crawl (next to climb up to Pushderig), then first right down a sandy slide until it opens out traverse to the left through a window then to make the decent easier climb down oposite a stalicemite turn left to the Nicolas cage handline.Surveys in this area (by .svx name)
Sesame Street to Moths via Horrorbank (route south)
10m pitch down from very cold windy passage, landing on boulder floor, leads to larger pitch of ~30m rigged from RH wall. Loose walls on initial descent got it the name 'horrorbank' (it was anticipated to be amazing so 'wankbank' was lined up, but then it was all loose and scary and didn't go romping) so the name was adjusted. Drops into 3m x 8m rift pitch aligned NE/SW. Pitch split by saddle about 12m down. QMA on far side (later explored as 'moths2'). Holes visible at SW end of rift at same level (QMB).
The bottom of the pitch is blind, but 4m up at the northern end is a nice ledge/window, easily accessible as it's just where the hang comes down. This drops into two ~10m pitches down to where a stream disappears into a rather sumpy-looking crawl. It can be followed for a few m before you'd have to get soaked to progress further. Not _actually_ dead but no-one wants to come here again. There is no wind at the bottom of the main pitch or these lower pitches. All the wind goes somewhere else.
Surveys in this area (by .svx name)
Sesame Street to Redlight via Pushderig (route east)
Path towards pushderig begins with a scramble up a step. The phreatic tube trends uphill, with a vadose trench in the bottom taking the water gradually deeper and out of sight and earshot. Where the passage jumps up a dodgy climb, the safer way on is through one of two little holes down and to the left. A 3x3m tube meanders around for a few meters. The floor of the tube is covered with sandy mud that seems to have a darkened crust. There is a bit of a climb up before a steep slide down a sandy slope. Take care to avoid falling in the hole at the bottom - it looks like a soft landing because of the pile of sand, but I've no idea how you would get out of that chamber - it looks a bit like the whole tube has a false floor in that area. The tube continues, eventually changing in profile to more of a tall 2x5m elipse. The noise of the stream can now be heard again far below. redlight begins with a traverse around the end of the Elizabeth line. After a rather strenuous and slippery traverse take the Large Phreas tube to the right. 3m by 2m passage continue for 50m until you reach a rift. Traversing over the top of the rift leads to as yet unexplored traverse that will need bolting. Following the bottom of the rift leads to small pitches preceding the start of clap my pitch up.
Surveys in this area (by .svx name)
Redlight to Apismedicus
A small pitch had been dropped and then a short section of meandering passage led to an apparently huge largening of the rift ahead, which would eat all of our pushing rope. Luke had rigged the pitch very nicely with lots of y-hang rebelays, making the SRT very easy. We soon arrived at the end of the ropes on a drippy ledge, where delicate scuttling around the edge of a big hole led to a further continuation of the rift. Luke flicked a small rock over the edge and we waited around 4 seconds till it hit a ledge and then a further second until it clattered to the floor.
Hopped down a traverse then down a very impressive 50-60m shaft to a very bouldery collapse chamber from which a muddy meander passage was heading nearly due south. We surveyed dilligently along this until we reached a watery impasse (3m drop, (illegible) without getting soaked) just beyond a drippy inlet (suspect this passage is not ideal in wetter conditions, considering we are in a drought it would appear this is probably wet often especially as we expereinced much drippier conditions in 'clap my pitch up' during its exploration eariler in the week which we disliked). However it was only just 6pm at this point and we felt it premature to leave, so I lashed some dyneema around a thread then attached some slings to that and we made a highly japist descent, only to discover that just around the corner the water plunged down a further 10m pitch. Back to the big pitch for the drill then Nathan had his first go on the bolts to drop the climb of pitch on the last of the nice 8.8mm rope which we cut from the base of the big pitch (felt bad). This done we rounded another courner, with the passage becoming ever more meandery and shit, only to discover that a further ~10m pitch lay just ahead. With no further drill batteries, rope or enthusiasm we decided it was time to head out, derigging the lead as we went.
Schematic plans of sections in this area (by .svx name)
QMs
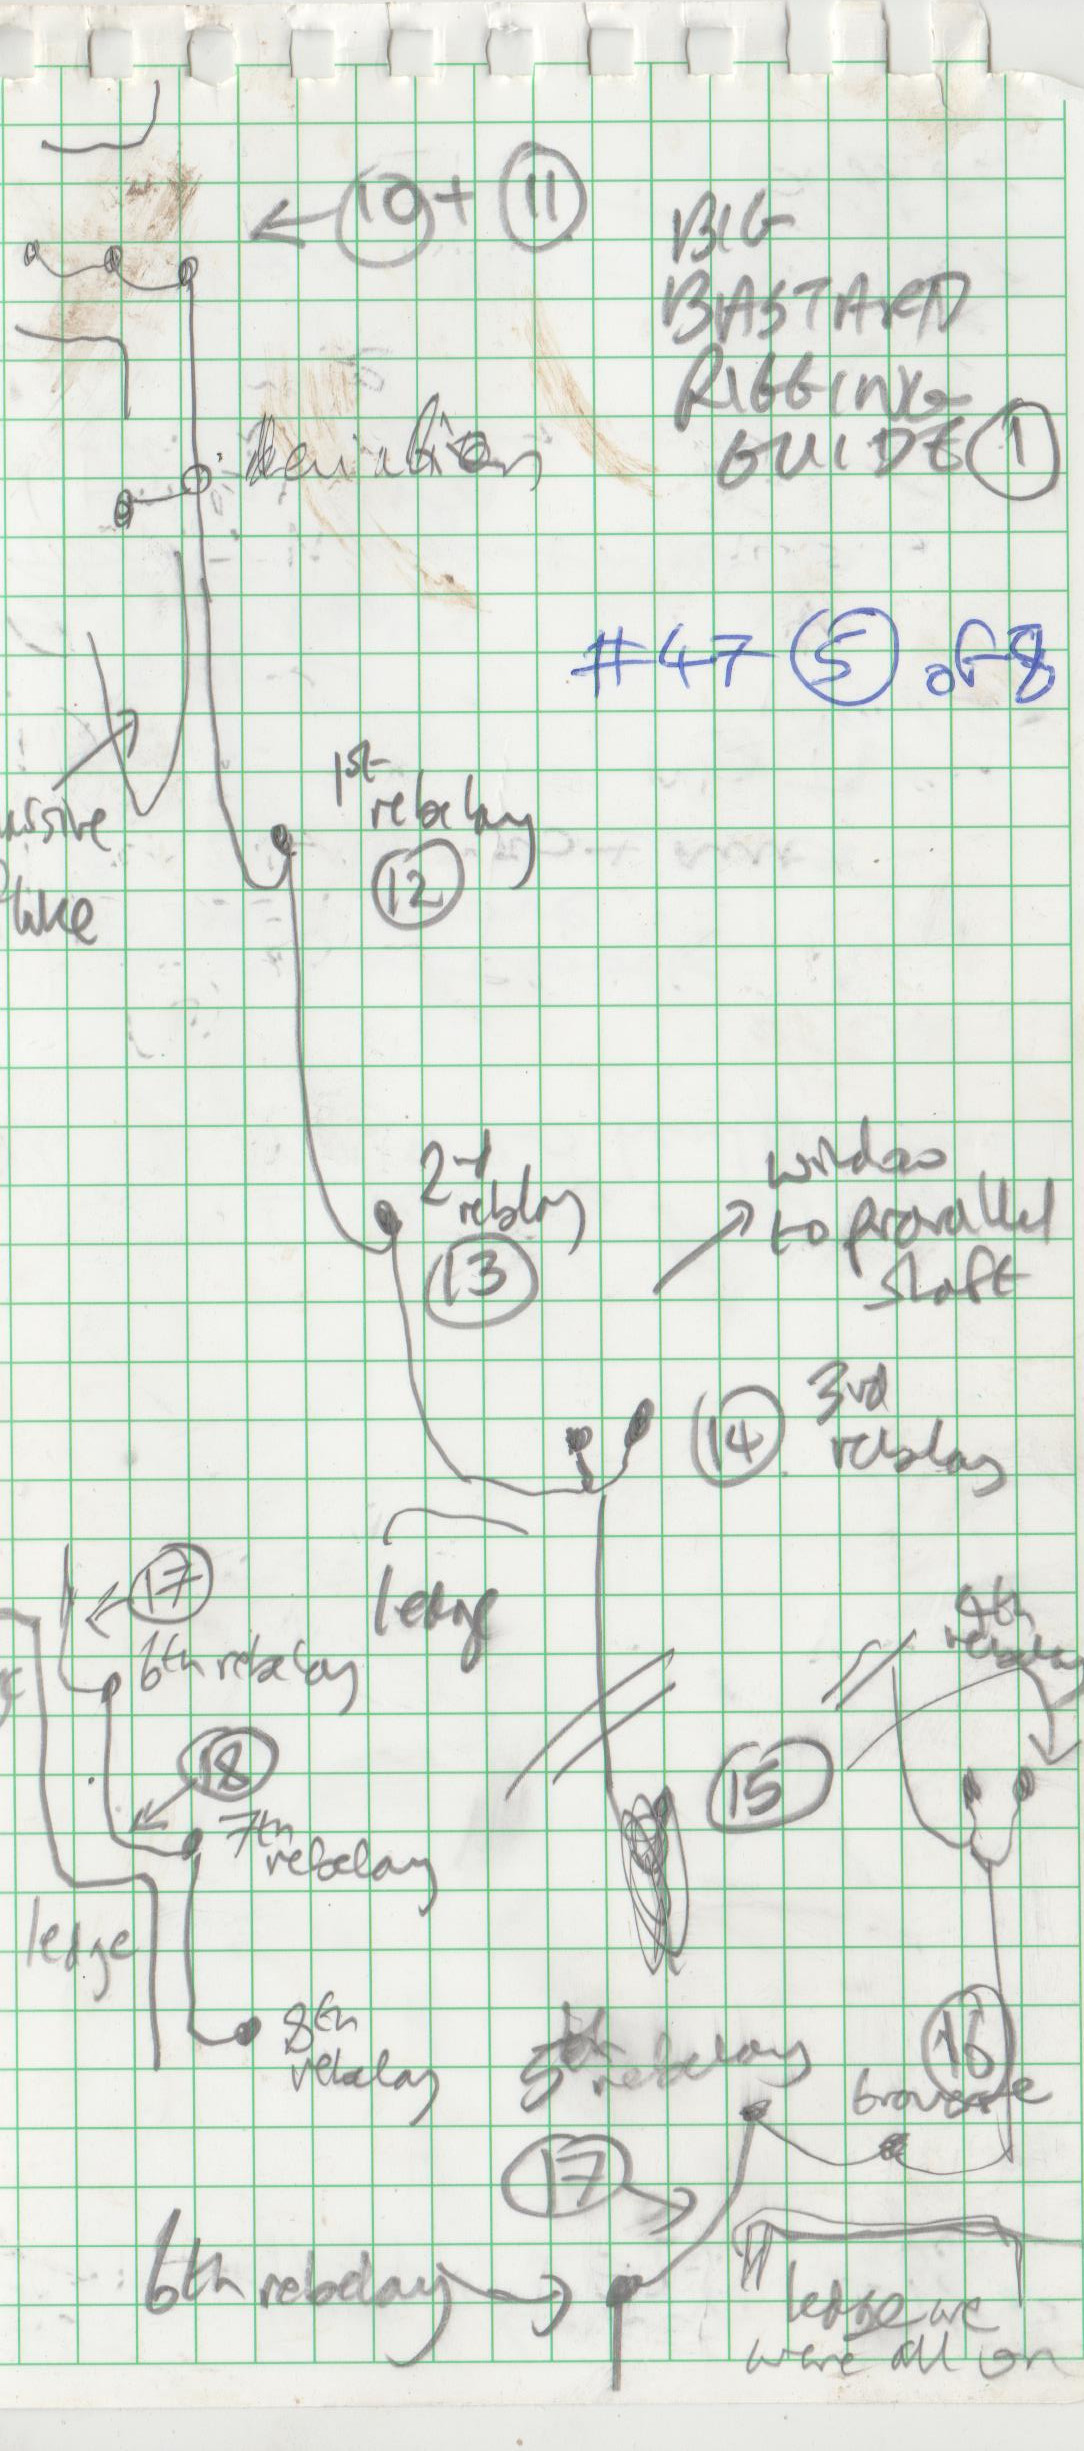
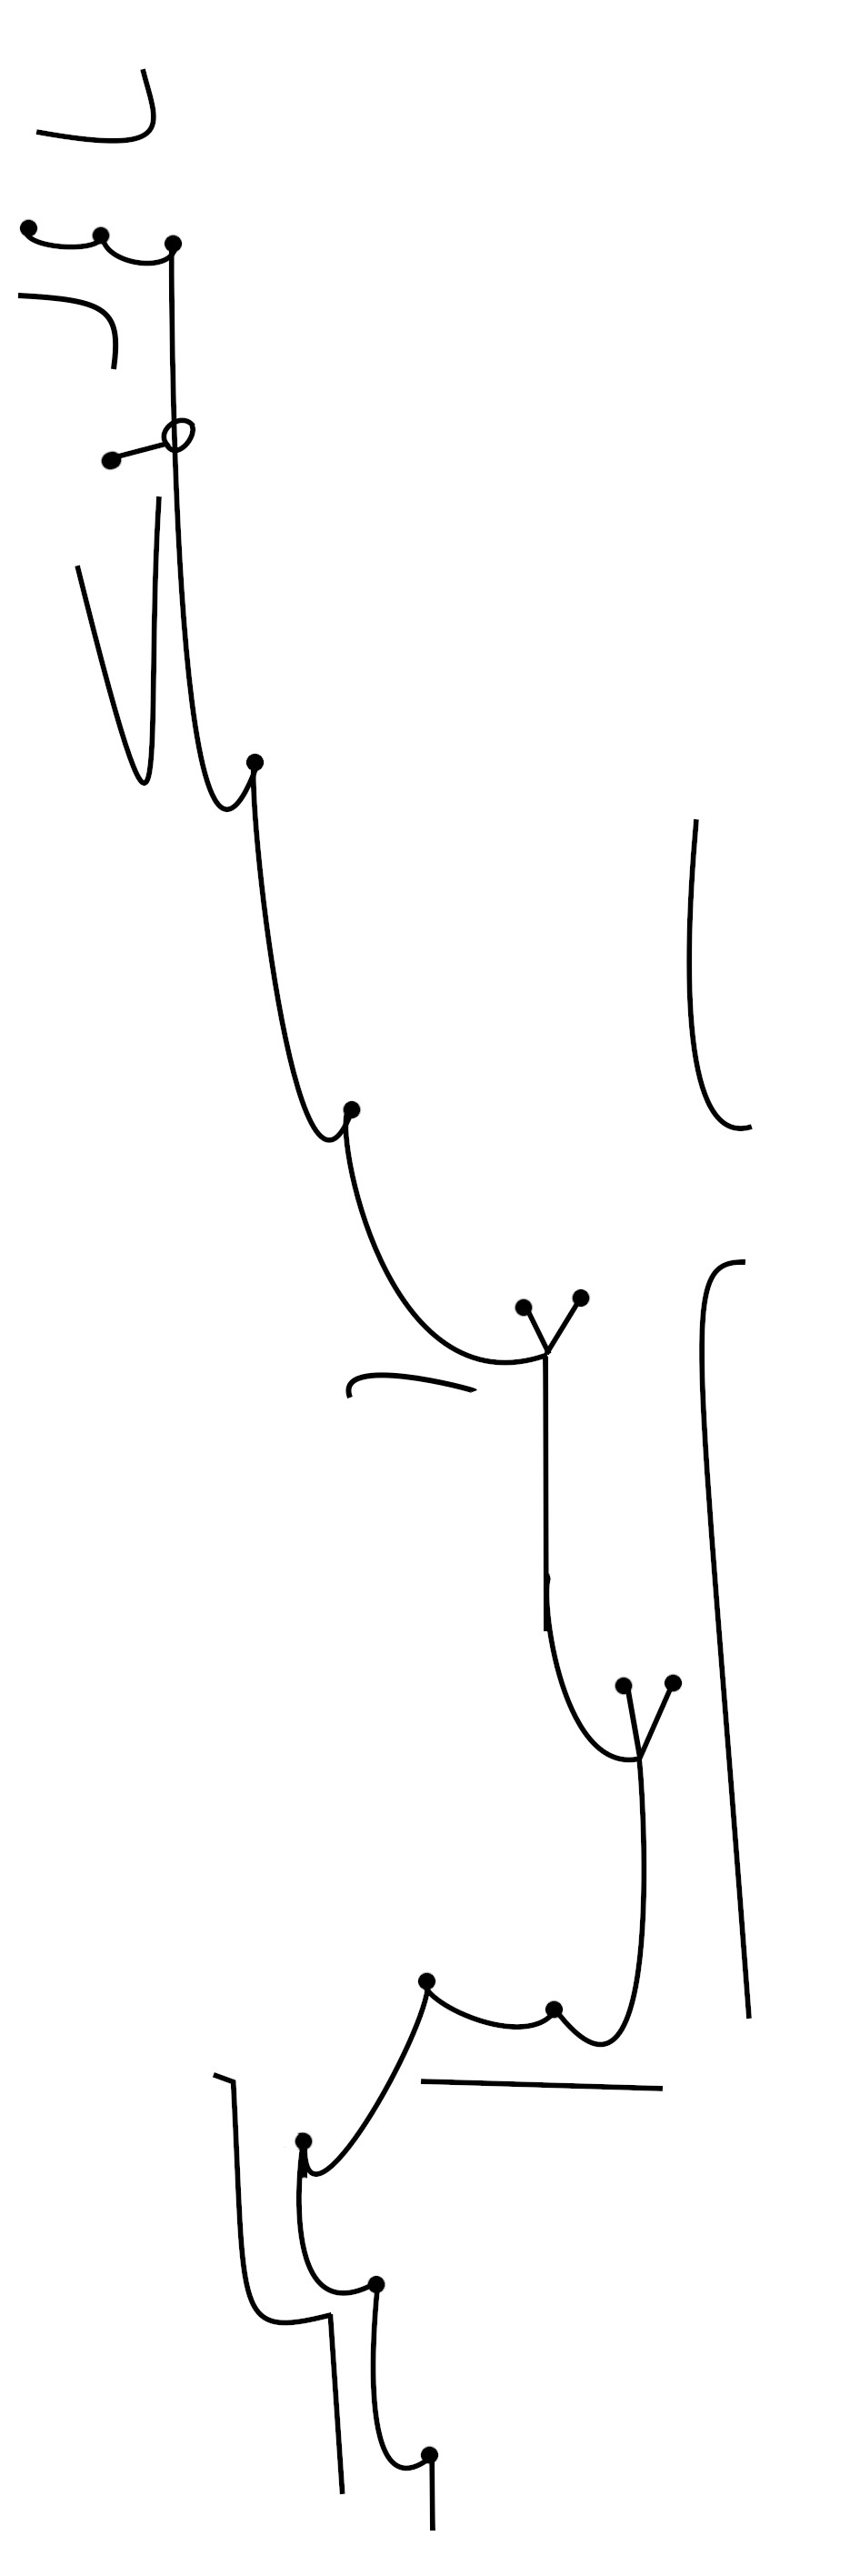
QM page for 1623-290Wallets: scanned survey notes
There are 73 wallets with data for this cave:2017#00 2017#29 2017#36 2017#38 2017#46 2017#48 2017#50 2017#53 2018#05 2018#06 2018#19 2018#20 2018#27 2018#28 2018#30 2018#31 2018#32 2018#34 2018#49 2018#57 2018#59 2022#05 2022#06 2022#07 2022#12 2022#13 2022#14 2022#15 2022#16 2022#22 2022#24 2022#25 2022#26 2022#27 2022#28 2022#29 2022#30 2022#33 2022#34 2022#38 2022#40 2022#41 2022#43 2022#44 2022#47 2022#49 2023#02 2023#04 2023#06 2023#07 2023#08 2023#16 2023#18 2023#19 2023#20 2023#45 2023#50 2023#54 2023#55 2023#58 2023#59 2023#60 2023#61 2023#62 2023#63 2023#66 2023#67 2023#68 2023#71 2023#72 2023#74 2023#75 2023#78