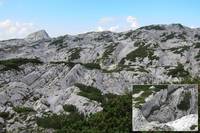
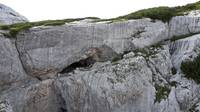
Surveys and Rigging Guides
Survey of only mid level of Balkonhoehle after 2024 Expo
- Survey of only upper levels of Tunnockschacht and Balkonhoehle - [do NOT use this]. (Tidied up before splitting upper 258 and 264 in Dec 2024.)
- Survey of mid-level and low-level only after 2022 Expo
- Survey after 2017 Expo
- Survey after 2015 Expo
- Survey of just Hilti-a-plenty after 2015 Expo

Low resolution plan of mid-level only after 2024 Expo.
Access full resolution surveys by clicking links below
Below are older surveys for comparison
Underground Description
WARNING - Entrance pitch floods dangerously in wet weather, particularly the lower section of the longest drop - wait at the bottom until it is safe to ascend. A bivvy bag, food and a brew kit should be left at the bottom of the entrance pitch!
The PT01 etc points and the RIG01 etc rigging locations are noted on the survey to make it easy to match up the survey to the description. The description could be added to the survey so they can be kept updated together and - more importantly - so they can be used together. Ditto the rigging guides.
_____________________________________________________________
Abbreviations:
R = right; L = left;
PT = point; RIG = rigging;
p = pitch (e.g., p30 = 30m pitch)
N = north, S = south, E = east, W = west
QM or ? = 'question mark' i.e. an open, unexplored lead
_______________________________________________________________
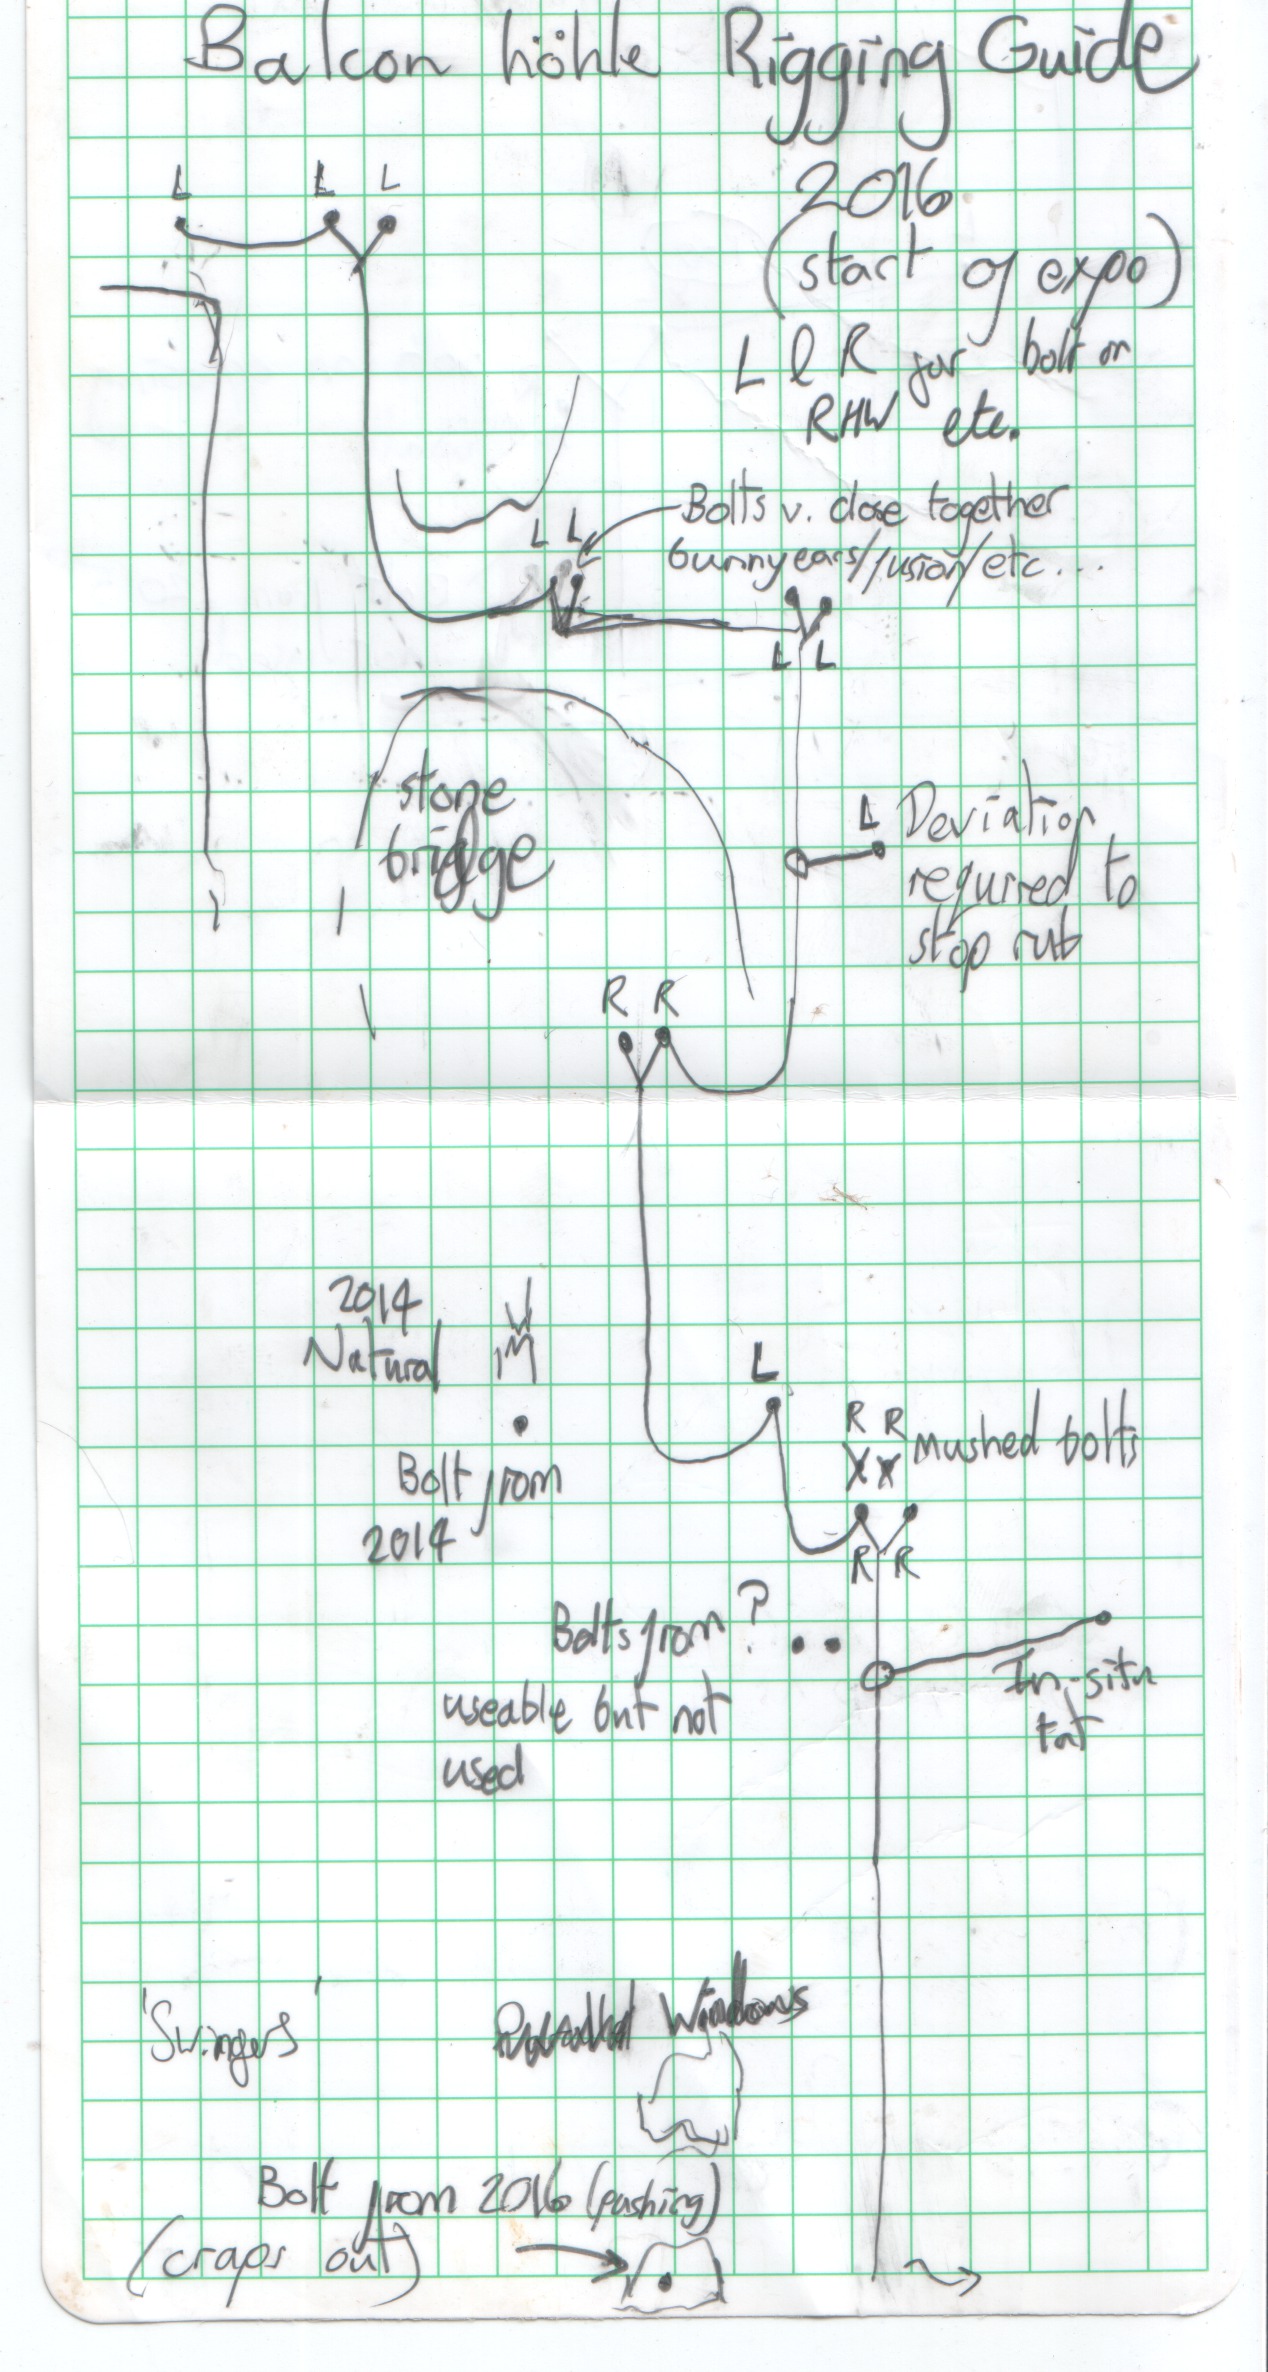
From upslope above the entrance, descend a c6 (RIG01 - 15m, 1 bunde backup, 1 top hanger, 1 rebelay hanger ... needs another hanger at the top to make top-out easier) using a handline to reach a large ledge.
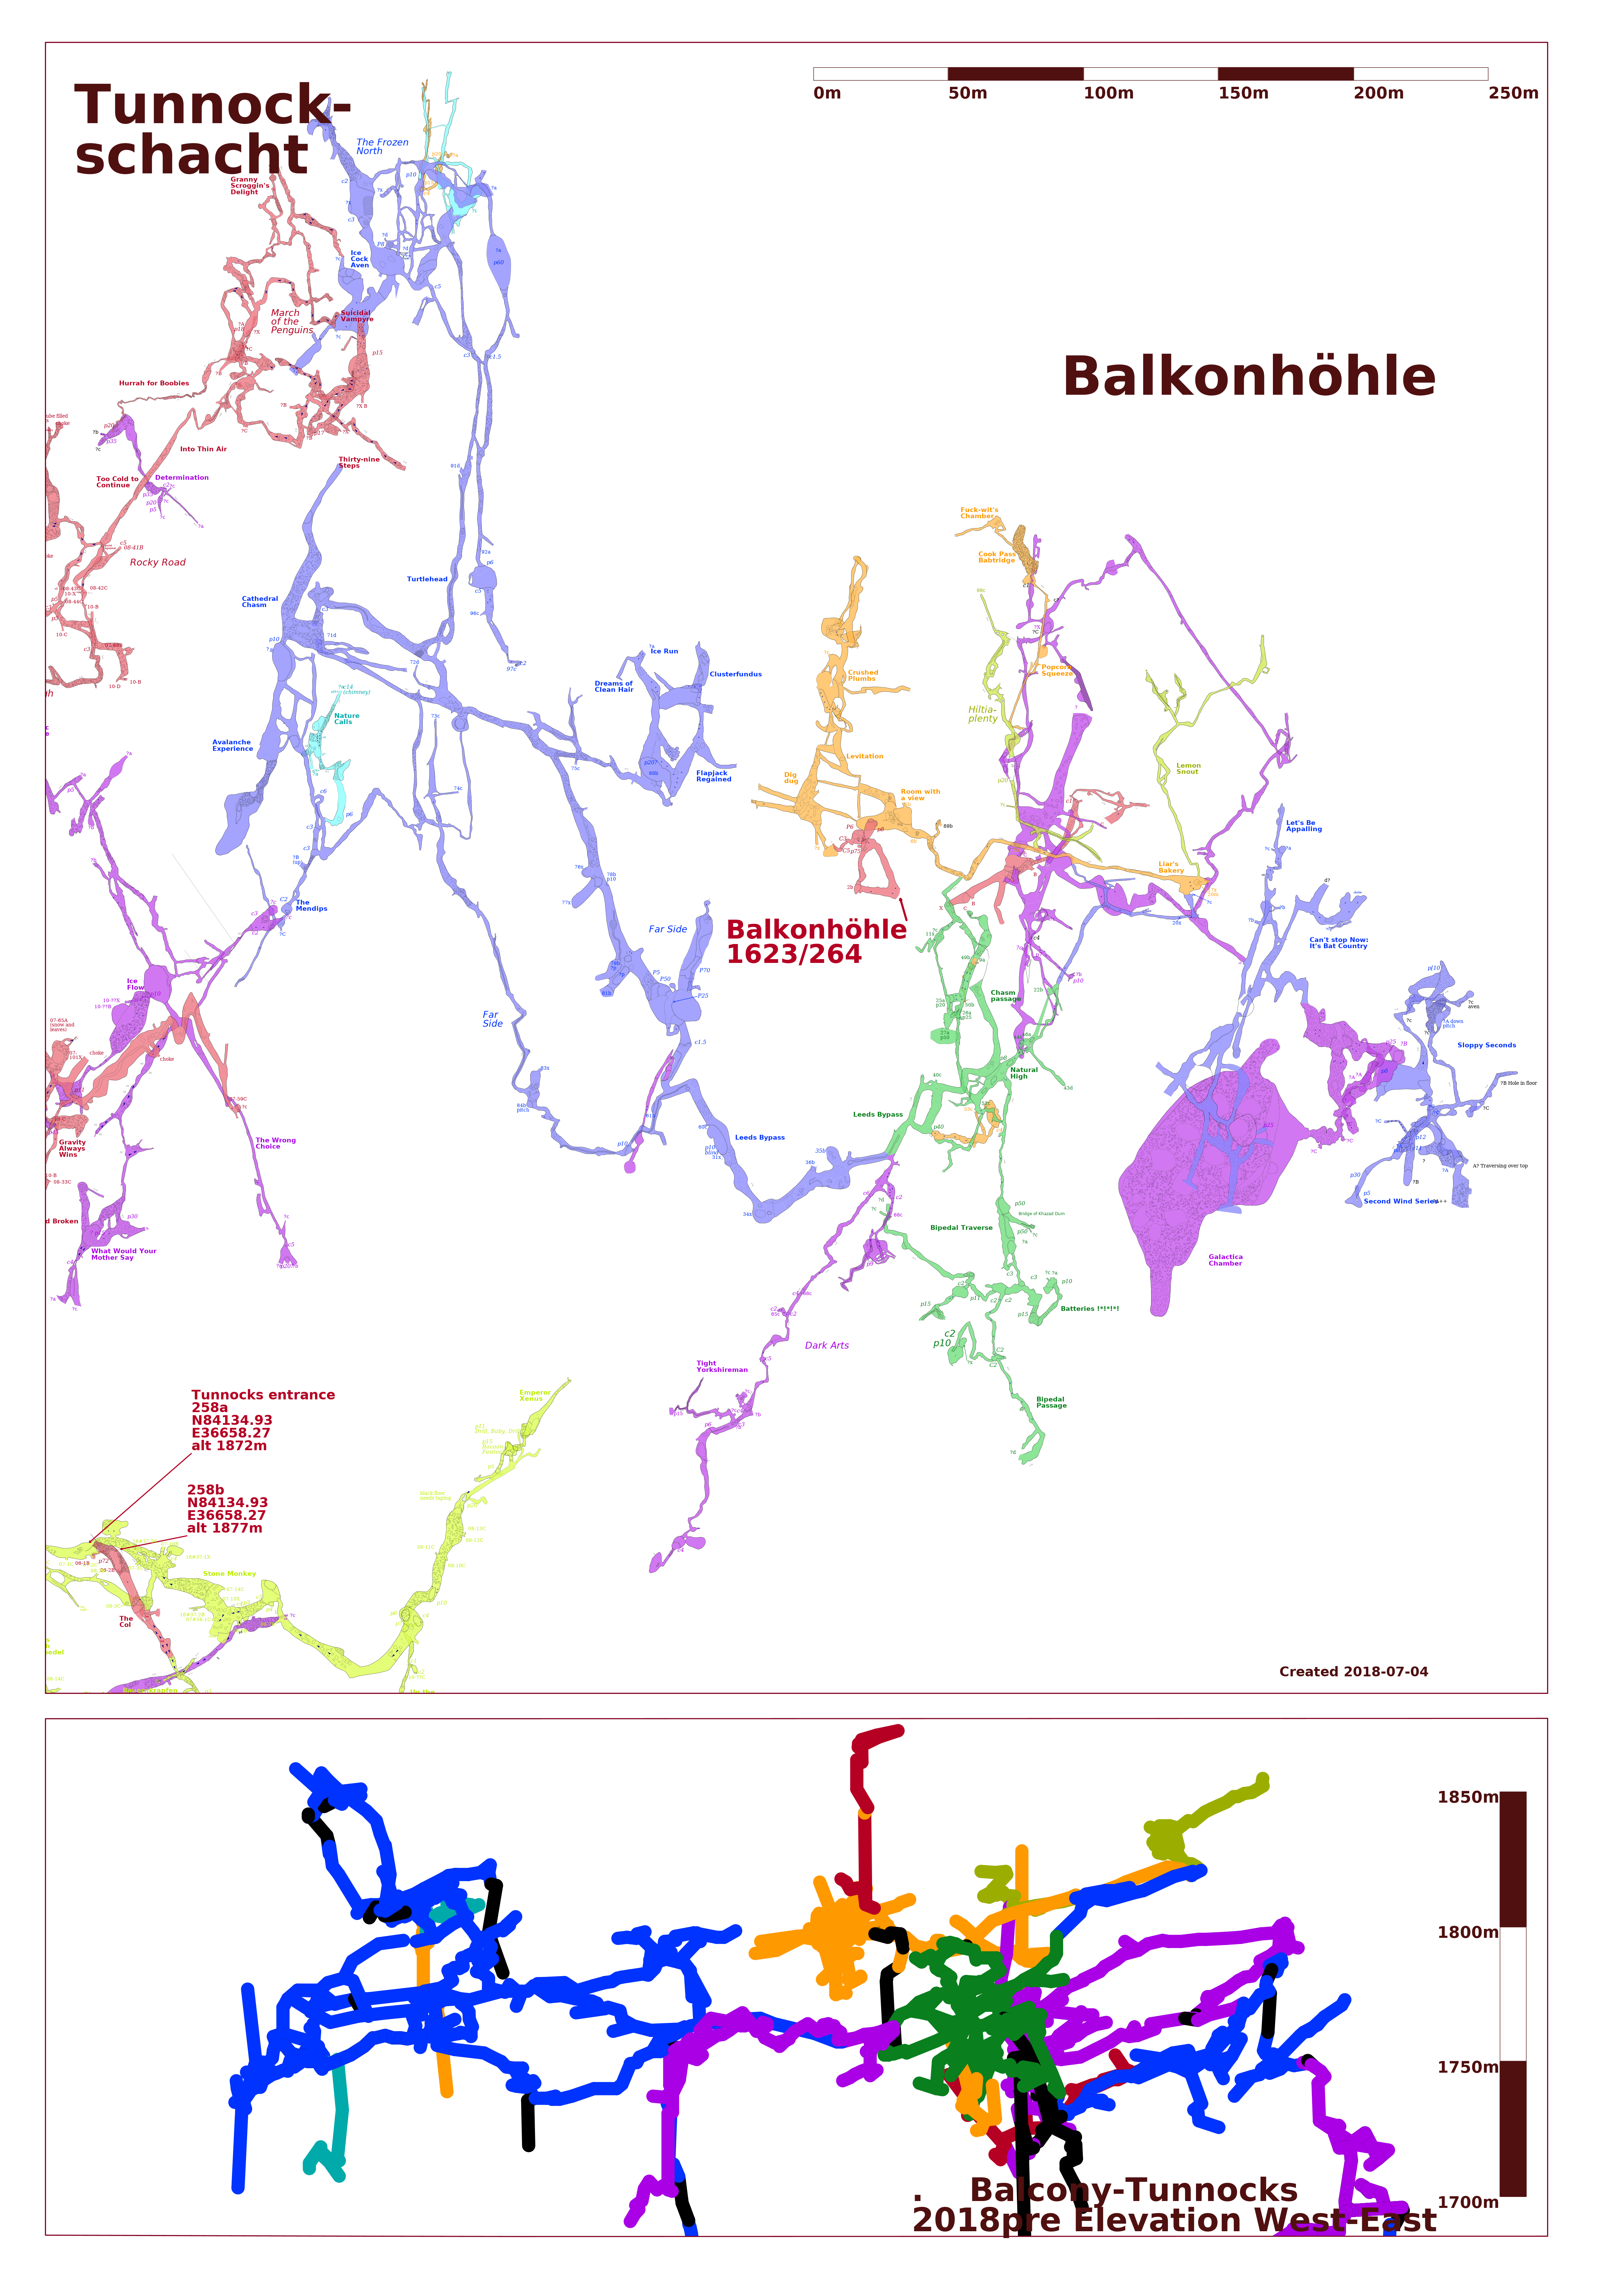
1 Upper series of Balkonhöhle (see "264-upper-balkon-only" survey)
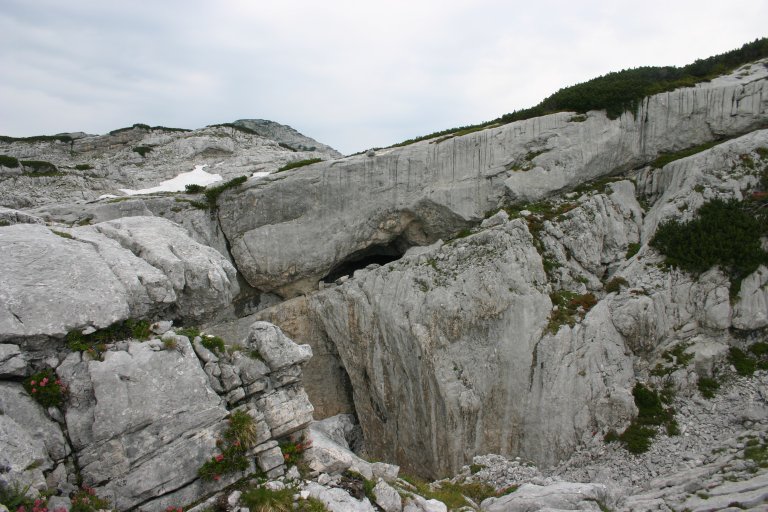
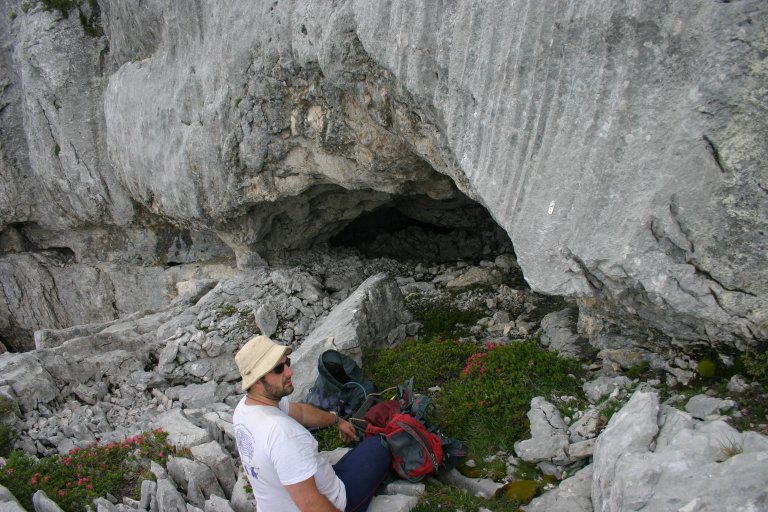
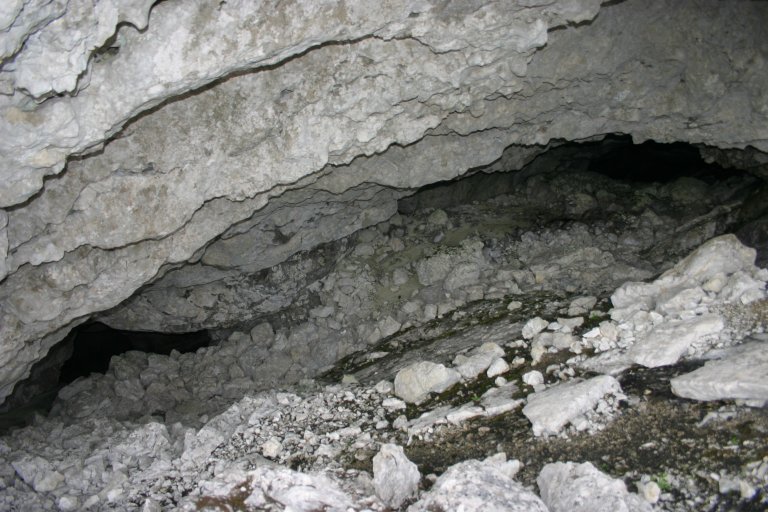
Entrance series
From the entrance (roomy and dry enough to leave surface gear), take the larger, R stooping passage (L passage runs parallel to this and re-joins at the entrance pitch) to reach the entrance pitch series (RIG02 - see rigging guide). This starts as a short, sloping drop which lands at a bridge. From here a second short drop reaches 2 ledges in a much larger shaft. Below these ledges traverse out to the longest hang, ignoring various old anchors that take you the wrong way. This longest hang is always wet and responds rapidly to rain, quickly becoming unpleasant and it can be impassable. This drops down with a deviation (not located in 2024 - it would be good to add a bolted deviation) to a large, loose, drippy ledge. Traverse out to the final short drop to reach a spacious chamber at the bottom of the entrance pitch series called Room With A View. An emergency dump - bothy, stove, food, etc. - should be left here in case returning cavers find the entrance pitch series too wet to ascend.
Three passages off to the N of Room With A View lead to Levitation and Crushed Plumbs, see separate description below. From the base of the pitch go to the high point of the chamber then descend to the far side along the R wall of the chamber, past some large boulders, The small passage leading down the boulder slope back under the pitch leads to the DigDug area, see separate description.
Levitation, Dig Dug and Crushed Plumbs
[Description needed to Crushed Plumbs area].
From the Entrance Series to the Natural Highs Traverse
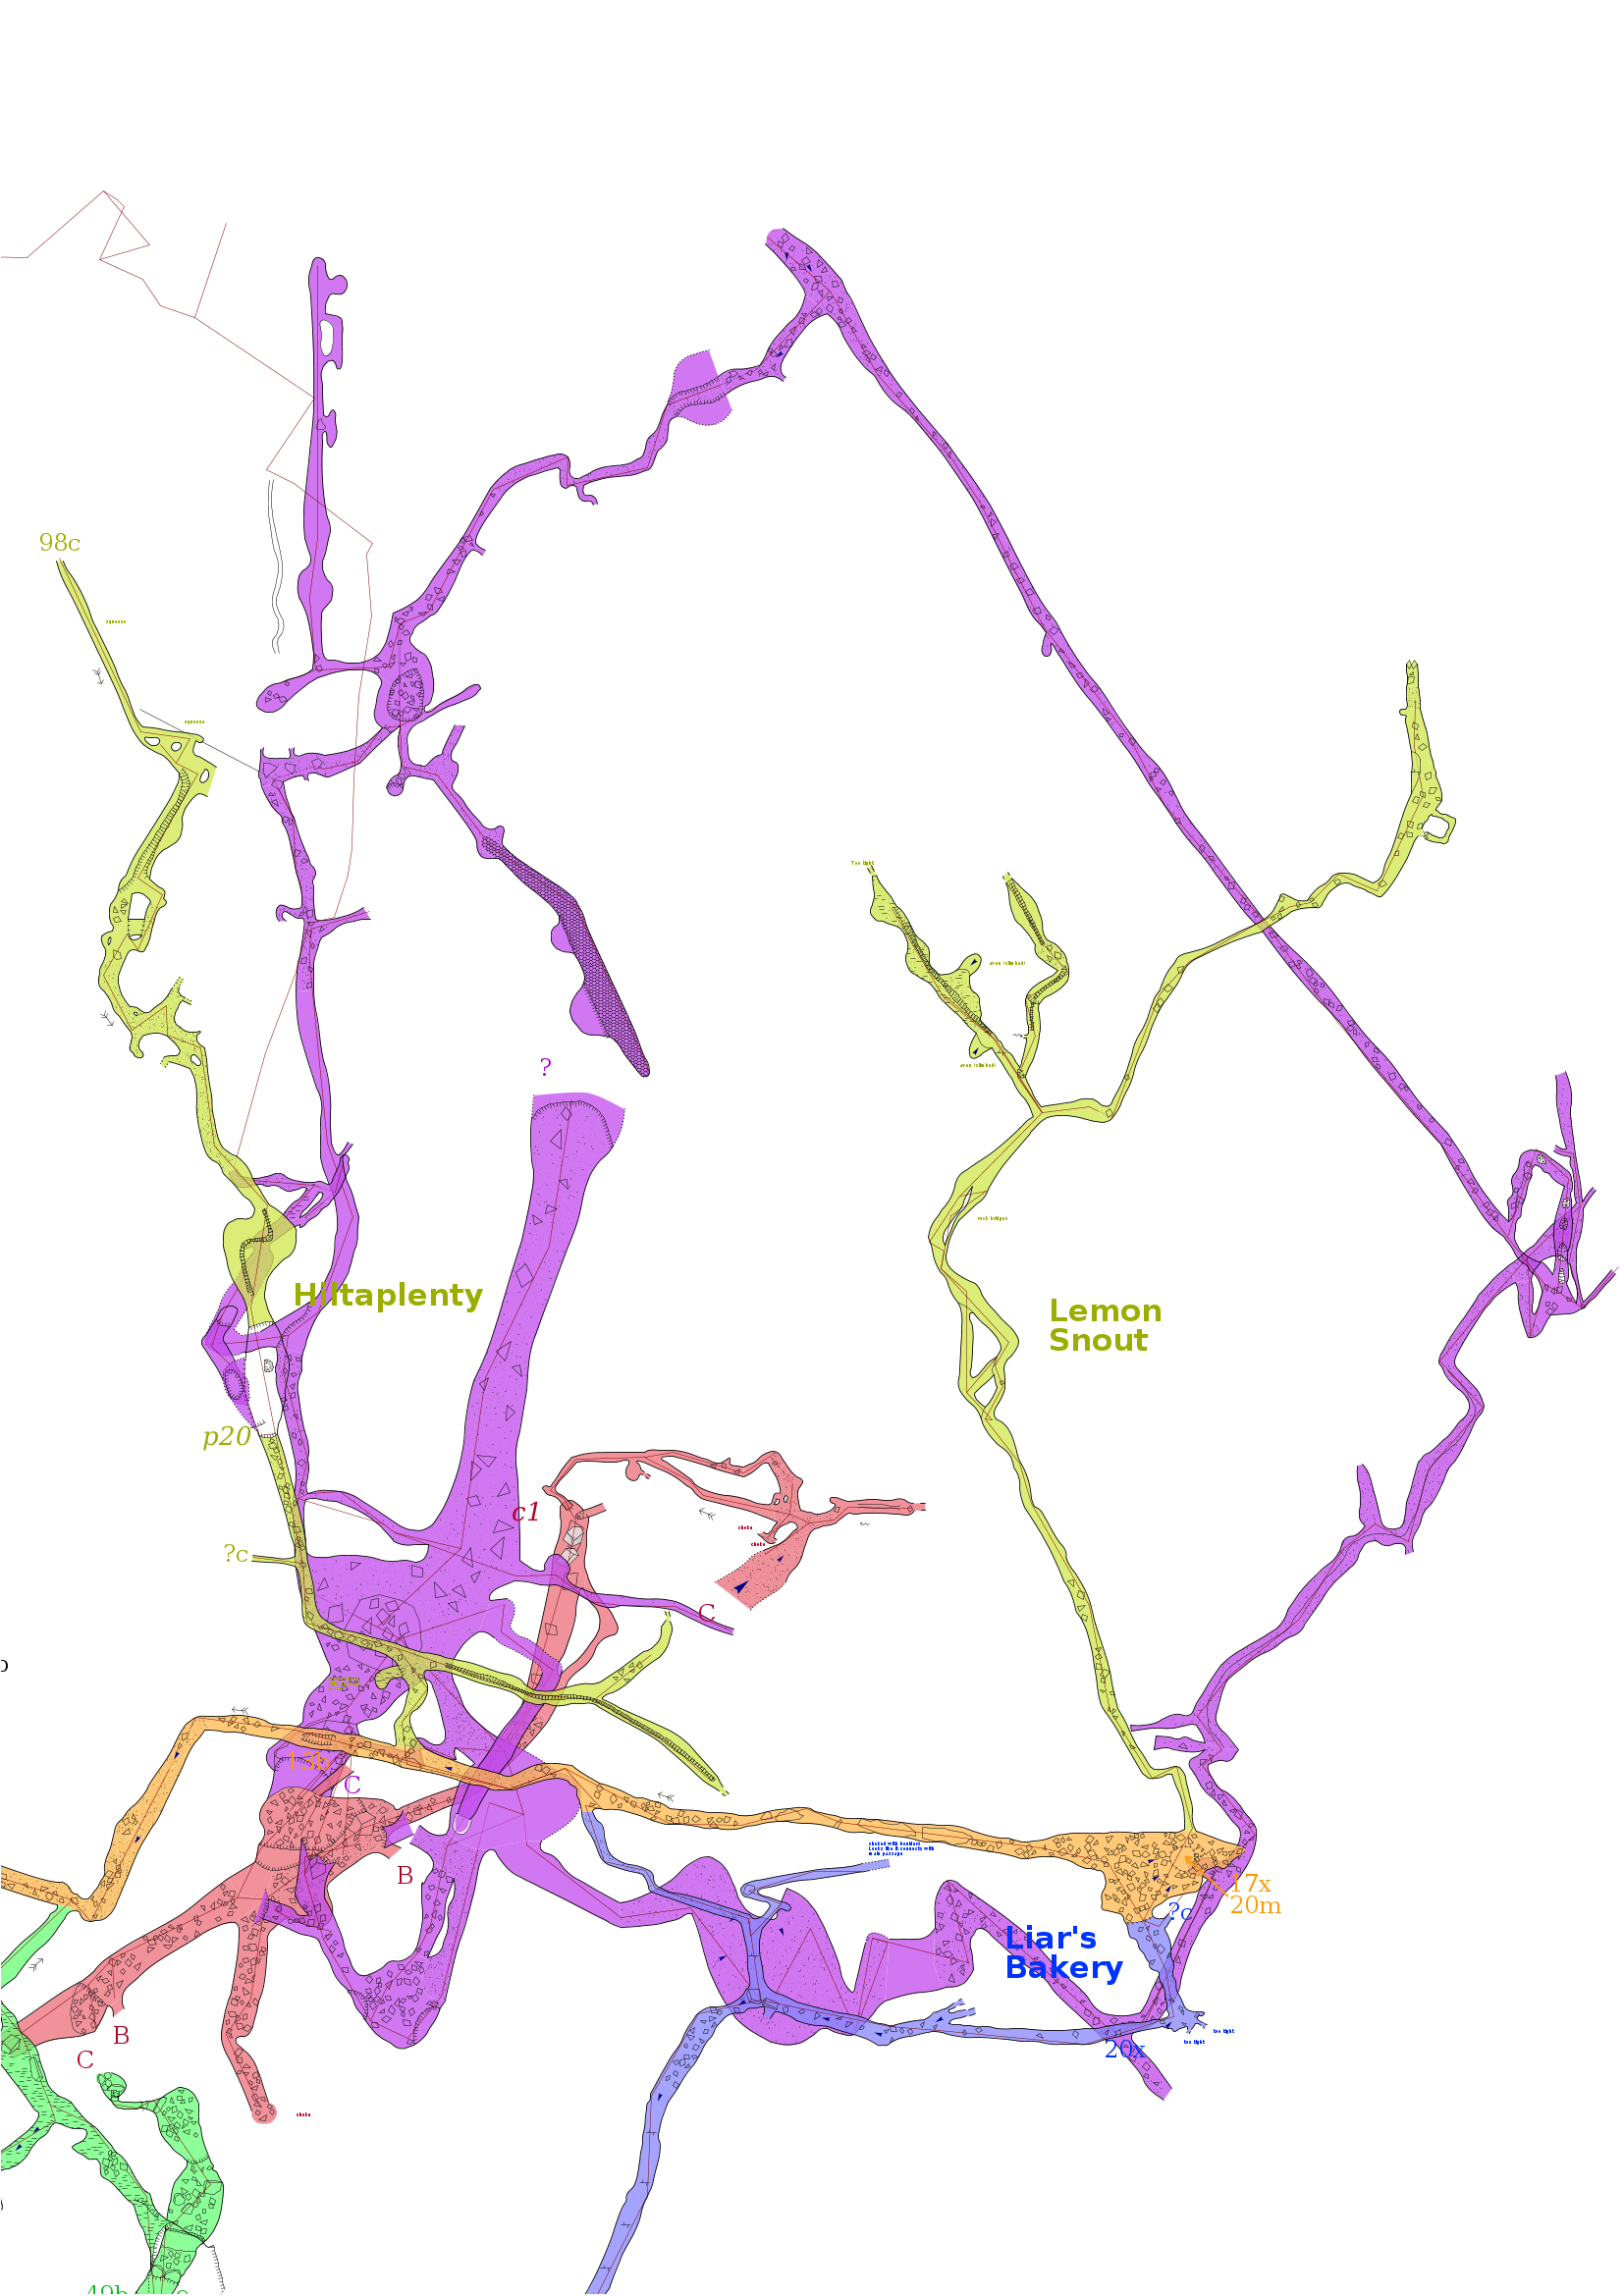
On leaving a Room With A View enter walking passage. The first R leads to Chasm Passage and a pitch head at PT01. Next, just beyond an obvious blind 10m hole in the floor, a small crawl on the L enters Hiltiaplenty. This leads to an extensive series of horizontal passages and pitches and a huge chamber, Galactica; see separate section below].
Hiltiaplenty area and Galactica chamber
Keep walking upwards to soon reach the unobvious 2nd R which is a short-cut.
Continuing along up the main passage leads over boulders to a modest chamber, Liar's Bakery, with water splashing down from an aven in the far corner. The obvious continuation is through a low wide archway on the R which then loops round right to eventually meet the end of the short-cut, at PT02); Lemon Snout is a passage that leads N from the L wall of Liar's Bakery up a short free climb. A bolt and a thread on either side of the opening can be used to rig a hand line).
The 2nd R short-cut is a small, low passage which immediately leads to a short crawl then regains walking passage and quickly reaches a junction at PT02. Turn R here - L leads to Liar's Bakery - and descend a rift made super-slippery by the passage of many cavers. This has a long hand-line rigged on it to prevent slipping.
At the bottom a c2 down soon leads to the Natural Highs traverse (RIG03 - 30m?, 4 slings?, 2 hangers?); named as it was originally rigged solely using naturals. This traverses along the R wall over a series of pits. At a bridge before the final pit ascend a c4 on the R, either as a straightforward free climb with good holds or a rope can be rigged from anchors high on the R. These anchors are in the sandy Chasm Passage on the R. This stomps uphill for a short distance to reach a ledge to a big pitch the far side of which is PT01; The pitch has probably been descended but this needs checking. Continuing along the traverse beyond the end of the Natural Highs traverse leads to Bipedal Traverse and Bipedal Passage, see separate section below.
Liar's Bakery to Lemon Snout
Lemon Snout goes North off Liar's Bakery. Appears as a tall, narrow rift passage with a rocky floor. A short way in the passage turns sharply left then right, with an awkward boulder to scramble around on the second corner. The rift continues sloping gently upward, after a short while the floor drops about a meter and it is advisable to continue by traversing on the obvious footholds. The rift traverse turns right above a hole in the lower level which is large enough to crawl into, but only connects back to the main rift in two other places. Meanwhile, the main traverse curves back left and lowers to meet the floor. After this a pair of smoothed rock bridges cut the passage in two vertically, they can be climbed from between the two but not from the outside. After the bridges the passage forks, with the larger route heading left, and the right-hand route dead-ending after about 50m. A hole on the left route floor shortly after leads steeply down, but doesn't continue. Avoiding this you come to a slightly wider chamber with a cracked black mud floor, and then the rift closes up.
Bipedal traverse and Bipedal passage
Description needed to Bipedal Passage area.
From the Natural Highs traverse to the Water Source Traverse
Turning left after the c4 beyond the Natural Highs traverse enters the roomy Leeds Bypass passage - named as the team exploring it heard a team of ULSA cavers who they had overtaken and who were rigging in from P01 coming towards them. Leeds Bypass is a mud-floored phreatic passage which soon divides. R is taped off to protect mud formations. Go L and after a few metres, at the next junction, turn R. ( here soon reaches a p40 and ????; a small passage on the far side of the top of the p40 loops back round to the end of the Natural Highs traverse. A third junction follows almost immediately. Here go L R here is the other end of the taped off passage. Descend steeply on slippy, smooth rock. Two modest holes on the L wall of this slippy section lead to the Dark Arts, see separate section below. At the bottom go past a hole on the R, QM35 and QM36, have these been checked?, taking the L passage.
Dark Arts and Tight Yorkshireman
Proper description needed to Dark Arts area. The main stretch of the Dark Arts in tall and narrow. It includes an up pitch and is a combination of stooping, crawling climbing. This section has been thoroughly tidied up. Probably do not return. From Fleur: Leads still remain here including a large, drippy pitch at the far, SE end and a p15 at the S end of Tight Yorkshireman. Becka: there's also a dodgy bit of survey in this section.
Continue along the L passage to descend a c2, go through a short rift section and a short crawl to soon reach the Water Source traverse[I'm not sure if this is right - anyone remember between Leeds Bypass and the 2nd traverse?]. The waterfall on the L at the start of this 2nd traverse is a good place to drink and to check water levels - these are high if the spout below the pool is a single wide sheet, progressively lower if 3, 2 or just 1 spouts. It was also used in 2023 and 2024 to wash and store rope.[This water and the traverse isn't marked on the survey, it should be]. Water Source traverse (RIG04 - 30m?, 7 hangers?, 2 slings?) follows a large ledge on the R wall past 2 long holes to reach a phreatic tube requiring a brief stoop or crawl.
From the Water Source Traverse to the Trident
The phreatic tube at the end of the Water Source traverse immediately leads to a junction at PT03. A major passage, the Far Side, leads off on the R here that goes to the Flapjack Regained area, see separate section below.
Far Side and Flapjack Regained area
Leave the main route immediately after the end of the Water Source traverse at PT03. Description missing from here (though the p59 survey looks like it descends here, right by PT03, and links back to the bottom of RIG05). Also from the survey it looks easier to get to Flapjack regained by going to the Trident then looping back around via PT04.
At the junction at PT03 the main route goes L to a c2 down into a short rift that soon reaches a p6 (RIG05 - 18m?, 5 hangers? Awkwardly rigged, could be improved). This drops to a large ledge (the pitch continues below here, wet. This pitch probably connects to the p56 by PT03 described in the Far Side section). From the ledge turn R to follow the rift down to a c2. Descend this and follow varied passage (note the level traversed at in the rift for the return) to a chamber with a water inlet then past a run-in of distinctive, white stones then to a small chamber with a pit on the L (this is still a QM and is undescended I believe). At the pit, take the c3 up through a window on the R of the central pillar and climb over boulders (care - the boulders may be loose, use the worn route; do not climb direct, to the L of the pillar). At the top turn L. R leads steeply up to the base of a climb, Backslash, QM83X. This ascends a steeply sloping aven. The climb was started in 2019 by Radost and Crossley and is still going. It lacks a centreline or survey. From here follow easy, ascending walking passage for ~100m to reach a distinctive four way junction, the Trident, with a prominent survey station 34 painted on it.
From the Trident there are 2 main routes, described separately below. Both start by turning left. After just 4m an obscure crawl on the left leads to Hangman's Pitch and the only connection from this upper level of Balkonhöhle to the rest of mid-level and low-level Balkonhöhle see below. Continuing on the main left from the Trident (or on the right) leads N to the remaining upper levels of Balkonhöhle
N from the Trident to the upper connection to Tunnockschacht via Ice Cock Aven
At the Trident turn L.
.Straight ahead at the Trident passes QM74C then ends at QM73C. R leads to a CHECK chamber with a deep hole which cannot be traversed without rigging???? CHECK. Beyond this hole is the complex chamber at PT04, where the main route (ie going L at the Trident) comes in from the L (W)and then the main route continues up a climb to the N whilst the passage to the R leads E then S back towards the entrance, eventually looping back to PT03 via Flapjack Regained and the Far Side).
From the L at the Trident it is just 4m to PT05.
Here, at PT05, an obscure L turn leads to Honeycomb Pitch via a short, flat-out crawl. This is the only route to the lowest levels of Balkonhöhle, see separate section.
The main route to the remaining upper horizontal passages of Balkonhöhle, to the north, continues past PT05, curving R until it reaches a T junction. L at the T junction quickly leads to a complex junction. From this complex junction heading L (to the S) leads to a wet pitch at Cathedral Chasm and this eventually connects back around SE to PT05 via Avalanche Experience and the Mendips; R, to the N connects back to the main route at PT06 at the start of Turtlehead; a further R - a few metres W of the 1st R - heads N for some distance then ends at what? No QM?.
R at the T junction quickly reaches PT04 at a chamber with 5 routes off. R, to the S, is the end of the route from turning R at the Trident, described above. Ahead, to the E, is the route into Flapjack Regained and the Far Side described in a separate section. The main route involves a c4 up the L wall of the chamber at PT04 then continues straight north past PT06 and along Turtlehead. The 1st L ends in a dig. The 5th route is the way you have come from. At PT06, ignore the left that leads back around to Cathedral Chasm.
Further N along Turtlehead, past PT06, the 1st R and 2nd R both lead to the same passage running parallel to Turtlehead. Both passages eventually connect to Ice Cock aven (named after a priapic ice stal, knocked over on original exploration) and the Frozen North, named due to the ice floor and snow slopes that suggest a nearby entrance that has, to date, remained elusive. The first connection made between 1623/264 Balkonhöhle and 1623/258 Tunnockschact came in down Ice Cock Aven, connecting it to the March of the Penguins area of Tunnockschacht. This area is complex and involves a maze of interconnected passages at various levels and interspersed with pitches. There may be plenty of leads remaining here and it should only take 1-2 hours to reach this area from the entrance to Balkonhöhle.
2 Mid-level Balkonhöhle (see "264-mid-balkon" survey)
From Trident to below Hangman's Pitch
To reach the lower areas of Balkonhöhle take an obscure L turn at PT05, around 4m along the L branch at the Trident. This leads immediately to a short, flat out crawl then, after <10m, it returns to walking passage. Honeycomb Pitch is now very close - go past 3 dead bats, each marked with red/white conservation tape, the first 2 on a slope down then turn sharply back on yourself to the R and ascend past the 3rd dead bat (there is a maze of climbs and interconnected passages in this area) to a small chamber. Ahead soon reaches a wet pitch, the far side of which eventually reaches P04 via Cathedral Chasm. This was the original route in to this area.
Take a well hidden R turn in this small chamber to immediately reach a short traverse on the L wall to the head of Honeycomb Pitch (RIG06 - see rigging guide; named after the abundance of golden dogtooth crystals). A short descent to a bridge leads to the main hang with several rebelays to a final wide Y-hang rebelay then a swing into a prominent ledge around 10m above the blind base of the pitch.
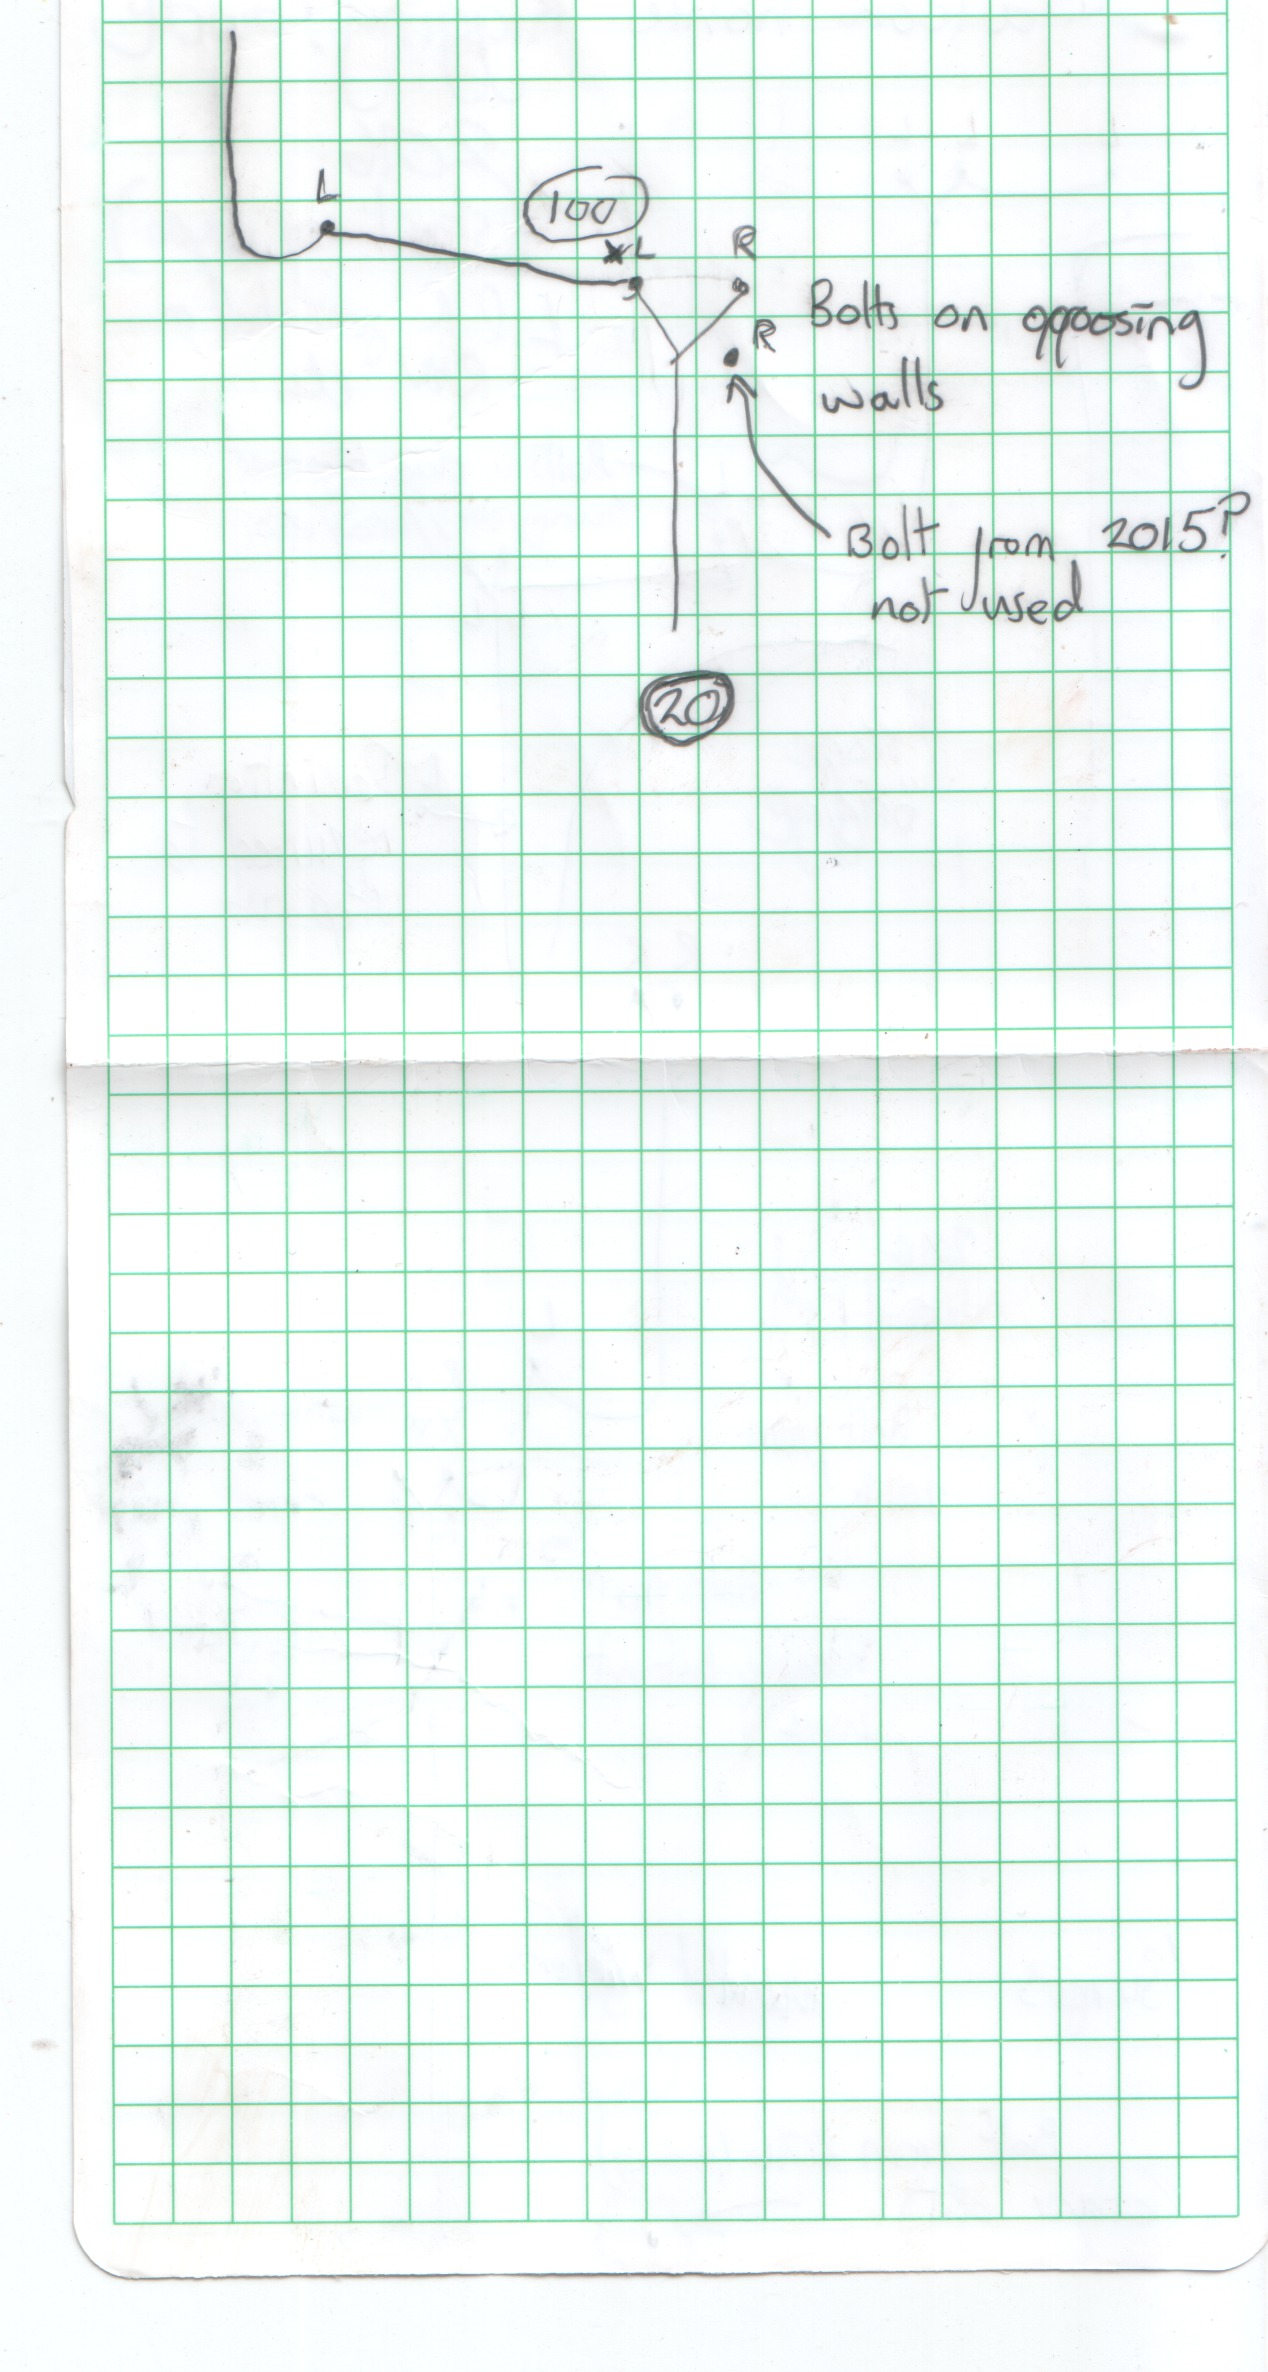
Take the tube off to the L from the ledge then go up an easy c3 to a p6 (RIG07 - natural and 2 hangers?, 12m?). Stay on the R wall (descending to the base of the chamber below the pitch leads to a narrow crawl. This soon opens up to a large, undescended pitch with the sound of water, QMA, p20?) and ascend a loose c4 (RIG08 - 2 hangers at top and 10m?). Descend along the R wall (with a QMC to an undescended pitch, p11?, on L side) then continue to follow the R wall of the rift as holes appear in the floor. A short traverse then a constricted, short drop with deviations down the final hole in the rift (this was free climbed in 2017 when it was surveyed) drops onto to a large ledge. This ledge is the start of a p40, Hangman's pitch (RIG09 - see rigging guide; Hangman's pitch is named after the monstrous boulder perched above the main hang. Climbing onto this boulder leads to Myopia, described in a separate section below). The roomy ledge has a stream cutting below. From here the main drop of Hangman's descends from the R wall via a rebelay and a deviation to reach a bouldery floor. The pitch down continues below the boulders but it sounds unenticingly wet; it is still a QMB.
Myopia
Climbing on top of the monstrous boulder above the main hang of Hangman's pitch lets you reach the far wall. From here, a short drop down (RIG09-01, see rigging guide) lets you descend a few metres and then swing into a window in the main pitch that leads to large, horizontal passage. This is called Myopia named as one of the original explorers repeatedly failed to notice it. This passage slopes up and is generally large with many loose boulders and huge amounts of dogstooth coating some rocks as well as some dead bats. It soon reaches the 1st Myopia traverse (RIG09-02, see rigging guide). This airy traverse follows the R wall past a large, undescended pitch (QMB 2018). The large passage continues to quickly reach the 2nd Myopia traverse (RIG09-03, see rigging guide). This was started but not finished in 2019 leaving QMC 2019 for the wet pitch below and QMB 2019 as the obvious passage continuing on the far side of the pitch that the next traverse needs to access.
Below Hangman's Pitch to the bottom of Mongol Rally
From the bouldery floor at the base of Hangman's pitch there is an easy, albeit loose traverse across the chamber on boulders (RIG10 - see rigging guide) along the L side (loose rocks fall down the large, undescended, wet sounding pitch on the R, QMB 2018, which is below Hangman's pitch). On reaching the far wall of the chamber turn R (L ascends Snail Trail (RIG10-01 - see rigging guide); this climbs steeply up loose boulders then soon ends) and go past the conservation tape protecting mud formations on the L wall. Using the in situ rope (RIG10-02 - see rigging guide), climb up a rock nose then a steep, muddy bank to enter a body-sized tube around 3m vertically above the taped-off mud formations.
Continuing the traverse rather than climbing up to the body-sized tube ascends to an obvious, large passage, Hangman's Daughter. This splits to two parallel passages that soon re-join then end at a small pitch down (RIG10-03 - see rigging guide). This drops into a small chamber with apparently no way on. However, the team exploring from Balkonhöhle spotted a well-placed survey station there and, after some scrutiny, spotted the tiny tube high on the SW wall that provided the 2nd connection made to Tunnockschacht, at Fecking Tight.
Entering the body-sized tube, wriggle through for a few metres. It is easier to drag large tacklesacks. The passage soon widens, stay on the L wall, and quickly reaches a p4 (RIG11 - see rigging guide). This drops to a large ledge with a slot down. Keep on rope to protect the walk along the ledge then up a muddy slope to reach the ledge at the top of Mongol Rally (~p197, RIG12 - see rigging guide; named after George and Luke saw cars on their ferry out to Expo that were heading out to do the Mongol Rally).
The upper part of Mongol Rally feels surprisingly friendly as it descends via numerous rebelays and 3 large ledges then 2 hanging rebelays to a rebelay at PT07. This requires a swing in to gain an obvious, large window that leads to an extensive, mostly horizontal level called Pitstop. PT07 is around 130m below the Mongol Rally pitch head and around 60m above the bottom of the pitch. Pitstop is described in a separate section below.
Below Pitstop, continue to descend around 50m further, past 2 rebelays, to a large ledge. From this ledge R leads W to a c3 down. At the base of the c3, R goes N to a wet pitch (with no QMs???) whilst L continues W into Floodland over fine mud banks in wide passage to a steeply descending mud slope down that needs protection (RIG12-01 - see rigging guide). Rigging from the R wall leads to an ongoing QMA maybe - this needs checking. A final short drop to the L (to the E) from the large ledge arrives at a huge, bouldery chamber. This is the bottom of Mongol Rally and the start of Grand Prix.
Pitstop and Turnback Time
The Pitstop area begins at PT07, at a large ledge which you can swing into from the main Mongol Rally pitch. At this ledge, straight ahead, to the E, soon closes down although on the survey this is marked as a p6 to a QMB so this needs checking . A traverse (RIG12-02 - see rigging guide) along the N wall leads to a large and obvious horizontal passage on the far side of the main Mongol Rally pitch, called Turnback Time. This goes up a c4 then bends left (ahead becomes too tight) and ends at two QMB 2018 undescended pits that are nearly above large, lower passages so they probably just drop in to them.
The main way on from PT07 is the short, stooping passage to the right (S) that soon opens up. Continuing ahead leads immediately to some deep, undescended pits, QMA 2018 and QMB 2018, that probably connect down to the large chamber at the base of Mongol Rally. Ignoring these, instead take the walking passage on the L. This ramps down steeply, zig zagging until it pops out at an obvious, important T-junction at PT20 with a significant stream entering from above. This is a good source of drinking water. At this PT20 T-junction, L enters Southern Pitstop and R goes to Northern Pitstop.
Southern Pitstop
Southern Pitstop begins as wide, horizontal, walking passage then, after a pool, it starts to slope steeply down. In 2024 a camp was set up on the left. It was muddy but reasonably comfortable for 4 people or 5 at a squash or with hammocks. The walking passage continues to a right turn where it descends more steeply then soon reaches an obvious junction at PT21. Here, L slopes up a muddy ramp with hundreds of bat bones - care - this should have a path marked with conservation tape. This passage ends at a pitch. Traversing over leads to a too tight rift with a draught and the sound of water whilst on the right over the pitch there is a QMB into a continuing rift that heads upwards.. The main way is to go R at the junction at PT21 and continue walking down to the Safe and Comfortable area. The passage initially descends steeply then enters a complex, open area with multiple interconnected streamways. The first main junction reached is on the right at PT22
The first R, at PT22, leads up to an aven then goes R and descends a rift. This ends at a small pitch requiring a p8 down then a p6 up to a sloped area above the rift Covid Corner, (RIG12-03; is there a rigging guide?).At Covid Corner the easiest way on is to the right where a small recessed area has a tricky and unobvious 4m climb up. Here, there is a junction. R leads to a passage ending in an undropped p7, QMA Is this correct? If really a QMA why hasn't it been dropped?. Left follows sloping mud banks before the passage turns sharply right and eventually reaching Tampon Turnaround . This is a complex chamber with an interconnected higher and lower section. To the left of the lower section is a short wide crawl downwards which ends in a perpandicular passage. To the left is a QMB crawl. The right passage becomes walking hight and continues, joining first a dry rift then a wet rift which emerges from the left wall (QMB). The passage eventually leads to a junction where both routes on quickly become impassable.
Continuing down the main passage from PT22 quickly reaches a tt slot where the water descends check this is correct . Shortly after this are passages R and L. R goes to a steep c5 up that leads to a continuing, unpushed climb, QM2018 B? but the survey instead suggests that it goes to an undescended pitch - needs checking . The L passage climbs up and soon reaches an undescended p15 which is a QM2018 B?.
Continuing straight ahead beyond this complex area soon reaches a T-junction at PT23 with a deep slot in the floor at the start of the Lipstick Dipstick area. Here, at the PT23 deep slot junction, L slopes up steeply to another junction. Here R quickly reaches another junction at PT24 whilst straight ahead quickly reaches a T junction at PT26. From PT26 there is QM2019 C lead going L and a QM2019 B lead going R.
R at the PT23 deep slot junction at the start of the Lipstick Dipstick requires rigging a series of alternating traverses and short drops (RIG12-04 - see rigging guide) to reach a large false floor with deep holes at PT25 (a L partway along leads to PT24 and in a loop back to PT23). At the false floor at PT25 the survey suggests that two undescended deep holes, QM2019 A and B, will connect to the Inferno pitch in Tunnockschact. There is also a climb above these pitches, QM2019 B, and another possible continuation above and beyond the pitches, QM2019 B.
Northern Pitstop
Northern Pitstop follows downstream in spacious walking passage (care to keep to the path) to enter a medium sized chamber (here, R is a QMA at a strongly drafting, wet pitch. This was explored but, unfortunately, neither surveyed or derigged in 2024, grrr ; L is a QMB up a sloping climb / aven). The main route continues opposite where you enter this chamber, down a c2. The easy walking passage passes a QMB climb on the L {does this exist? It's on the survey but maybe a mistake?} and another left that just leads to an aven and continues until it briefly lowers to a 3m crawl on mud. This opens up to a high sloping passage. Clamber up on the L and continue in easy walking passage to finally reach a bouldery ledge overlooking a medium sized chamber. A sneaky clamber between the boulders on the R (care, the one you climb over moves a bit) allows you to free climb down to the upper part of the chamber (there are aven QMs above the lower part of the chamber). The only exit to the chamber involves crossing it to the far, N wall and clambering down either of two nearby holes. Both holes drop a p6 to reach the same point (This pitch is awkward and needs a rigging guide, RIG12-05).
The p6 lands in Northern Powerhouse, a further section of horizontal passage. It begins with two parallel passages, both tight but the R is easier (the L passage has a QMB climb off on the L, though this may simply loop back to the chamber you have just come from). These two passages re-join and, shortly after, you arrive at a balcony looking out onto a large, wet pitch the small L descending passage immediately before the balcony soon ends whilst an easy-to-miss c4 on the R a few metres before the balcony leads to a second balcony which overlooks the same big pitch. This Northern Powerhouse pitch descends 50m - care, loose rocks - to a wet chamber. From this chamber a c10 leads to an aven.
The main way on from the balcony above the Northern Powerhouse pitch is to traverse (care, loose rocks) along the L wall then to ascend a short, awkward pitch (RIG12-06, see rigging guide) to reach the upper part of the chamber above the big pitch and the start of Medusa's Maze. This upper chamber was originally accessed by a climb on the R wall then a squeeze through loose boulders - not recommended. From this upper chamber a passage leads off the L wall to a pitch then to Gorgon's Lair - this is more easily reached via the main route, see below. The main passage continues W out of the chamber via a c5 down. This is easiest to descend by climbing past boulders on the R wall - a R here quickly loops back to the main passage further down. The main passage soon reaches a 4 way junction at PT30. Ahead quickly leads to a pitch, QM2019-B Is this really still an undescended QMB?. L enters a low, wide room, Gorgon's Lair, which has a draughting QMA on the far wall. The main route is R and this immediately goes to a T-junction. R here loops back to where you have come from. Go L and follow the main walking route, stepping over a small stream and ignoring minor R passages. Rest of the description to needs writing from here - Enthusiasm Chamber, Tartarus, Charon
2 Low-level Balkonhöhle and on to the deepest connection to Tunnockschact at Anthemusa (see "258plus264-lower-tunnbalkon" survey)
Base of Mongol Rally along Grand Prix to Little Boy Chamber
The massive chamber at the base of Mongol Rally seems only to have one way on, Grand Prix. This is reached by initially descending past huge boulders then traversing up R as the roof lowers and the walls close in. This passage soon reaches the p15 into Little Boy chamber (RIG13, see rigging guide). This pitch starts with a protected c2 down to a loose, muddy slope and then a vertical drop with a rebelay into a large, attractive round chamber. Little Boy chamber was used as a camp later on the 2018 Expo by moving the camping gear from Camp Kraken in Tunnockschacht which had been used in 2016, 2017 and early 2018; the Little Boy chamber was not used in 2019 and was completely removed that year.
The main passage, Grand Prix, leaves Little Boy chamber as a low arch to the SE, roughly opposite the pitch. It starts wide but is low and bouldery. Take care to try to follow the footpath. A second passage to the R of this main passage, leaves Little Boy chamber at the lower, S part, to get to PT09. From PT09 there is a network of passages including Scoopy Loop and One Direction as well as to the Rubberman pitch series, see separate section.
Little Boy chamber to Rubberman pitch series and associated passages
From PT09, just outside Little Boy Chamber, there are three ways on though this isn't immediately obvious. First, turning L here immediately re-joins the main passage into Grand Prix.
Second, going straight ahead enters Scoopy Loop. Scoopy Loop leads to a junction (L is a QM2018- B) where R enters One Direction. One Direction can be followed until it drops down at PT10 to join the main route to Rubbermann described below or, by turning L at the next junction, it can be followed to Crab Louse which ends in a QM2018-A.
The third and final way from PT09 involves turning R to take the main route to the Rubberman pitch series. This starts as a c2 down to enter walking passage. (Along here an easy-to-miss passage high on the L at PT10 is the far end of One Direction described above). The walking passage splits at a junction. R follows a stream up a narrow canyon a short way to the base of a waterfall and large pool. This is where water for camp can easily be collected. The main way on is L, up a c2, to a short rift. Descend and bear R to quickly reach a pitch head at the start of the Rubberman pitch series Traversing beyond this point leads to a bridge and ???a window onto the same Rubberman pitch??? So no QM?.
The upper section of the Rubberman pitch series (RIG14 - see rigging guide) is an awkward, sloping and loose rift descent via a series of ledges to where the pitch opens out (rigging down here needs significant improvement and more bolts to avoid rubs and loose rock). Here, swing over to the obvious ledge into ongoing passage on the R - care, stones here drop onto the remainder of the pitch that corkscrews below you. The rope can be tied off here. Descend off rope past boulders and mud, to the continuation of the pitch after around 30m?? The obvious L passage shortly before the lower continuation of the Rubberman pitch series leads S to a p10 QM2018 A on the R and a p5 QM2018 B straight ahead. This area is not far below You Don't Know You're Beautiful near Crab Louse - this may even be a better route in to this area.
The lower section of the Rubberman pitch (RIG15, see rigging guide) descends to a loose slope. Traverse to the R wall and continue down to a ledge on the L where a waterfall fills a pool on the L. Traverse along the ledge, past the waterfall, following the L wall then scramble up a steep mud slope to the top of the L wall a 2018 traverse rope up here and beyond was left in situ in the 2019 derig trip. At the top of this slope descend the slope and cross to the R wall to continue the descent (QM2018 A).
Little Boy chamber to Anthemusa and on to Camp Kraken
Grand Prix continues as 20-30m wide passage then it narrows before opening out again into more huge passage. At the start of this section you need to move a cheval (shuffling along with one leg each side of a triangular ridge) to cross from the R to the L wall.
At the far side of this a cheval ridge a p40 (RIG13-01 - see rigging guide) descends to Suction Cup, a complex area beneath the main, huge Grand Prix passage. Below the p40, a further p20 may be a QM2018 A. The main route in Suction Cup scrambles S then E through boulders then climbs up steeply sloping ramps to reach an aven with QM2018-B's off it. Near the base of the ramps a passage on the R leads to QM2018 A.
Beyond the p40 down to Suction Cup the huge, main passage of Grand Prix continues heading steadily SW until it closes down leaving a climb (QM2018 XX) on the L and the connection to deep Tunnockschact on the R, at PT11. Here, climbing up to the far corner as the roof lowers reveals a tall but narrow rift with an enticingly strong draft blasting through. After a few metres this rift pops out above a substantial chamber, Anthemusa. This looks like it will need rigging to access but, in fact, backtracking and clambering down under boulders allows you to straightforwardly free climb down to the bouldery chamber of Anthemusa.
From the bottom of the down climb immediately and carefully descend the steep, loose boulder slope on the L then traverse down and R to enter the main Kraken chamber. A minimal traverse line (RIG13-02, 25m? 3 hangers; could be improved) along the R wall reaches the boulders at the bottom of Inferno (the final pitch from Tunnockschact coming via String Theory, Procrastination, Bring on the Clowns and the Number of the Beast). Walking up the boulder slope reaches the traverse line for the start of the p50?? Kraken pitch (RIG13-03 - see rigging guide) that drops down to a huge chamber which was the site of Camp Kraken in 2016, 2017 and 2018.
See survey section below for links to surveys
QMs
QM page for 1623-264Wallets: scanned survey notes
There are 151 wallets with data for this cave:2014#09 2014#10 2014#11 2014#12 2014#13 2014#14 2014#15 2014#19 2014#20 2014#22 2014#31 2014#32 2014#33 2014#35 2014#36 2014#38 2014#39 2014#40 2014#42 2014#43 2014#44 2014#45 2014#46 2014#47 2014#49 2014#50 2015#02 2015#05 2015#06 2015#07 2015#08 2015#09 2015#11 2015#12 2015#13 2015#14 2015#15 2015#17 2015#22 2015#23 2015#24 2015#27 2015#28 2015#29 2015#30 2015#31 2015#34 2015#37 2015#38 2015#43 2015#45 2015#47 2015#48 2015#51 2015#53 2015#56 2015#57 2015#70 2015#72 2015#74 2015#78 2015#80 2015#81 2015#82 2016#02 2016#03 2016#04 2016#07 2016#09 2016#10 2016#11 2016#19 2016#28 2016#29 2016#30 2016#34 2016#35 2016#39 2016#40 2016#42 2016#45 2016#46 2016#47 2017#01 2017#03 2017#07 2017#12 2017#18 2017#19 2017#20 2017#21 2017#22 2017#23 2017#24 2017#37 2017#42 2017#47 2017#49 2017#52 2018#03 2018#23 2018#26 2018#29 2018#35 2018#36 2018#37 2018#45 2018#46 2018#70 2018#71 2019#01 2019#07 2019#09 2019#10 2019#12 2019#14 2019#15 2019#16 2022#01 2022#02 2022#03 2022#04 2022#08 2022#09 2022#11 2022#18 2022#19 2022#20 2022#21 2022#23 2022#31 2022#32 2022#35 2022#39 2022#42 2022#45 2022#46 2022#54 2024#14 2024#16 2024#17 2024#18 2024#19 2024#20 2024#29 2024#30 2024#31 2024#32 2024#38 2024#39 2024#41