| 204 | Steinbrückenhöhle | 5/S x |
|---|
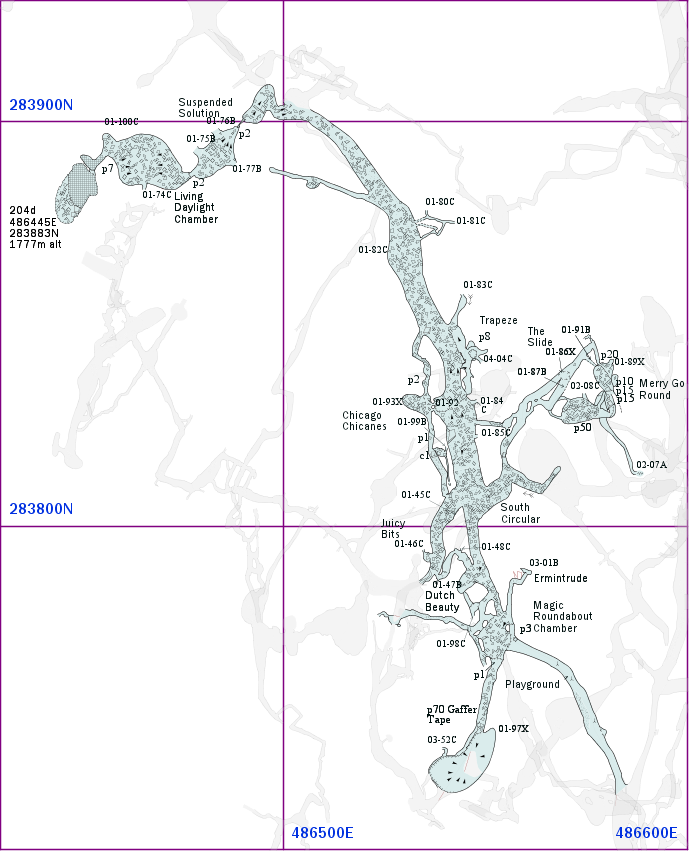
Swings and Roundabouts is an area of rubble-strewn passages to the west of Treeumphant Passage. Access is from Bonsai Crawl or the 204d entrance. The series links to the Rhino Rift series via Taking the Piss pitch, and to the Underworld via the Gaffered to the Walls series.
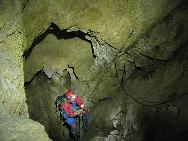
Swings and Roundabouts branches off from Bonsai Crawl, at what was QM2000-12B. Initially, a walking sized passage Playground leads past some mud formations and a drippy mini-aven to a view overlooking a mid-sized chamber, Magic Roundabout, with several exits. The easiest way to the chamber floor is via a corkscrew climb down through a hole in the floor on the right.
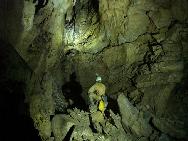
Once in the chamber, climbing down over boulders to the left leads to a small exit between rocks. A short rubble-strewn chute (which is free-climbable but crumbly, and was rigged in 2002 with a Y-hang following Dave falling off it) leads to a duck under a flake into a mud-floored ramp. After 15m or so a large shaft, Gaffer Tape, is reached. Descending this leads to the Gaffered to the Walls Series, while there is also a traverse across the pitch head.
Back in the main chamber, a rubble slope to the north leads onwards. To the north up the slope is Ermintrude; to the east leads back to the point where Playground overlooks the chamber. To the west is the main passage continuation. A passage on the left is Dutch Beauty, which also has windows into the main chamber. Continuing over rocks, a phreatic tube enters from Juicy Bits on the left ahead, and a crawl enters from Dutch Beauty behind; the main way on is up a short slope over boulders to the start of the main Swings trunk passage: 10m wide and 8m high.
Ermintrude passage, which leads north from Magic Roundabout Chamber, soon shrinks to a crawl, with some boulders that need crawling around. This leads to a small chamber, with a small phreatic tube leading off to the right about 2m above the floor. This leads to the base of a free climbable aven [C2003-204-01 B].
From the head of Gaffer Tape pitch, a narrow ledge continues around the right-hand wall of the shaft towards an opening visible at the far side, which was the target of a loony bolt traverse in 2003.
There are significant ledges and other footholds around for most of the way, which is just as well given the variable quality of the rock. Starting from the pitch-head traverse line, it is possible to climb up onto a large ledge. After around 10m this ledge runs out and the traverse continues as a blank wall for a few metres. A pull up onto a muddy ledge signals the halfway point. Here a muddy tube slopes up to a mud/sand choke [C2003-204-52 C].
At the NW corner of the shaft, there is a small slot in the wall, where there is a view through boulders but it "seemed unwise" to try to pass through. Three bolts further on it is possible to abseil down onto the target passage's boulder slope. This is the far end of 21 Bolt Bypass in Rhino Rift.
Pretty Bits branches off the Swings and Roundabouts trunk passage, passing a pit on the right (which can be climbed over to a crawl, emerging in the main passage). Down the pit is a tight rift pitch [C2001-204-98 C]. Continuing along the passage past the pit, a number of windows are visible overlooking Magic Roundabout Chamber. A passage goes off to the right which passes a number of stalactites, before intersecting a rift. Descending the rift is Taking The Piss pitch, leading to the Rhino Rift series. It is also possible to traverse round to the left, passing a grotto of stalactites; this leads to a narrow passage that was the original route into Rhino Rift.
Juicy Bits is a large passage to the left from the south end of the Swings and Roundabouts trunk passage. After 10m in, a large passage descends at a 30 degree slope down, which can be traversed around. At the bottom there is a climb down over boulders[C2001-204-45 C]. This passage can be traversed around, and a passage to the right decreases in size to a body sized tube that needs digging [C2001-204-48 C]. The main passage then splits in two, the right turn going to what appears to be the same rift as Taking The Piss pitch [C2001-204-47 B]. To the left a smaller passage doubles back on itself, past a small window to the rift. Now going uphill the passage turns a sharp right and flattens out and passes a tube going into the ceiling[C2001-204-46 C], before emerging in to the passage near Magic Roundabout Chamber.
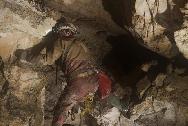
The trunk passage, a large phreatic with much breakdown and generally a boulder strewn floor, continues for over 100m in a northerly direction. Rubble slopes up and down keep the passage at roughly the same level. Along its length, a number of passages branch off to the left and right.
The first two passages leading off are Juicy Bits on the left and the way towards The Slide on the right. Further along, the small connection with The Slide enters from the right. QMs [C2001-204-84 C] and [C2001-204-85 C] may be found on the right wall. A pitch on the left [C2001-204-92] is surrounded by a lot of very loose boulders; rocks fall for a considerable distance, but no attempt was made to descend due to the loose debris. Across the top of the pitch are two slots looking into Chicago Chicanes. Opposite this, in the right-hand wall, is the first entrance to Trapeze. Continuing along Swings passage, the main entrance to Chicago Chicanes is on the left, and a climb up on the right also leads to Trapeze.
A little further along, a phreatic tube slopes down to the left. This passes through a small chamber and develops a stream in a deep, narrow slot in the floor before choking in earth. This passage may in fact be [C2001-204-82 C] or this QM may in fact exist as a separate lead on the left wall of the main swings passage; the survey notes are somewhat unclear.
A series of small holes in the right hand wall interconnect, with a possible, uninviting, way on through tight, sharp vadose passage. [C2001-204-80 C] [C2001-204-81 C]
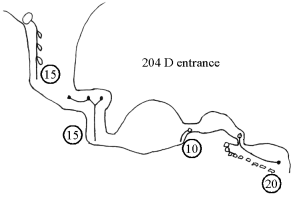
At the end of Swings passage, a very loose rubble slope leads up to Suspended Solution, and so on towards the 204d entrance. Mid-way up the slope, a traverse (rope advised) round a nose of rock is possible. This leads one to the base of a climb (not yet done) up to where water can be heard and a large passage continues [C2001-204-79 C]. Alternatively, traversing further to the right from the base of the climb leads to a steeply sloping, clean-washed phreatic tube, Cresta Run.
A large passage to the right, South Circular quickly narrows up a rubble slope to a drafting passage, which becomes too tight after ~10m. Before the slope, a passage entering from the left leads to The Slide passages.
The Slide passages are upwardly sloping phreatics, mainly clean washed. Soon after entering the slide, a small passage on the left connects back to the main Swings trunk passage. Heading on up the slope past a couple of small loops and a small aven [C2001-204-86 X] brings one to a window onto a very large shaft whose roof [C2001-204-89 X] is not visible, down the pitch leads to Merry Go Round. At the corner before the pitch, a small passage leads of but quickly chokes. The holes on the right, [C2001-204-91 B] and [C2001-204-87 B], probably connect back into Merry Go Round.
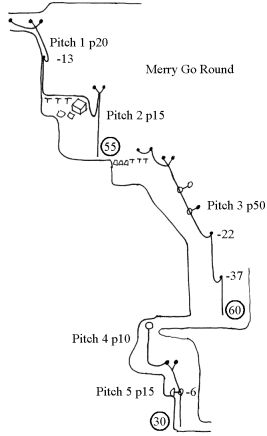 The first pitch of Merry Go Round is rigged with a backup and Y hang, and the
rope lies against the wall for 13m till a rebelay, which allows a clear hang to
the floor. The floor is a a slope of loose boulders, heading towards a hole in
the floor. It is advisable to stay on the rope whilst traversing this; going
over a large wedged boulder leads to the second pitch, a Y hang, giving a free
hang to the floor. At this point the passage becomes more of a rift, and the
ceiling is still not visible, which starts slightly further upstream than where
the ropes hangs down to. In the rain, water comes down the top end of the
rift, from the hole in the floor of the chamber above, and disappears down a
very small rift.
The first pitch of Merry Go Round is rigged with a backup and Y hang, and the
rope lies against the wall for 13m till a rebelay, which allows a clear hang to
the floor. The floor is a a slope of loose boulders, heading towards a hole in
the floor. It is advisable to stay on the rope whilst traversing this; going
over a large wedged boulder leads to the second pitch, a Y hang, giving a free
hang to the floor. At this point the passage becomes more of a rift, and the
ceiling is still not visible, which starts slightly further upstream than where
the ropes hangs down to. In the rain, water comes down the top end of the
rift, from the hole in the floor of the chamber above, and disappears down a
very small rift.
5m from the bottom of the second pitch, the third pitch starts, with a traverse line and a short drop down to the main Y hang. A couple of deviations pull the rope away from the wall; below these, it was too wet to continue rigging in the wet. The pitch continues down past a couple of deviations, just above obvious places where the wall is undercut. The floor of this pitch is jagged boulders, which form a slight slope. The walls have large (10-20cm) fossil bivalves protruding from them. Up slope a small rift twists round to a chamber, linked by a window to the main shaft. Down slope leads to a narrow rift, which has a very small slot in the floor. At the end of this, a natural thread in the roof (all the rock is like cottage cheese), which allows a vertical squeeze to be rigged. The squeeze is not too bad, and has a convenient ledge below to stand on. Just below the squeeze, a rope protector is useful for the remaining few meters of descent into a rift type chamber. The way on continues via the fifth pitch, from a Y-hang, descending down more rift, before the chamber becomes more shaft-like and a deviation, allows descent to the floor. Going downstream, the passage becomes keyhole shaped, with puddles on the ground; the passage turns left, and a crumbly looking rift continues onwards [C2002-204-07 A].
Chicago Chicanes doubles back on the main passage. A series of rubble filled pot-holes leads to a chamber with a high aven [C2001-204-93 X] and slits up on the right wall back into the main passage. Beyond the chamber, a hole in the floor leads to two small rift passages, left an unpromising QM [C2001-204-99 B] , and right probably linking into the pitch head at the start of Juicy Bits. Climbing up and over the hole leads to more pot-holes and a boulder choke. Carefully negotiating the boulders and through a narrow slot brings one back to Juicy Bits.
Stuart / Becka / Nial ... [C2001-204-83 C] [C2004-204-04 C]
Suspended Solution is a solution tube at the top of the rubble slope at the end of Swings Passage. When scaling this slope, care is needed as if too much rubble is kicked down it will be difficult to climb up into the tube. Also, the (much larger) boulders at the top of the slope may be dislodged. Climbing up through the tube brings one to the base of another scree slope. A sloping passage to the right [C2001-204-76 B] has been climbed for some distance but appears to go nowhere.
At the top of the scree slope, under a low arch, is a small chamber. A hading rift on the right [C2001-204-75 B] has been climbed for some distance. There is an unpromising hole on the left. [C2001-204-77 B] Straight ahead leads to a climb down (20' ladder useful) into Living Daylight Cavern.
 This large chamber (11m diameter) has a boulder floor and what looked like a
dried-up streambed. A possible QM [C2001-204-74 C] in the left hand corner goes over
boulders into a small chamber. The way on is under a low arch across the
chamber from the ladder. A climb up reaches more space and becomes more serious
[C2001-204-100 C].
From the arch, go left to within sight of the 204d entrance. The 7m climb up is
bolted at the top, or may be climbed from the bottom in the recess in the right
hand wall. Traversing over the top of the climb emerges in the base of a shake
hole.
This large chamber (11m diameter) has a boulder floor and what looked like a
dried-up streambed. A possible QM [C2001-204-74 C] in the left hand corner goes over
boulders into a small chamber. The way on is under a low arch across the
chamber from the ladder. A climb up reaches more space and becomes more serious
[C2001-204-100 C].
From the arch, go left to within sight of the 204d entrance. The 7m climb up is
bolted at the top, or may be climbed from the bottom in the recess in the right
hand wall. Traversing over the top of the climb emerges in the base of a shake
hole.
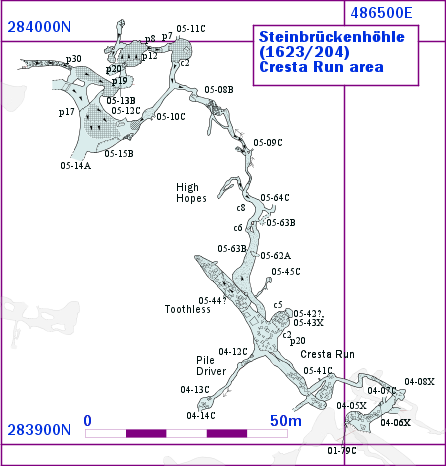

Traversing over this pitch past an aven [C2004-204-06 X] and a narrow passage leading off into the roof [C2004-204-07 C] leads to a small chamber. Above this is another aven [C2004-204-08 X]; the way on is a passage sloping down to the left. This continues downwards past a number of dog-legs to reach a loose boulder-filled chamber; various attempts to dig in the floor and walls of this met with no success. The way on is a downward-sloping tube, leading to a further chamber; an oxbow part- way down the slope leads back into this lower chamber, and a hole in the floor of the slope also doesn't go. In the chamber there are two ways on; one horizontal meandering slot closes down, while a prominent ramp leads to the head of a pitch. Traversing on a wide sloping ledge leads past Pile Driver passage to a point where the pitch may be easily descended into Toothless.
Pile Driver passage may be reached without rigging the traverse, although this requires a slightly unnerving clamber over a greasy slab. It begins as a high rift passage. After a few metres the lower level becomes too narrow, but a tube in the ceiling continues to a chamber, floored with a loose choss slope. Here a hole in the floor leads to a tight-looking crawl [C2004-204-13 C]; there is an aven in the ceiling, while straight on there may be a continuing crawl underneath a magical levitating boulder [C2004-204-14 C].
From the end of the ledge the pitch is a short descent of 6m to land on top of a large block in a wide passage, Toothless, continuing north and south [MARK NIAL] [C2005-204-41 C] [C2005-204-42 ??] [C2005-204-43 X] [C2005-204-44 ??] [C2005-204-45 C].
From the bottom of the pitch a climb up the opposite wall (left rigged as the holds were rather temporary) leads to a passage in the roof, High Hopes [WOOKEY NIAL BECKA TONY] [C2005-204-62 A] [C2005-204-63 B] [C2005-204-64 C] [C2005-204-08 B] [C2005-204-09 C].
Beyond the traverse the passage goes up a steep incline. There is a slot in the floor, which presumably connects to the pitch but is too tight to enter. After around 10m the passage reaches a T-junction. To the left continues straight, passing a tube in the roof [C2005-204-10 C], to emerge at a short climb down into a large aven chamber with a flat ice floor, at the bottom of the G entrance pitches. To the right, there are two options: a narrow rift between boulders at floor level, or a climb up at 45° into a bedding plane, both emerging in a chamber with a high aven above, where the H and I entrances drop in.
The G entrance starts as a sloping phreatic tube of diameter around 3m; this is steep and the floor is loose, and a rope is required, which can be secured from a thread at the entrance and a bolt in the roof. The tube steepens gradually, and after a rebelay on the left-hand wall the floor turns to sloping ice at an angle of around 45°. Shortly below this a window leads into a parallel tube on the right, which could be descended via a natural rebelay from a column; this could bypass some of the loose ice which renders the 2005 route somewhat dangerous. Continuing down the pitch leads to a rebelay on the right and a short vertical section into a snow-floored chamber. Here there is a passage leading down to the left [C2005-204-13 B], while the main route continues to the right. Here a large boulder wedged in the ceiling gives a traverse anchor (2 slings needed) to protect a traverse out to a rebelay bolt in the right-hand wall. Here the parallel tube enters from above, while below the pitch slopes down over snow to land in a large chamber with an ice floor. A pitch continues down [C2005-204-15 B], and beyond this a passage (apparently the continuation of the entrance tube) continues down at 45° [C2005-204-14 A]. On the other side of the chamber is a small pile of rocks concealing a too-tight tube in the wall on the right, a corresponding narrow tube on the left [C2005-204-12 C], and a step up over a boulder into High Hopes.
The H entrance pitch is a wide circular shaft surrounded by bunde. A Y-hang from a sling around a flake and a spit allows descent to the first ledge at around 5m down, where the shaft pinches in to a narrow tube. A deviation at this point gives a free hang to the floor 15m further down. Here the parallel shaft of the I entrance pitch enters above, while a short climb down to one side (best to stay clipped in, as the climb is exposed and the holds are mainly soft snow) lands on a ledge of snow and the start of the next pitch.
Various descent routes are possible here, and none are very pleasant: the sloping gap between the snow plug and the wall is narrow, and when prusiking it is hard to avoid ploughing your body into the snow. Descending straight down from the bolt leads to a narrow tube, which gradually levels out and ends at a snow blockage. Descending to the left leads to a branch passage, where a slope of smooth clear ice leads down to a flat ice-pan, and a narrow window in the right-hand wall leads to a second similar ice-pan. To the right of these a passage leads upwards steeply to a blockage of loose cobbles. The way on is to take the left-hand route to the ledge at the beginning of the passage, then swing to the right at this point, past a prominent ice column. This leads to an arch in the wall and an 8m sloping pitch. This ends at a rock floor, and ducking under a window leads to a platform overlooking a chamber, with an aven above.
The 7m descent to the floor is rigged from a backup before the window, a pitch-head bolt on the right, and an immediate rebelay in the wall below the lip. The chamber is floored with ice interspersed with a few large boulders; on the left is a tube 3m up in the wall [C2005-204-11 C], while on the right is the connection back to High Hopes
.